Home


About
In this code snippet, we will take a look at string interpolation in C#.
To enable string interpolation put the $ character before the string. Now variables in brackets can be put straight into a string. This is a bit more convenient compared to splitting up as string, putting the desired variables in between the strings and than concatenating it all together.
Let’s have a look at the code below to see how to use string interpolation.
Code:
using System;
namespace stringInterpolation
{
class Program
{
static void Main(string[] args)
{
int a = 10;
//Both ways do the same thing. The second one with string interpolation is just a bit more convinient.
//You can do this or...
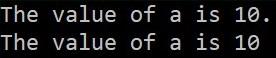
Console.WriteLine("The value of a is " + a + ". ");
//use string interpolation and to this.
Console.WriteLine($"The value of a is {a}");
//You should place your variables inside a set of curly braces. And use the "$" infront of your string to enable interpolation.
Console.ReadLine();
}
}
} Resulting output:
About
In this code snippet, we will take a look at string literals and the @ character in C#.
In C# the @ character can either be used to make reserved keywords available as variable names or it can be used to make a string literal. A string literal takes everything in the string literally. For example, you do not have to escape a \ with \\ . Your string can now also span multiple rows in the editor. This can be useful when making SQL statements or HTML, XML, …
Let’s have a look at the code below to see how to use the @ character.
Code:
using System;
namespace stringLiteral
{
class Program
{
static void Main(string[] args)
{
//1.
//If prefixed with @ reserved keywords can be used as variable names.
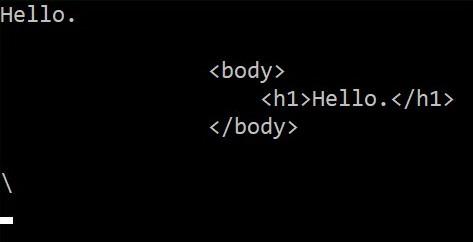
string @int = "Hello.";
Console.WriteLine(@int);
//2.1
//A string literal enables the string to span multiple rows.
string literal = @"
<body>
<h1>Hello.</h1>
</body>
";
Console.WriteLine(literal);
//2.2
//No need for escaping characters.
string literal2 = @"\";
Console.WriteLine(literal2);
Console.ReadLine();
}
}
} Resulting output:
About
In this code snippet, we will take a look at break and continue in C#.
break
Is used to break out of a code block. If done in a loop it will essentially stop the loop from executing.
continue
Is used to inside a loop to skip the current iteration.
Note: break is also used with the switch statement to break out of it after a case has been matched. See how to use the switch statement here.
Let’s have a look at the code below to see how to use break and continue.
Code:
using System;
namespace BreakContinue
{
class Program
{
static void Main(string[] args)
{
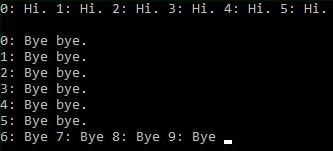
for (int i = 0; i < 10; i++)
{
if(i > 5)
{
//break will stop the loop from looping.
break;
}
Console.Write(i + ": Hi. ");
}
Console.WriteLine(" ");
Console.WriteLine(" ");
for (int j = 0; j < 10; j++)
{
Console.Write(j + ": Bye ");
if (j > 5)
{
//continue won't stop the loop from looping.
//It will just skip all the code after it for the current iteration.
continue;
}
Console.WriteLine("bye.");
}
Console.ReadLine();
}
}
} Resulting output:
About
In this code snippet, we will take a look at the goto keyword in C#.
goto is used to move the control of your program to a label you define beforehand. This can be useful to get out of nested loops, if statements or any nested code blocks in general.
You can even make a DIY loop or method using the goto keyword 😁(But you should of course use the regular loops and methods).
Let’s have a look at the code below to see how to use goto.
Code:
using System;
namespace gotoStatement
{
class Program
{
static void Main(string[] args)
{
//The goto keyword can be used to redirect the flow of your program to a marked point.
//You can make a mark/tag by just writing some text and ending it with a :
//Then you can point at it using goto.
//See examples bellow:
#region Break out of loop using goto
for (int i = 0; i < 10; i++)
{
for (int j = 0; j < 10; j++)
{
if (i == 5 && j == 2)
goto breakOutOfLoop;
}
}
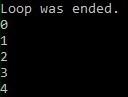
breakOutOfLoop: Console.WriteLine("Loop was ended.");
#endregion
#region DIY loop using goto.
int k = 0; //Declare and initilize counter.
loopBegin: //Mark beginning point.
Console.WriteLine(k);//Execute code inside loop.
k++; //Increment loop counter.
if (k < 5) //Check if counter is smaller than 5. If so ...
goto loopBegin; //Go to the beginning.
#endregion
Console.ReadLine();
}
}
} Resulting output:

About
In this code snippet, we will take a look at variable scope and code blocks in C#.
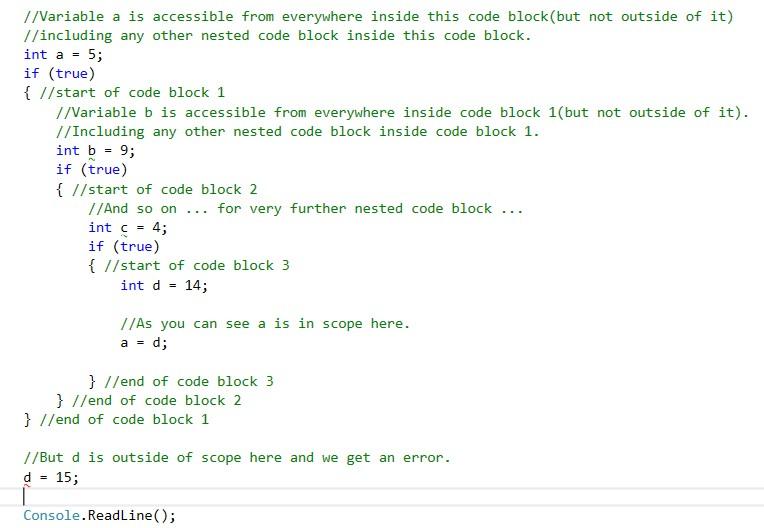
A code block is the space between two { }. Variables can be considered out of or in scope depending on whether they are accessible or not from a particular code block.
Let’s just have a look at the code below.
Code:
using System;

namespace scope
{
    class Program
    {
        static void Main(string[] args)
        {//start of code block
         //A set of { }  makes a code block.
         //You can nest a code block inside another code block.

            //Variable a is accessible from everywhere inside this code block(but not outside of it)
            //including any other nested code block inside this code block.
            int a = 5;
            if (true)
            { //start of code block 1
                //Variable b is accessible from everywhere inside code block 1(but not outside of it).
                //Including any other nested code block inside code block 1.
                int b = 9;
                if (true)
                { //start of code block 2
                    //And so on ... for very further nested code block ...
                    int c = 4;
                    if (true)
                    { //start of code block 3
                        int d = 14;

                        //As you can see a is in scope here.
                        a = d;

                    } //end of code block 3
                } //end of code block 2
            } //end of code block 1

            //But d is outside of scope here and we get an error.
            d = 15;

            Console.ReadLine();
        }//end of code block
    }

    //Another scope example with a class.
    class MyClass
    {
        //MyClassVariable is only available in this class and to other members of this class.
        int MyClassVariable = 10;

        void MyMethod()
        {
            //Only available inside this method.
            int MyMethodVariable = 10;

            Console.WriteLine(MyMethodVariable);

            Console.WriteLine(MyClassVariable);
        }

        void MySecondMethod()
        {
            //MyMethodVariable is not available in MySecondMethod.
            Console.WriteLine(MyMethodVariable);

            Console.WriteLine(MyClassVariable);
        }

        //NOTE:
        //The members of this class can be set to be accessible/inaccessible from outside of this class.
        //This can be done by changing the access modifiers private/public/protected.
        //See my post on access modifiers for more information on the topic.
    }
}
Resulting output:

About
In this code snippet, we will take a look at the TPL(Task Parallel Library) in C#.
If you read some of my other posts on threading you will know that it can be quite complicated and laborious for the developers to implement parallelism into their programs(deadlocks, cancellation, thread pooling, getting data back from the thread, …). The Task Parallel Library(TPL) takes care of a lot of these things and or makes them easier to manage.
For example:
The TPL uses a thread pool so you don’t have to worry about using it.
The .NET runtime will also automatically decide how many threads it should create. The fact that this is automatic is great because if you don’t create enough threads your application won’t run as fast as it possibly could. While creating too many threads can actually slow down your application(too much context switching).
A Task can be thought of as a “unit of work”. You can take a method and “make it/put it” into a Task. This task can be run asynchronously using async/await(like shown in this post) and then be awaited at a later point in your code allowing you to execute other code in the meantime. Or you can make multiple tasks and execute them in parallel and wait for the results from them like we’ll do in this post.
Note:
For simple things, for example: looping through an array with a 100 entries, you shouldn’t use multithreading as it just increases the complexity of your code and won’t offer much performance gain(might even decrease it if used improperly).
Let’s have a look at the code below to see how to use the task parallel library.
Code:
using System;
using System.Threading;
using System.Threading.Tasks;
namespace TPL
{
class Program
{
static void Main(string[] args)
{
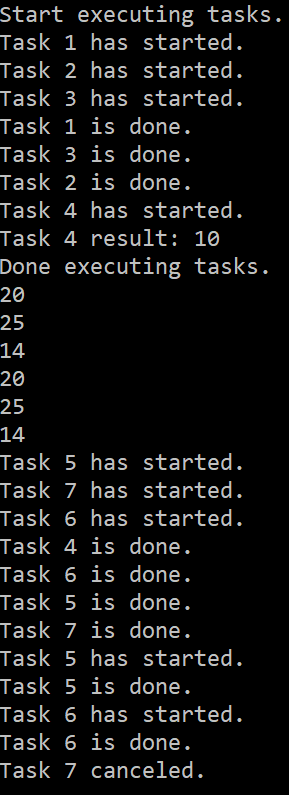
Console.WriteLine("Start executing tasks.");
#region 1. Creating tasks
//1.1
//Create a task.
Task t1 = new Task(() => doWork(1));
//Start the task.
t1.Start();
//1.2
//Create and start a task at the same time.
Task t2 = Task.Factory.StartNew(() => doWork(2));
//As a side note:
//Here you can see a practical implementation of the factory software design patern.
//Instead of instantiating the Task class it gets made in the "factory" and is then returned to us.
//1.3
//This is how you can chain/schedule antother task after the previous one is finished.
Task t3 = Task.Factory.StartNew(() => doWork(3)).ContinueWith((task) => doWork(4));
//1.4
Task<int> t4 = Task<int>.Factory.StartNew(() => doWork());
//You can access the result of a completed task by accessing the "Result" property.
Console.WriteLine("Task 4 result: " + t4.Result);
#endregion
#region 2. Waiting for tasks
//4.
//As you might have noticed in the console output "Done executing tasks." gets written out before any of the tasks have finsihed.
//Well that is great in the sense that we don't have any thread blocking code. But what if we need to wait for a task to complete before continuing(like in the example above)?
//You can pass an array of the tasks that you want to wait to finish to the AwaitAll() method.
//Now task 1 and 2 will execute before "Done executing tasks." is printed to the console.
Task[] tasks = { t1, t2 };
Task.WaitAll(tasks);
#endregion
Console.WriteLine("Done executing tasks.");
#region 5. Parellel for loops
//Make some int arrays.
int[] ar1 = new int[4] { 1, 5, 6, 8 };
int[] ar2 = new int[4] { 7, 5, 5, 8 };
int[] ar3 = new int[4] { 2, 3, 6, 3 };
//Make an array of int arrays.
int[][] arrays = new int[][] { ar1, ar2, ar3 };
//Get and write out the sum for each array using For. (asynchronously)
Parallel.For(0, 3, (i) => Console.WriteLine(sumArray(arrays[i])));
//Get and write out the sum for each array using ForeEach. (asynchronously)
Parallel.ForEach(arrays, (array) => Console.WriteLine(sumArray(array)));
#endregion
#region 6. Parallel Invoke
//Using Parallel.Invoke you can start up multiple prallel tasks at once.
Parallel.Invoke(
() => doWork(5),
() => doWork(6),
() => doWork(7)
);
#endregion
#region 7. Cancelation token.
//If we want the ability to cancel a task we can implement a cancellation token to achive this.
//Make a cancellation token.
var cancel = new CancellationTokenSource();
try
{
//Start a task chain.
Task t5 = Task.Factory.StartNew(() => doWork(5, cancel.Token)).ContinueWith((task) => doWork(6, cancel.Token)).ContinueWith((task) => doWork(7, cancel.Token));
//Simulate doing something ...
Thread.Sleep(4500);
///////////////////////////////
//We decide that our tasks need to be canceled.
cancel.Cancel();
}
catch (Exception ex)
{
Console.WriteLine(ex.Message);
}
finally
{
cancel.Dispose();
}
#endregion
Console.ReadLine();
}
//Sums all the integers in na int array.
public static int sumArray(int[] array)
{
int sum = 0;
foreach (int element in array)
sum += element;
return sum;
}
public static void doWork(int taskNumber)
{
Console.WriteLine("Task " + taskNumber + " has started.");
//Simulate doing time consuming work.
Thread.Sleep(4000);
Console.WriteLine("Task " + taskNumber + " is done.");
}
public static int doWork()
{
//Simulate doing time consuming work.
Thread.Sleep(4000);
int result = 10;
return result;
}
//This overloaded version of the doWork() method takes in a cancelation token.
public static void doWork(int taskNumber, CancellationToken cancel)
{
//If the cancelation tooken was sent the task will cancel.
if (cancel.IsCancellationRequested)
{
Console.WriteLine("Task " + taskNumber + " canceled.");
cancel.ThrowIfCancellationRequested();
}
Console.WriteLine("Task " + taskNumber + " has started.");
//Simulate doing time consuming work.
Thread.Sleep(4000);
Console.WriteLine("Task " + taskNumber + " is done.");
}
}
} Resulting output:

About
In this code snippet, we will take a look at thread pools in .NET and C#.
Creating threads and disposing of them when a task is done can be an expensive operation to perform as it uses up time and memory. To mitigate this we can use a thread pool which is essentially a collection of pre instantiated threads. We can assign tasks to these threads. When the task is completed the thread gets returned to the thread pool instead of being disposed of.
The way a thread pool is implemented is you have a class that has a queue of threads and tasks.
-
- When you initialize the class you would create some threads and put them in the thread queue.
- Then you would add some tasks to your task queue.
- While tasks are present in the task queue you would keep dequeuing them. For each of the dequeued tasks, you would dequeue a thread and assign it that task.
- When the thread completes the task it then gets queued back into the thread queue thus keeping a reference to it and prevent it from being destroyed by the garbage collector.
However, making your own thread pool is really not advisable as you would just be complicating your life for no reason. Microsoft already made a thread pool in .NET that you can use(and it’s very easy). In this post, I will show how to use the said thread pool.
Note:
At the end of the day, you should just use the TPL(Task Parallel Library) which is a library made specifically to make multithreading/parallel/asynchronous code execution easier. The TPL already uses a thread pool behind the scenes.
Let’s have a look at the code below to see how to use the thread pool.
Code:
using System;
using System.Threading;
namespace ThreadPooling
{
class Program
{
static void Main(string[] args)
{
//Creating and destroying threads takes up time and memory.
//To overcome this we can use a thread pool. A thread pool contains threads that are waiting for you to assign them a task.
//Once a task is given/queued it will be assigned to a thread.
//When the task is completed the thread will be put back into the queue(thus keep a reference in memory and avoid being dispossed by the garbage collector) and wait for another task.
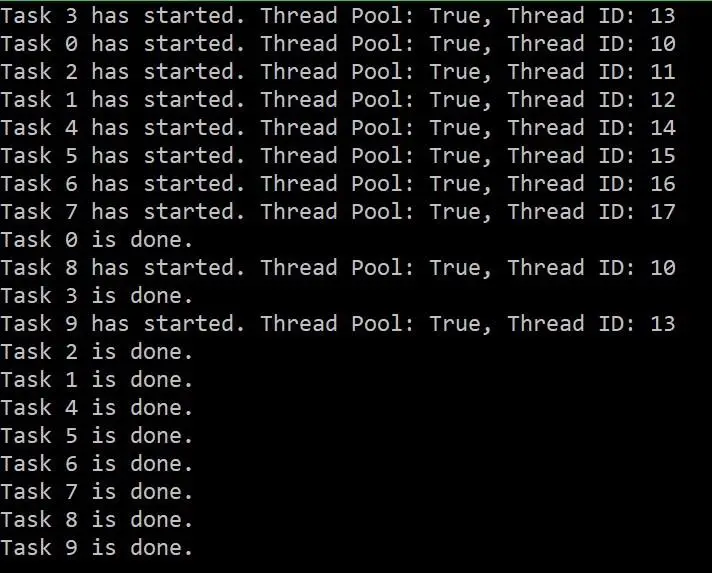
for(int i = 0; i < 10; i++)
{
//Queue a task.
ThreadPool.QueueUserWorkItem(new WaitCallback(doWork), i);
}
//As you will be able to see in the console output different tasks sometimes reuse the same threads from the thread pool.
Console.ReadLine();
}
public static void doWork(object obj)
{
//Get current thread.
Thread thread = Thread.CurrentThread;
//Write out some inforamtion.
Console.WriteLine($"Task {obj.ToString()} has started. Thread Pool: {thread.IsThreadPoolThread}, Thread ID: {thread.ManagedThreadId}");
//Simulate doing time consuming work.
Thread.Sleep(4000);
//Thread is done.
Console.WriteLine("Task " + obj.ToString() + " is done.");
}
}
} Resulting output:
About
In this code snippet, we will see some more ways of doing thread synchronization in C#. We’ll look at mutex, semaphore, and thread signaling(ManualResetEvent/AutoResetEvent).
You can find out what thread synchronization is and why it’s needed in this post. Here I will only show a few more ways of doing it.
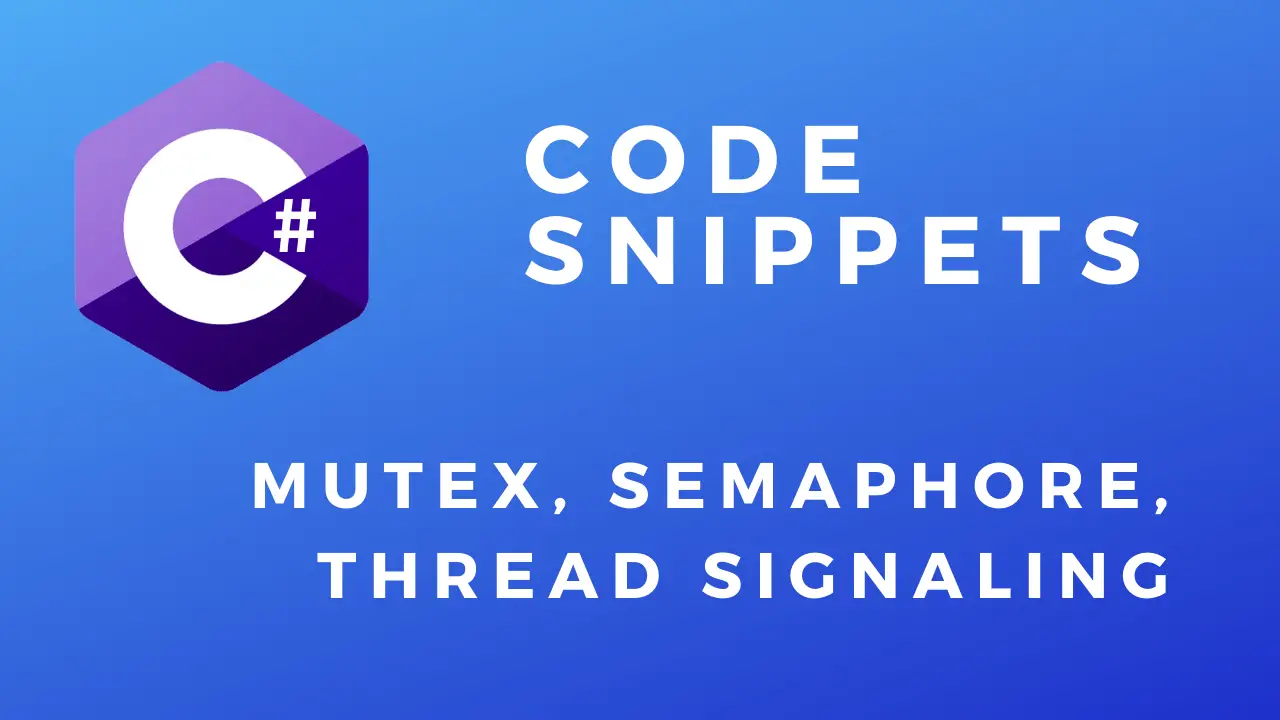
Mutex
Mutex(mutual exclusion) is very similar to lock/Monitor. The difference is that it can work across multiple processes.
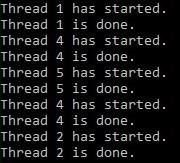
Semaphore
A semaphore is very similar to lock/Monitor. The difference is that it can allow for a specified amount of threads to work with the same resources at the same time. The way it works is the Semaphore class has an integer variable. When the class is instantiated the variable is initialized to the max number of threads that will be allowed to access a resource. When the value of this variable is 0 no more threads are allowed to access the resources being locked. When a thread enters a lock(WaitOne()) it will decrement the said variable by one and when it exits the lock(Release()) it will increase it by one.
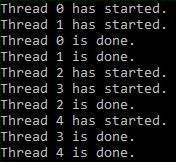
Thread Signaling using Auto/ManualResetEvent
Thread signaling is yet another way of doing thread synchronization. When the child thread hits the WaitOne() method it will wait there until the main thread signals it to continue by using the set() method.
Note:
For more information and other thread synchronization methods see Microsoft documentation here. Sometimes you can also avoid having to deal with thread synchronization by using thread-safe classes. So make sure you consult the documentation to see if the class you are using is thread-safe(or if you can find a thread-safe alternative). You might just save yourself some work.
Let’s have a look at the code below to see how to do thread synchronization.
1.1 ManualResetEvent
Mutex Code:
using System;
using System.Threading;

namespace MutexExample
{
    class Program
    {
        static void Main(string[] args)
        {
            for (int i = 0; i < 5; i++)
            {
                Thread doWorkThread = new Thread(new ParameterizedThreadStart(doWork));
                doWorkThread.Start(i);
            }

            Console.ReadLine();
        }

        //Mutex(mutual exclusion) is very similar to lock/Monitor. The difference is that it can work across multiple processes.
        //Make mutex.
        private static Mutex mutex = new Mutex();

        public static void doWork(object threadNumber)
        {
            try
            {
                //The code will stop executing here and wait until the lock is released by the previous thread.
                mutex.WaitOne();

                Console.WriteLine("Thread " + threadNumber.ToString() + " has started.");

                //Simulate doing time consuming work.
                Thread.Sleep(1500);

                Console.WriteLine("Thread " + threadNumber.ToString() + " is done.");
            }
            finally
            {
                //Realesase the lock so other threads can now get access.
                mutex.ReleaseMutex();
            }
        }
    }
}
Resulting output:
Semaphore Code:
using System;
using System.Threading;

namespace SemaphoreExample
{
    class Program
    {
        static void Main(string[] args)
        {
            for (int i = 0; i < 5; i++)
            {
                //Make new thread.
                Thread doWorkThread = new Thread(new ParameterizedThreadStart(doWork));
                //Start thread.
                doWorkThread.Start(i);
            }

            Console.ReadLine();
        }

        //A semaphore is very similar to lock/Monitor. The difference is that it can allow for a specified amount of threads to work with the same resources at the same time.
        //Make a semaphore that allows for up to two threads to work with the same resource.
        public static Semaphore semaphore = new Semaphore(2, 2); //Semaphore(initial thread count, max thread count)

        public static void doWork(object threadNumber)
        {
            try
            {
                //The code will stop executing here and wait until the lock is released by the previous thread.
                semaphore.WaitOne();

                Console.WriteLine("Thread " + threadNumber.ToString() + " has started.");

                //Simulate doing time consuming work.
                Thread.Sleep(1500);

                Console.WriteLine("Thread " + threadNumber.ToString() + " is done.");
            }
            finally
            {
                //Realesase the lock so other threads can now get access.
                semaphore.Release();
            }
        }
    }
}
Resulting output:
Thread Signaling Code:
using System;
using System.Threading;
namespace ThreadSignaling
{
class Program
{
static void Main(string[] args)
{
//Make new thread.
Thread doWorkThread = new Thread(new ParameterizedThreadStart(doWork));
//Start thread.
doWorkThread.Start(1);
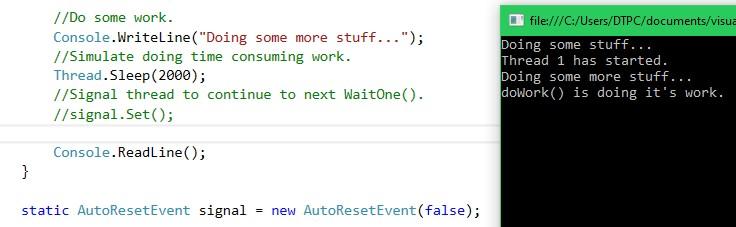
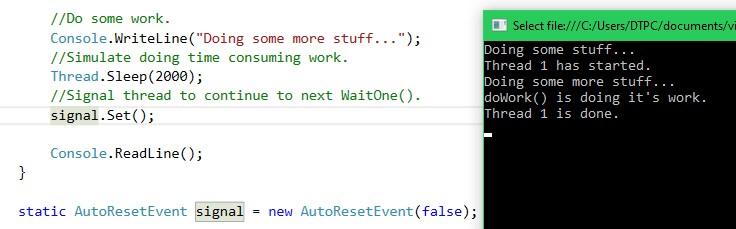
//Do some work.
Console.WriteLine("Doing some stuff...");
//Simulate doing time consuming work.
Thread.Sleep(2000);
//Signal thread to continue.
signal.Set();
//Do some work.
Console.WriteLine("Doing some more stuff...");
//Simulate doing time consuming work.
Thread.Sleep(2000);
//Signal thread to continue to next WaitOne().
//signal.Set();
Console.ReadLine();
}
//static AutoResetEvent signal = new AutoResetEvent(false); //While using AutoResetEvent the Set() method has to be called once for every WaitOne() method used.
static ManualResetEvent signal = new ManualResetEvent(false); //ManualResetEvent only reqiures the Set() method to be called once.
public static void doWork(object threadNumber)
{
Console.WriteLine("Thread " + threadNumber.ToString() + " has started.");
//The code will stop executing here and wait until it gets signaled to continue.
signal.WaitOne();
//Simulate doing time consuming work.
Thread.Sleep(1500);
Console.WriteLine("doWork() is doing it's work.");
//The code will stop executing here and wait until it gets signaled to continue.
signal.WaitOne();
Console.WriteLine("Thread " + threadNumber.ToString() + " is done.");
}
}
} Resulting output:
1.1 ManualResetEvent
2.1 AutoResetEvent
2.1 AutoResetEvent

About
In this code snippet, we will take a look at thread join, isAlive and abort in C#.
join() The main(parent) thread waits for the joined threads(threads that had the join() method called on them) to complete their execution before proceeding with its execution.
abort() Can be used to abort the thread execution. For example, if a thread takes to long to finish we can abort its execution. When this method is called on a thread it will throw a ThreadAbortException that will stop the thread. However, it’s not guaranteed that a thread will stop in all situations.
isAlive() Checks if the thread is running and returns true or false.
Let’s have a look at the code below to see how to use thread join, isAlive and abort.
Code:
using System;
using System.Threading;
namespace Threading
{
class Program
{
static void Main(string[] args)
{
//Thread Join//////////////////////////////////////////////////////////
Thread th1 = new Thread(() => printToConsole(1));
Thread th2 = new Thread(() => printToConsole(2));
th1.Start();
th2.Start();
//With Join() the main(parent) thread waits for the joined threads to compleate their execution before proceeding.
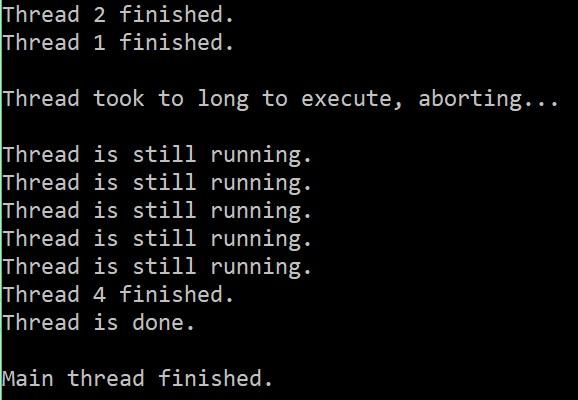
th1.Join();
th2.Join();
Console.WriteLine("");
///////////////////////////////////////////////////////////////////////
//Thread Abort////////////////////////////////////////////////////////
Thread th3 = new Thread(() => printToConsole(3));
th3.Start();
//If the joined thread takes more than the specified amount of time(500ms in this case) join() will return false else it will return true.
//In this case if the thread doesn't compleate in 500ms we will abort it.
if (th3.Join(500))
{
Console.WriteLine("Thread has finished.");
}
else
{
Console.WriteLine("Thread took to long to execute, aborting...");
th3.Abort();
}
Console.WriteLine("");
//////////////////////////////////////////////////////////////////////
//Thread Status///////////////////////////////////////////////////////
Thread th4 = new Thread(() => printToConsole(4));
th4.Start();
/*
//Check if thread is still running.
if (th4.IsAlive)
{
Console.WriteLine("Thread hasn't finished yet .");
}
else
{
Console.WriteLine("Thread has finished.");
}
*/
threadStatus(th4);
Console.WriteLine("");
Console.WriteLine("Main thread finished.");
//////////////////////////////////////////////////////////////////////
Console.ReadLine();
}
public static void printToConsole(int threadNumber)
{
Thread.Sleep(1000);
Console.WriteLine("Thread " + threadNumber + " finished.");
}
public static void threadStatus(Thread thread)
{
while (thread.IsAlive)
{
Console.WriteLine("Thread is still running.");
Thread.Sleep(200);
}
Console.WriteLine("Thread is done.");
}
}
} Resulting output:
About
In this code snippet, we will take a look at thread deadlocks in C# and how to resolve them.
If you see this post I made about thread resource locking you will see why a thread would need to lock a resource to prevent other threads from using it. But when you start locking down resources you could potentially run into a deadlock.
A thread deadlock occurs in such a situation:
-
- Thread 1 acquires a lock on resource A.
- Thread 2 acquires a lock on resource B.
- Thread 1 needs resource B to complete its execution.
- Thread 2 needs resource A to complete its execution.
- Both threads are now waiting on each other to finish.
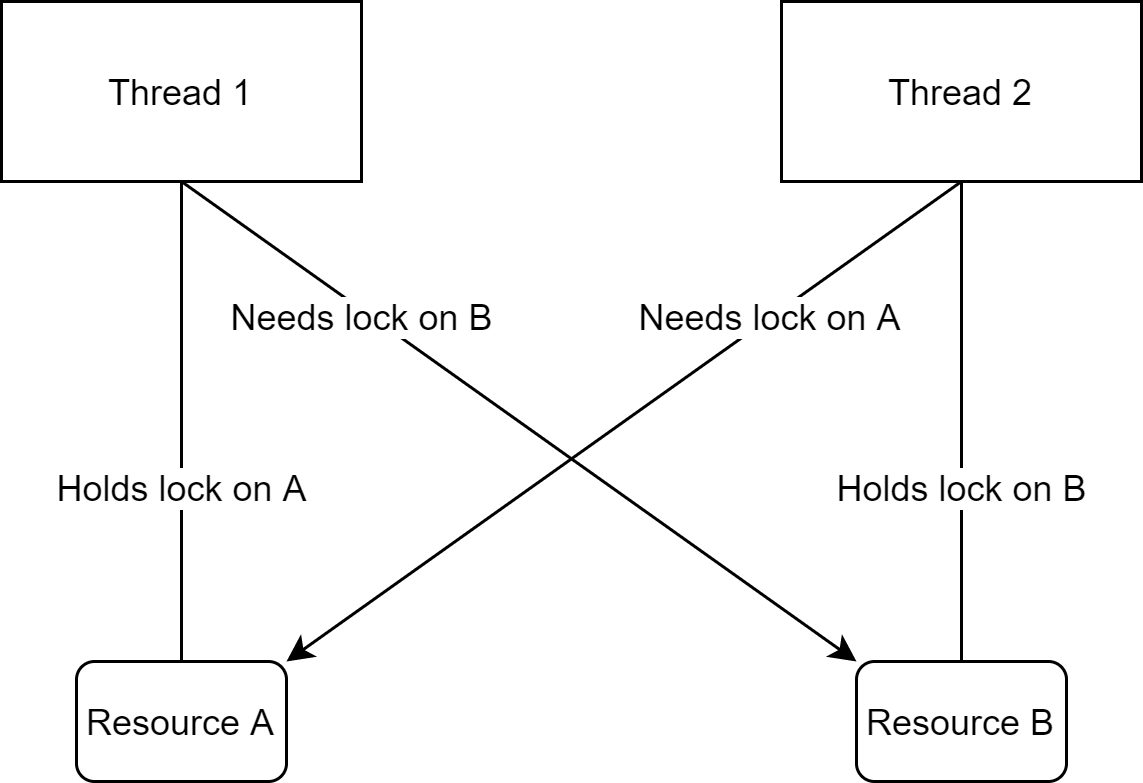
To resolve this deadlock we need to change our code in such a way:
- Thread 1 acquires a lock on resource A.
- Thread 2 tries to acquire a lock on resource A but fails because it’s already locked.
- Thread 1 acquires a lock on resource B and completes its execution. After that, the lock on A and B is released.
- Thread 2 acquires a lock on A.
- Thread 2 acquires a lock on B and completes its execution.
Basically what you have to do is make sure that you are locking resources in the same order in all the threads. This way when the first common resource is locked by one thread no other thread can continue executing and locking on any other common resource required by the first thread.
Let’s have a look at the code below to see how to resolve a deadlock.
Code:
using System;
using System.Threading;

namespace ThreadDeadlock
{
    class Program
    {
        static void Main(string[] args)
        {
            MyClass MC = new MyClass();

            //Make threads.
            Thread th1 = new Thread(() => MC.transferFromAToB(100));
            Thread th2 = new Thread(() => MC.transferFromBToA(100));

            //Start threads.
            th1.Start();
            th2.Start();

            Console.ReadLine();
        }
    }

    class MyClass
    {
        private int a;
        private int b;

        //lock objects.
        private Object aLock = new Object();
        private Object bLock = new Object();

        public MyClass()
        {
            a = 1000;
            b = 1000;
        }

        #region Deadlock Code


        public void transferFromAToB(int amount)
        {
            lock (aLock)
            {
                //Simulate computing time to get the value;
                Thread.Sleep(100);
                a = a - amount;

                lock (bLock)
                {
                    //Simulate computing time to get the value;
                    Thread.Sleep(100);
                    b = b + amount;
                }
            }

            Console.WriteLine(amount + " was transfered from A to B.");
        }

        public void transferFromBToA(int amount)
        {
            lock (bLock)
            {
                //Simulate computing time to get the value;
                Thread.Sleep(100);
                b = b - amount;

                lock (aLock)
                {
                    //Simulate computing time to get the value;
                    Thread.Sleep(100);
                    a = a + amount;
                }
            }

            Console.WriteLine(amount + " was transfered from B to A.");
        }


        #endregion

        #region Resolved deadlock Code
        /*
        public void transferFromAToB(int amount)
        {
            lock (aLock)
            {
                //Simulate computing time to get the value;
                Thread.Sleep(100);
                a = a - amount;

                lock (bLock)
                {
                    //Simulate computing time to get the value;
                    Thread.Sleep(100);
                    b = b + amount;
                }
            }
            Console.WriteLine(amount + " was transfered from A to B.");
        }
        public void transferFromBToA(int amount)
        {
            lock (aLock)
            {
                //Simulate computing time to get the value;
                Thread.Sleep(100);
                a = a + amount;
                lock (bLock)
                {
                    //Simulate computing time to get the value;
                    Thread.Sleep(100);
                    b = b - amount;
                }
            }
            Console.WriteLine(amount + " was transfered from B to A.");
        }
        */
        #endregion
    }
}
Resulting output: