Home


About
In this code snippet, we’ll learn how to submit and validate forms with Javascript.
Form data validation with javascript:
We’ll use the onsubmit attribute to call our validation function when the form is submitted. The function will return a boolean as an indication of whether the validation was successful. This will prevent the form from being sent if the validation fails and false is returned.
Note: This form would be sent via post request to the url/page in action attribute. There is no actual backend code here as this is just to demonstrate form data validation.
HTML
<h3>Subscribe To Newsletter</h3>
<form
  name="newsletterSubscription"
  action="/subscribeNewsletter.php"
  onsubmit="return validateEmail()"
  method="post"
>
  <input type="text" name="email">
  <input type="submit" value="Subscribe">
</form>
Javscript
function validateEmail(){
	//Get value from form textbox.
	const email = document.forms["newsletterSubscription"]["email"].value;

  //Define regex.
	const regex = /^(([^<>()[\]\\.,;:\s@"]+(\.[^<>()[\]\\.,;:\s@"]+)*)|(".+"))@((\[[0-9]{1,3}\.[0-9]{1,3}\.[0-9]{1,3}\.[0-9]{1,3}\])|(([a-zA-Z\-0-9]+\.)+[a-zA-Z]{2,}))$/;

  //Validate email with regex.
	if(regex.test(String(email).toLowerCase())){
  	//Inform user.
  	alert("You have successfully subscribed to the newsletter.");
    //Approve submition of form by sending true.
  	return true;
  }
  else{
  	//Inform user.
  	alert("Invalid email address provided.");
    //Prevent submission by returning false.
    return false;
  }
}
Resulting output:

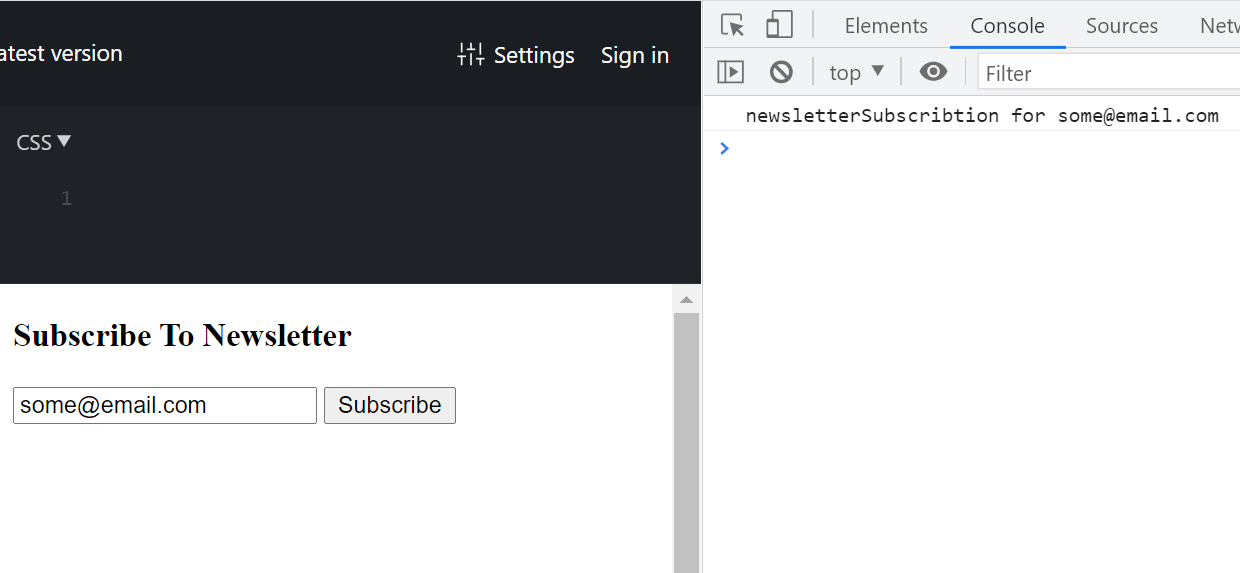
Sending form data with javascript
To send the form data with javascript we first have to prevent it from sending the data. This can be done by subscribing/registering to the submit event. Then we call the preventDefault() function which will prevent the data from being sent. Finally, we can retrieve the values for the form inputs and process them however we want(process in code, save or send to the backend).
HTML
<h3>Subscribe To Newsletter</h3>
<form id="newsletterForm">
  <input id="emailInput" type="text">
  <input type="submit" value="Subscribe"/>
</form>
Javscript
Note: I’ll be using jQuery here see this post if you want to learn more about it.
jQuery('#newsletterForm').submit(function(event) {
      //Prevent form submit.
      event.preventDefault();
      //Get value from textbox.
      email = jQuery("#emailInput").val();
      //Send to backend with JS.
      sendTobackend("newsletterSubscribtion", email)
});

function sendTobackend(action, value){
	//This is where you would send the data to your backend API.
  console.log(action + " for " + email)
}
Resulting output:

About
In this code snippet, we’ll learn about jQuery.
jQuery is a library that makes working with javascript a bit easier and quicker. It’s not as popular or needed these days because of all the js frameworks. But it’s still present on a lot of older code. Also, I think it’s useful if you are making a smaller project and don’t need the features and complexity of a js framework.
Note: There are lot more jQuery functions than demonstrated here. This is the complete documentation. Also, I demonstrate some of those functions in other posts.
Adding jQuery
You can add it by using the <script> tag. The src can then be pointed to either a CDN(like in the example below) or to a jQuery file added to your project locally. jQuery download here.
<script src="https://ajax.googleapis.com/ajax/libs/jquery/3.6.0/jquery.min.js"></script>
Code:
let element;

//Get element by id.
element = jQuery("#someid");
//Get element by class.
element = jQuery(".someclass");
//Get element by tag.
element = jQuery("p");
//Remove element.
jQuery("#someid").remove();
//Get perent element.
element = jQuery("#someid").parent;
//Show element.
jQuery("#someid").show(); //If a number in miliseconds is put in as a parameter to show()/hide()
//Hide element.
jQuery("#someid").hide();
//Setting CSS properties.
jQuery("#someid").css("color","red");
//Setting inner HTML.
jQuery("#someid").html("<p>Just some text.<p/>"); //Call html() without parameters to get the html instead.
//Setting inner text.
jQuery("#someid").text("Some other text."); //Call text() without parameters to get the text instead. 
About
In this code snippet, we’ll learn about async/await and promises in Javascript.
Promises allow us to execute code asynchronously(file operations, api calls, blocking code, …). When we make a promise we define what code it will execute. When it’s done the then() function is used to execute any further code(process results from the promise).
Async and await keywords make working with promises easier. If any value is returned from an async function it will be returned as a promise which can be awaited with the await keyword.
Note: Await can only be used within an async function.
Let’s see the code examples below.
Code:
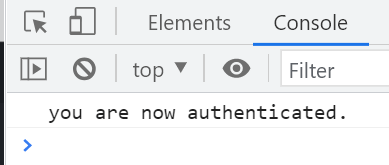
Promise
//Calling the function that will return a promise.
//This will start executing the code in the promise.
//When it's finally done the code in then() will run.
authenticate("Bob", "password123").then(
  function(response) {
  	//On success execute this code.
  	console.log(response);

    //do authenticated stuff here...
  },
  function(error) {
  	//If error occours log it.
  	console.log("Authentication failed: " + error);
  }
);

//We'll wrap our promise in a function.
//This way we can easily call it and pass it parameters.
function authenticate(username, password){
	return new Promise(function(success, error) {
  	//Here we do our work...//////////

    const authenticted = callBackendAuthService(username, password);

    /////////////////////////////////

    //When done...
    if(authenticted)
      success("you are now authenticated.");
    else
      error("username or password incorect");
  });
}

function callBackendAuthService(username, password){
	//Lets pretend this is our backend...
  if(username == "Bob" && password == "password123")
  	return true;

  return false;
}
Resulting output:
Async/Await
//Async keyword./////////////////////////////////////////////////

//If a function is marked as async it will return a promise.
async function generateRandomNumber() {
  return Math.ceil(Math.random()*10);
}

//The promise can be then handled with then() like so:
generateRandomNumber().then(
  function(result) {
    console.log(result);
  }
);

////////////////////////////////////////////////////////////////

//Await keyword/////////////////////////////////////////////////

GetRandomNumber();

async function GetRandomNumber(){
	//await can be used to await the result from a promise instead of using then().
  //await can only be used within a function marked as async.
  let randomNumber = await generateRandomNumber();
  console.log(randomNumber);
}

////////////////////////////////////////////////////////////////
Resulting output:
About
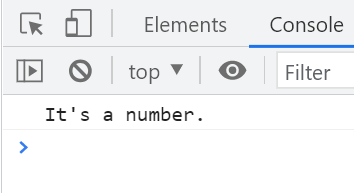
In this code snippet, we’ll learn about callbacks in Javascript.
Callbacks are nothing more than function pointers passed as an argument into another function to be then called from within that function.
This example might seem a bit useless but the concept of callbacks becomes much more useful when we start dealing with asynchronous behavior. Like for example when making an API call, events, timers, …
Code:
isNumber(5, logToConsole);

function logToConsole(text){
	console.log(text);
}

function isNumber(input, callback){
  if(typeof input == "number")
  	callback("It's a number.");
  else
 	callback("Not a number.");
}
Resulting output:

About
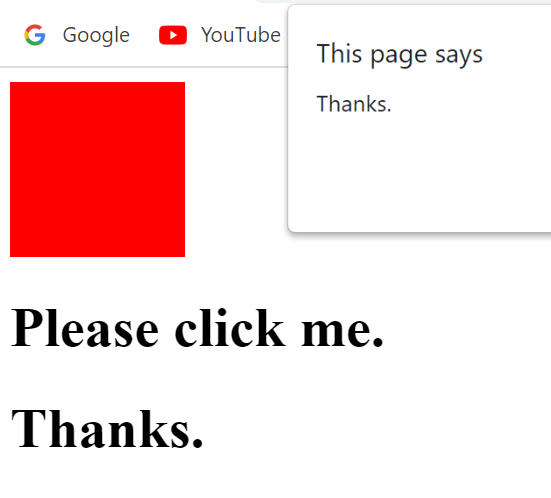
In this code snippet, we’ll learn about events in Javascript.
We can add and subsequently remove event listeners(of different types: click, change, mouseenter, …) to any element of our choosing. These event listeners will wait for the specified event(like clicking on an element) to occur. When finally it does the event listener will call/execute the code we specified beforehand.
Let’s see the code example below.
Code:
index.html
<!DOCTYPE html>
<html>
    <head>
        <title>DOM Manipulation</title>
    </head>
    <script src="code.js"></script>
    <script>
        function sayThanks(){
            alert("Thanks.");
        }
    </script>
    <body>
        <div>
            <div style="background-color: blue; width: 100px; height: 100px;"></div>
            <!-- Events can also be registered like so(but the function must be defined in this file!): -->
            <h1 onclick="sayThanks()">Please click me.</h1>
            <h1 onclick="this.innerHTML = 'Thanks.'">Please click me.</h1>
        </div>
    </body>
</html>
code.js
//Run this when the HTML gets loaded.
window.onload = () => {

    //Add event listener. //Possible events: "click", "mouseenter", "mouseleave", "change", "keydown", "load"
    document.getElementById("coloredDiv").addEventListener("click", changeColor);

    //Remove event listener.
    //document.getElementById("coloredDiv").removeEventListener("click", changeColor);

    function changeColor(eventArgs){
        //eventArgs.currentTarget will return the element that was clicked.
        //Then we can simply use .style.backgroundColor to change its color.
        eventArgs.currentTarget.style.backgroundColor = "red";
    }
}
Resulting output:
Before:

After:

About
In this code snippet, we’ll learn how to manipulate the DOM with Javascript.
When you open up a web page the browser will parse the HTML and CSS. Then it will build a DOM(data object model) from the parsed data. Finally, it will render it to display the web page.
Javascript can be used to dynamically change the DOM. We can do that by getting elements(by tag, id or class) and then modifying, adding or removing them.
Let’s see the code example below.
Code:
index.html
<!DOCTYPE html>
<html>
<head>
<title>DOM Manipulation</title>
</head>
<script src="code.js"></script>
<body>
<div>
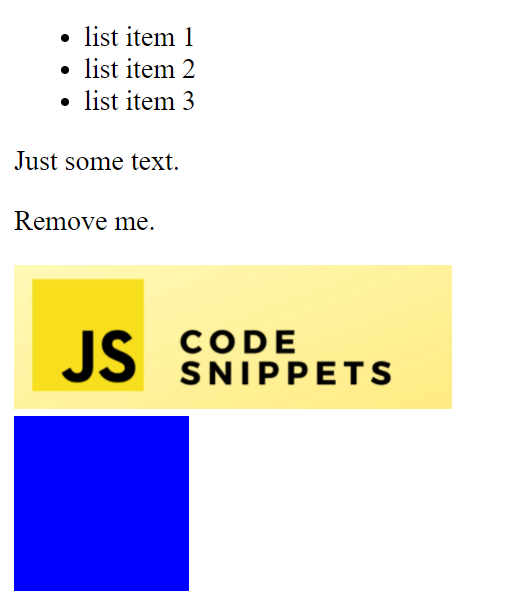
<div id="listWrapper" class="section">
<ul id="itemList">
<li>list item 1</li>
<li>list item 2</li>
<li>list item 3</li>
</ul>
</div>
<div id="textWrapper" class="section">
<p id="text">Just some text.</p>
</div>
<div id="removeMe" class="section">
<p>Remove me.</p>
</div>
<div class="section">
<img id="thisPost" src="js code snippets.png" width="250">
</div>
<div class="section">
<div id="coloredDiv" style="background-color: blue; width: 100px; height: 100px;"></div>
</div>
</div>
</body>
</html> code.js
//Run this when the HTML gets loaded.
window.onload = () => {
    //Getting elements//////////////////////////////////////////

    //Get element by tag.
    let li_elements = document.getElementsByTagName("li");
    console.log(li_elements);
    //Get element by id.
    let text_element = document.getElementById("text");
    console.log(text_element);
    //Get elements by class.
    let sections = document.getElementsByClassName("section");
    console.log(sections);

    ////////////////////////////////////////////////////////////


    //Modify elements///////////////////////////////////////////

    //Change CSS.
    document.getElementById("coloredDiv").style.backgroundColor = "red";
    //Change HTML.
    document.getElementById("textWrapper").innerHTML = "<h1 id='postTitle'>DOM Manipulation</h1>";
    //Change attribute.
    document.getElementById("thisPost").src = "JS Code Snippets DOM Manipulation.png";

    ////////////////////////////////////////////////////////////


    //Add/remove elements///////////////////////////////////////

    //Remove element,
    document.getElementById("removeMe").remove();

    //Create and add new element////////////////////////////////

    //Create new li element.
    const newLiElement = document.createElement("li");
    //Create new text content.
    const newLiText = document.createTextNode("list item 4");
    //Add text to newly created li element.
    newLiElement.appendChild(newLiText);

    //Get existing list.
    let itemsList = document.getElementById("itemList");
    //Add new li to existing list.
    itemsList.appendChild(newLiElement);

    ////////////////////////////////////////////////////////////
}
Resulting output:
Before:
After:

About
In this code snippet, we’ll learn about closures in Javascript.
A closure is simply a function within a function. With this, we can achieve variable encapsulation. In other OOP languages, this would be done by making a private property inside a class. This way the variables inside are isolated and protected from the global space.
Let’s see the code example below.
Code:
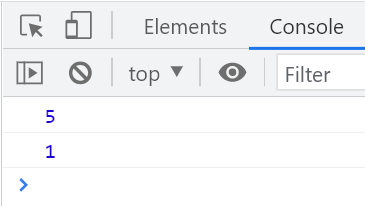
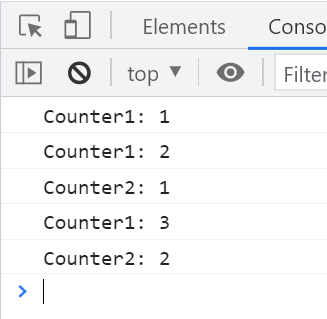
function counter() {
	//Local variable. Just like a private variable in an object.
  let count = 0;

  return function incCount() {
    count++;
    return count;
  };
}

//More counters can be made and each one will have it's own internal variables that are protected form the global space.
const counter1 = counter();
const counter2 = counter();

console.log("Counter1: " + counter1());

console.log("Counter1: " + counter1());
console.log("Counter2: " + counter2());

console.log("Counter1: " + counter1());
console.log("Counter2: " + counter2());
Resulting output:
About
In this code snippet, we’ll learn how to use arrow functions in Javascript.
Arrow functions are nothing more than “syntactic sugar” to make writing a function a bit shorter. Both examples below achieve the same thing but the second one is just a bit more compact that’s all.
Let’s see the code example below.
Code:
//1. way//////////////////////////////////////////

const someFunction = function(){
	console.log("I am a function.");
}

someFunction();

//////////////////////////////////////////////////


//2. way//////////////////////////////////////////

const someOtherFunction = () => {
	console.log("I am another function.");
}

someOtherFunction();

//////////////////////////////////////////////////
Resulting output:
About
In this code snippet, we’ll learn how to handle errors in Javascript.
You can throw errors by using the throw keyword. Then you can catch them using the try catch block. If you want to catch errors globally you can use the window.onerror event to call your error handling function.
Let’s see the code example below.
Code:
//Handle errors locally with try catch///////////////////
try{
//You execute your code here.
console.log(addNumbers("5", 5));
}catch(ex){
//Here you would handle/log the error. I will just log it to the console,
console.log(ex);
}finally{
//Code here always executes. Regardless if an error was thrown or not.
}
function addNumbers(num1, num2){
//Check if input parameters aren't numbers throw an error.
if(typeof num1 != "number")
throw "num1 needs to be a number!";
if(typeof num2 != "number")
throw "num2 needs to be a number!";
return num1 + num2;
}
////////////////////////////////////////////////////////
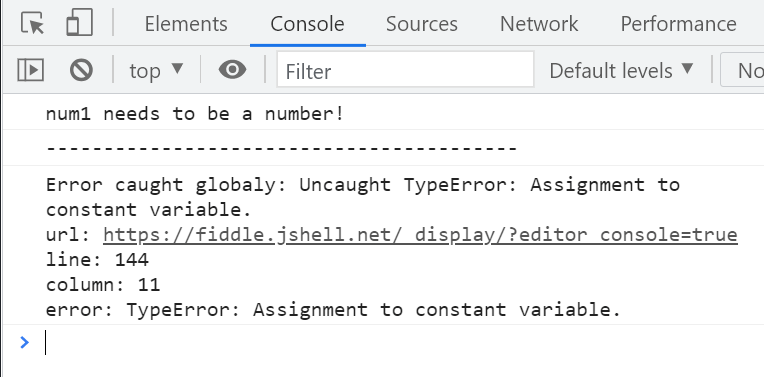
console.log("-----------------------------------------");
//Handle global errors//////////////////////////////////
//If this function is called our global error handler will become active on the page.
handleGlobalerrors();
//Lets try to change a constant and see how the error gets handled.
const myVariable = 8;
myVariable++;
function handleGlobalerrors(){
window.onerror = function(msg, url, line, col, error){
let extra = !col ? '' : '\ncolumn: ' + col;
extra += !error ? '' : '\nerror: ' + error;
const message = "Error caught globaly: " + msg + "\nurl: " + url + "\nline: " + line + extra;
//You would do some error login here. I will just display the error message to the console.
console.log(message);
//If true is returned then errors will be suppressed.
return true;
};
}
//////////////////////////////////////////////////////// Resulting output:

About
In this code snippet, we’ll learn about classes in Javascript.
Classes were introduced ES6. They work the same way they do in other languages and act as templates to make objects from. Again I will just demonstrate how to use classes in javascript and won’t go into specifics of OOP(I already did some posts about it in C#).
Let’s see the code example below.
Code:
//Class definition.////////////////////////////////////////////

class Computer{
	//This is how you define a constructor...
  constructor(cpu, gpu, ram) {
   	//...and properties.
    this.cpu = cpu;
    this.gpu = gpu;
    this.ram = ram;
  }

  //Methods don't need the function keyword.
	boot(){
  		console.log("Checking hardware...");

      console.log("CPU: " + this.cpu);
      console.log("GPU: " + this.gpu);
      console.log("RAM: " + this.ram);

      console.log("Booting OS...");
  }

  shutdown(){
  	console.log("Shutting down.");
  }

  //And static methods don't require an instance of a class to be used.
  static getRequiredParts(){
  	console.log("You need to provide a CPU, GPU and RAM to use this computer.");
  }
}

///////////////////////////////////////////////////////////////


//Inheritance./////////////////////////////////////////////////

class Laptop extends Computer{
	constructor(cpu, gpu, ram, batteryCapacity) {
  	//Calling the parent class constructor.
    //super() can also be used for regular methods(to call the parent implementation of the method).
    super(cpu, gpu, ram);

    this._batteryCapacity = batteryCapacity;
  }

  //To override a method just redeclare it again in the derived(child) class.
  shutdown(){
  	console.log("Shutting down laptop.");
  }

  //You can define getter/setter like so:
  get batteryCapacity() {
    return this._batteryCapacity;
  }

  set batteryCapacity(capacity) {
    this._batteryCapacity = capacity;
  }
}

///////////////////////////////////////////////////////////////


//Using the class./////////////////////////////////////////////

//Calling the static method without an instance.
Computer.getRequiredParts();

//Making an instance(object) of our class.
let myPC = new Computer("Ryzen 9 3900X", "RTX 2080 SUPER", "HyperX 64GB 3446 MHz");
myPC.boot();
myPC.shutdown();

console.log("-------------------------------------------");

//Making an instance(object) of our derived class.
let myLaptop = new Laptop("I5", "integrated", "8GB 1333 MHz", "40Wh");
myLaptop.boot();
myLaptop.shutdown();

//Get property.
console.log(myLaptop.batteryCapacity);

///////////////////////////////////////////////////////////////
Resulting output:
