Home


About
In this code snippet, we will take a look at interfaces in C#.
When I was first learning about interfaces I was given this analogy: “Interfaces are like contracts that specify what a class has to implement”. When a class uses an interface it must implement everything that the interface specifies.
Interfaces are very similar to abstract classes. But a class can only inherit from one other class meanwhile it can implement multiple interfaces. When naming an interface the convention is to start the name with I.
Interfaces can contain: events, indexers, methods, properties
Interfaces can’t contain: constants, types, fields, constructors, operators, finalizers
Let’s have a look at the code below to see how to make an interface.
Code:
using System;
namespace Interfaces
{
class Program
{
static void Main(string[] args)
{
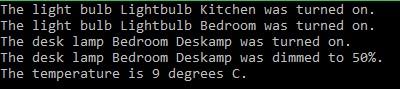
//In this example we we will make objects of IOT(internet of things) devices.
LightBulb bulb1 = new LightBulb("Lightbulb Kitchen", "192.168.1.10");
LightBulb bulb2 = new LightBulb("Lightbulb Bedroom", "192.168.1.11");
DeskLamp lamp1 = new DeskLamp("Bedroom Deskamp", "192.168.1.12");
TemperatureSensor temp1 = new TemperatureSensor("Temperature Sensor Yard", "192.168.1.13");
bulb1.on();
bulb2.on();
lamp1.on();
lamp1.dimm(50);
temp1.getTemperature();
Console.ReadLine();
}
}
/******************************************** Interfaces **********************************************/
//Interfaces contain the things that must be implemented when that particular interface is used.
//Each class using the interface can define a different implementation for a particular member of the interface.
//For example the on() method is implemented a bit differntly for every device.
//Every IOT device should implement this interface.
interface IOTDevice
{
string Name { get; set; }
string IpAdress { get; set; }
}
//Some devices are controllable(can be turned on/off). Those should implement this interface.
interface IControllable
{
void on();
void off();
}
//Some lights are dimmable. Those should implement this interface.
interface IDimmable
{
void dimm(int percent);
}
///////////////////////////////////////////////////////////////////////////////////////////////////////
//As you see a class can implement multiple interfaces.
class LightBulb : IOTDevice, IDimmable, IControllable // <= Interfaces
{
public LightBulb(string name, string ipAdress)
{
Name = name;
IpAdress = ipAdress;
}
//IOTDevice interface implementation ////////////////////
public string Name { get; set; }
public string IpAdress { get; set; }
/////////////////////////////////////////////////////////
//IControllable interface implementation ////////////////
public void off()
{
Console.WriteLine("The light bulb " + Name + " was turned off.");
}
public void on()
{
Console.WriteLine("The light bulb " + Name + " was turned on.");
}
/////////////////////////////////////////////////////////
//IDimmable interface implementation ////////////////////
public void dimm(int percent)
{
Console.WriteLine("The light bulb " + Name + " was dimmed to " + percent + "%.");
}
/////////////////////////////////////////////////////////
}
class DeskLamp : IOTDevice, IDimmable, IControllable
{
public DeskLamp(string name, string ipAdress)
{
Name = name;
IpAdress = ipAdress;
}
//IOTDevice interface implementation ////////////////////
public string Name { get; set; }
public string IpAdress { get; set; }
/////////////////////////////////////////////////////////
//IControllable interface implementation ////////////////
public void off()
{
Console.WriteLine("The desk lamp " + Name + " was turned off.");
}
public void on()
{
Console.WriteLine("The desk lamp " + Name + " was turned on.");
}
/////////////////////////////////////////////////////////
//IDimmable interface implementation ////////////////////
public void dimm(int percent)
{
Console.WriteLine("The desk lamp " + Name + " was dimmed to " + percent + "%.");
}
/////////////////////////////////////////////////////////
}
class TemperatureSensor : IOTDevice
{
public TemperatureSensor(string name, string ipAdress)
{
Name = name;
IpAdress = ipAdress;
}
//IOTDevice interface implementation ////////////////////
public string Name { get; set; }
public string IpAdress { get; set; }
/////////////////////////////////////////////////////////
public void getTemperature()
{
//Yeah ... not really getting the temperature here, just making up some random numbers.
Random rand = new Random();
Console.WriteLine("The temperature is " + rand.Next(-20, 40) + " degrees C.");
}
}
} Resulting output:

About
In this code snippet, we will take a look at extension methods in C#.
If you have a class that you don’t own or is sealed you won’t be able to add anything to it. In such cases, you can use extension methods which will be “glued” on to the class. This enables you to add your code to a class without modifying it or creating a new derived class.
Let’s have a look at the code below to see how to implement an extension method.
Code:
using System;

namespace ExtensionMethods
{
    class Program
    {
        static void Main(string[] args)
        {
            MyClass MC = new MyClass();

            //We can now call this method even though it isn't part of the MyClass.
            MC.extensionMethod();

            Console.ReadLine();
        }
    }

    //Here we have a class thet we don't own or is sealed.
    sealed class MyClass
    {
        public void writeText()
        {
            Console.WriteLine("This was written from the base class method.");
        }
    }

    //To be able to extend the above class we have to do the following:

    //Make this class static.
    static class MyClassWithExtensionMethod
    {
        //Put the "this" keyword before the input parameter.
        //And make the input paremeter the type of the class that you want to extend.
        public static void extensionMethod(this MyClass MC)
        {
            //You can call methods from the base class if you need to.
            //MC.writeText();

            Console.WriteLine("This was written from the extension method");
        }
    }
}
Resulting output:
About
In this code snippet, we will learn how to work with and manipulate strings in C#.
Let’s have a look at the code below to work with strings.
Code:
using System;
namespace strings
{
class Program
{
static void Main(string[] args)
{
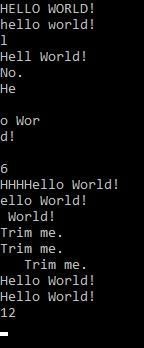
string stringOne = "Hello World!";
//Make a string uppercase.
Console.WriteLine(stringOne.ToUpper());
//Make a string lowercase.
Console.WriteLine(stringOne.ToLower());
//Get a character at a specific position like so(a string is essentialy an array of characters):
char ch = stringOne[3];
Console.WriteLine(ch);
//Replace a charater/string within your string:
Console.WriteLine(stringOne.Replace("Hello", "Hell"));
//Check if your string contains a specific character
if (stringOne.Contains("a"))
{
Console.WriteLine("Yes.");
}
else
{
Console.WriteLine("No.");
}
//Split your string it into many strings when a specified character is encountered and store them in an array.
string[] strings = stringOne.Split('l');
//Display the string in the array.
foreach (string str in strings)
{
Console.WriteLine(str);
}
Console.WriteLine("");
//Get the index of a character/string within your string.
Console.WriteLine(stringOne.IndexOf("Wor"));
//Insert a character/string into your string.
Console.WriteLine(stringOne.Insert(0, "HHH"));
//remove a character/string from your string.
Console.WriteLine(stringOne.Remove(0, 1));
//Get the a part of your string between the specified positions.
Console.WriteLine(stringOne.Substring(5, 7));
string stringTwo = " Trim me. ";
//Get rid of spaces.
Console.WriteLine(stringTwo.Trim());
//Get rid of spaces at the front.
Console.WriteLine(stringTwo.TrimStart());
//Get rid of spaces at the end.
Console.WriteLine(stringTwo.TrimEnd());
//Joining strings.
Console.WriteLine("Hello" + " " + "World!");
//Or if you have an array.
string[] words = { "Hello", " ", "World", "!" };
Console.WriteLine(string.Concat(words));
//Get the length of your string.
Console.WriteLine(stringOne.Length);
Console.ReadLine();
}
}
} Resulting output:

About
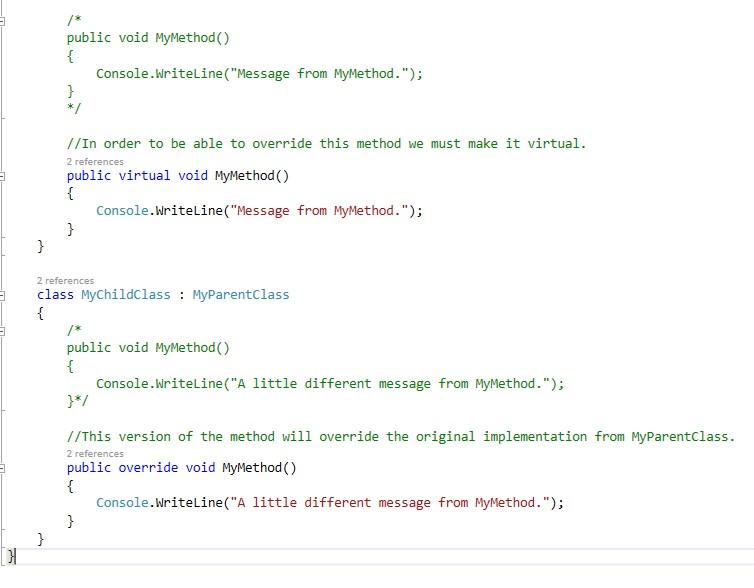
In this code snippet, we will take a look at polymorphism, the virtual and the override keywords in C#.
Polymorphism is one of the main concepts of OOP(object-oriented programming). It means that child classes can be viewed as parent classes at run time.
Suppose we have a method that takes a parent class as an input. We can pass it the derived class and everything will still work. This can work because the child method inherits the required members from the parent class.
However, we now run into a problem. What if we want to implement our own version of the method and not use the parents’ version?
Well, this is why we have the virtual and override keywords.
Virtual: The virtual keyword enables the method to be overridden in the derived(child) class. In other words, if a method isn’t marked as virtual in the parent class no child class will be able to override it.
Override: The override keyword will make the current method of the child class override the original implementation of the parent class.
Let’s have a look at the code below to see how polymorphism looks like and how the virtual and override keywords are used.
Code:
using System;
namespace Polymorphism
{
class Program
{
static void Main(string[] args)
{
MyParentClass MPC = new MyParentClass();
MyChildClass MCC = new MyChildClass();
//Here we will call the method polymorphicly.
displayMessage(MPC);
displayMessage(MCC);
Console.ReadLine();
}
private static void displayMessage(MyParentClass MPC)
{
//Here MyParentClass implementation of MyMethod will be used, even when an instance of MyChildClass is used.
//To change that we have to override the parent method in the child class.
MPC.MyMethod();
}
}
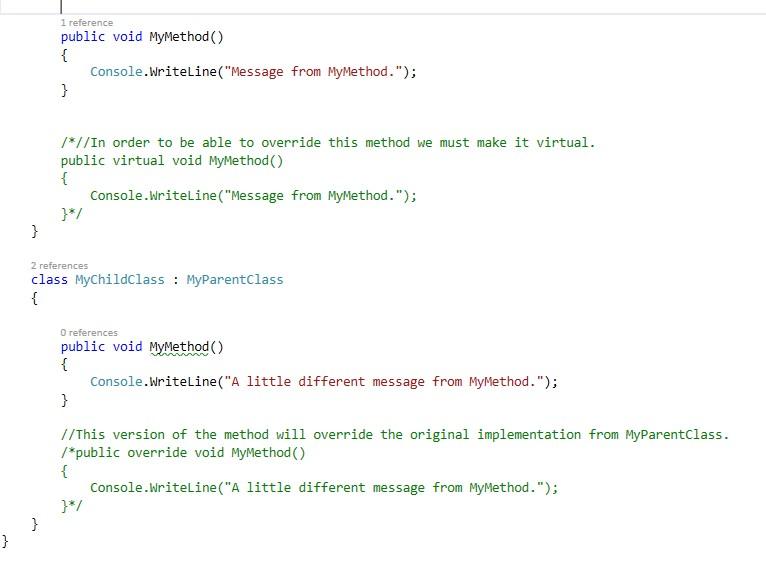
class MyParentClass
{
public int MyFirstProperty { get; set; }
public int MySecondProperty { get; set; }
/*
public void MyMethod()
{
Console.WriteLine("Message from MyMethod.");
}
*/
//In order to be able to override this method we must make it virtual.
public virtual void MyMethod()
{
Console.WriteLine("Message from MyMethod.");
}
}
class MyChildClass : MyParentClass
{
/*
public void MyMethod()
{
Console.WriteLine("A little different message from MyMethod.");
}*/
//This version of the method will override the original implementation from MyParentClass.
public override void MyMethod()
{
Console.WriteLine("A little different message from MyMethod.");
}
}
} Resulting output:
About
In this code snippet, we will take a look at the base keyword in C#.
The base keyword is used to get the members of the parent class. In this example, we will call the constructor from the parent class. By doing so we can avoid duplicating the code.
Let’s have a look at the code below to see how to use the base keyword.
Code:
using System;

namespace baseClass
{
    class Program
    {
        static void Main(string[] args)
        {
            MyClass MC = new MyClass();
            MySecondClass MSC = new MySecondClass();

            MC.MyMethod();

            Console.WriteLine("");

            MSC.MyMethod();

            Console.ReadLine();
        }
    }

    class MyClass
    {
        public void MyMethod()
        {
            Console.Write("Hello");
        }
    }

    class MySecondClass : MyClass
    {
        public void MyMethod()
        {
            //Instead of duplicating code we can just call the method from the base class.
            base.MyMethod();
            //Then we add the code specific for this version of the method.
            Console.Write(" World");
        }
    }
}
Resulting output:

About
In this code snippet, we will take a look at the base keyword in C#.
Inheritance means that one class can inherit members from another class. This is one of the fundamental concepts in OOP(object-oriented programming). (see example 1)
Let’s say we are making an app for a store. The store sells grapes and bananas. Both items will have a price so we can make a parent class called fruit and put the price property inside. Then the banana and grape classes would inherit the price from the fruit parent class. Grapes can also have a color(white or red). This color property would only be put in the grape class. (see example 2)
Inheritance reduces code duplication and it provides organization and structure to the code. Despite how crucial inheritance is to OOP don’t go overboard with it and only use it when it makes sense to do so.
Note: A child class can only have one parent. If you have the need for more than one parent use an interface instead.
Let’s have a look at the code below to see how to use inheritance.
Code:
using System;

namespace Inheritance
{
    class Program
    {
        static void Main(string[] args)
        {
            MyParentClass MPC = new MyParentClass();
            MyChildClass MCC = new MyChildClass();

            //Even though not included in the MyChildClass, MyFirstProperty can be accessed because it's inherited from the parent class.
            MCC.MyFirstProperty = 0;

            Console.WriteLine(MCC.MyFirstProperty);

            Console.ReadLine();
        }
    }

    //Example 1////////////////////////////////////////////////////////////////////////////////////////////

    class MyParentClass
    {
        public int MyFirstProperty { get; set; }
        public int MySecondProperty { get; set; }
    }

    //MyChildClass inherits the members of MyParentClass.
    class MyChildClass : MyParentClass
    {

    }

    //////////////////////////////////////////////////////////////////////////////////////////////////////

    //Example 2///////////////////////////////////////////////////////////////////////////////////////////

    class Fruit
    {
        public int price { get; set; }
    }

    class Banana : Fruit
    {

    }

    class Grape : Fruit
    {
        public string color { get; set; }
    }
    //////////////////////////////////////////////////////////////////////////////////////////////////////
}
Resulting output:
About
In this code snippet, we will take a look at the IEnumerator and IEnumerable in C#.
Making an object enumerable will allow us to iterate over it with something like the foreach loop. IEnumerable is an interface that specifies what has to be implemented to make an object iterable(an object that can be iterated over). For an object to be iterable it has to have a GetEnumerator() method that returns an object of type IEnumerator.
You could define your own enumerator(for more information see Microsofts documentation) by making a class that implements the IEnumerator interface. However, you should use yield return instead as it greatly simplifies the process. We’ll look at the yield keyword more closely in the second part of this post.
The great thing about using this iterator design pattern is that you can do deferred loading/execution. Let’s say we want to generate a 1000000 random numbers and do something with them. Normally you would generate all of them, save them in memory, and then proceed to use them. This uses up a lot of memory and it means that all the numbers have to be generated before you can start processing them.
Using the iterator pattern allows us to instead generate a number, process it as part of the iteration step and move on to the next number in the next iteration. This way only one number at a time is held in memory and you can immediately do something with the processed data like sending it over the network or writing it to a database or file.
The same idea applies if you are making large queries to a database or reading/writing any other I/O like files, etc. LINQ is a great example of where this concept/design pattern is also used.
Let’s have a look at the code below to see how to make an object enumerable.
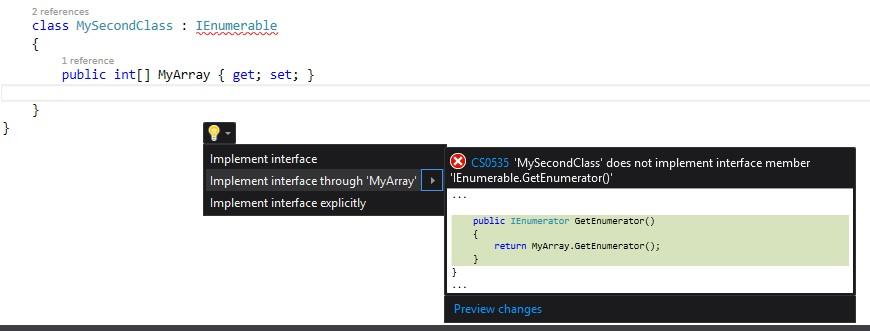
Once you implement the interface you can just press ctrl + . select “implement interface” and IntelliSense will automatically make the required GetEnumerator() method.
Code:
using System;
using System.Collections;
using System.Collections.Generic;

namespace IEnumerableExample
{
    class Program
    {
        static void Main(string[] args)
        {
            MyClass MC = new MyClass();

            //Fill up the list.
            MC.Mylist = new List<int>() { 10, 5, 15, 20 };

            //We can now use foreach on our object.
            foreach (var item in MC)
                Console.WriteLine(item);


            Console.WriteLine("----");


            MySecondClass MSC = new MySecondClass();

            //Fill up the array.
            MSC.MyArray = new int[5] { 10, 5, 2, 3, 7 };

            //We can now use foreach on our object.
            foreach (var item in MSC)
                Console.WriteLine(item);

            Console.ReadLine();
        }
    }

    //Implement the IEnumerable interface.
    class MyClass : IEnumerable
    {
        public List<int> Mylist { get; set; }

        //Here we define the Enumerator for our class.
        //The class can now be used with something like foreach as it relies on the GetEnumerator.
        public IEnumerator GetEnumerator()
        {
            //When foreach gets used on an instance of this class we want to iterate through the MyList List<>.
            //Lists have their GetEnumerator already set. So we will just get GetEnumerator of our list and return that.
            return Mylist.GetEnumerator();
        }
    }

    //Implement the IEnumerable interface and our own IEnumerator with the help of the yield keyword.
    class MySecondClass : IEnumerable
    {
        public int[] MyArray { get; set; }

        //Here we've implemented the enumerator so our class is enumerable and we can use foreach with it.
        //We could just call GetEnumerator() on the array to get its enumerator(as arrays implement IEnumerable already) like we did for the list in the example above.
        //But we'll write our own enumerator with the help of the yield keyword for demonstration purposes.
        public IEnumerator GetEnumerator()
        {
            //Let's iterate over the array and get its values.
            for (int i = 0; i < MyArray.Length; i++)
            {
                int value = MyArray[i];

                //... we could add some additional logic or calculations here if needed ...

                //Finally we yield return the value.
                yield return value; //See the code in the next section of this post to see how yield works.
            }
        }
    }
}
Resulting output:

Yield Keyword Code:
using System;
using System.Collections.Generic;

namespace yieldKeyword
{
    class Program
    {
        static void Main(string[] args)
        {
            foreach (var number in yieldDemo())
                Console.WriteLine(number);


            Console.WriteLine("--------");


            var rng = new RandomNumberGenerator();

            //Iterate over IEnumerable type.
            foreach (var number in rng.GenerateRandomNumbers(0, 10, 5))
                Console.WriteLine(number);


            Console.WriteLine("--------");


            //Keep iterating over the IEnumerable type until it manages to generate the number 15.
            foreach (var number in rng.GenerateRandomNumbersUntil(0, 10, 7))
                Console.WriteLine(number);


            Console.ReadLine();
        }

        public static IEnumerable<int> yieldDemo()
        {
            yield return 1;
            yield return 3;
            yield return 3;
            yield return 7;
        }

        class RandomNumberGenerator
        {
            public RandomNumberGenerator()
            {
                random = new Random();
            }


            private readonly Random random;


            public IEnumerable<int> GenerateRandomNumbers(int min, int max, int number)
            {
                for (int i = 1; i <= number; i++)
                {
                    //Generate a random number between the min and max value.
                    int randomNumber = random.Next(min, max);

                    //return each generated number one at a time using yield.
                    yield return randomNumber;
                }
            }

            public IEnumerable<int> GenerateRandomNumbersUntil(int min, int max, int match)
            {
                while (true)
                {
                    //Generate a random number between the min and max value.
                    int randomNumber = random.Next(min, max);

                    //Numbers will keep getting generated and returned until
                    if (randomNumber == match)
                        yield break; //Stop the iteration when we get to the desired number.
                    else
                        yield return randomNumber; //return each generated number one at a time using yield.
                }
            }
        }
    }
}
The yield keyword is just “syntactic sugar” for a state machine. The working principle is similar to the way that async/await works. If we look at the lowered code of the method yieldDemo() from the code below using SharpLab we can see what’s actually going on in the background.


You can see that a state machine and an iterator(similar to the implementation described here) are automatically created when the code gets lowered by the compiler.


I think this video where I use the debugger to step through the code line by line better illustrates how yield works.
Resulting output:

About
In this code snippet, we will learn about JSON serialization in C#.
Serialization is when you take an object and convert it to a stream of bytes that can be then stored in a file, database or memory. This is useful if you want to store the state of your objects or send them over the network(for example an API). Of course, you can also deserialize a file/database entry back into an object.
Note: See also XML and binary serialization.
In this example, we will serialize and deserialize an object to/from JSON. I will only make a JSON string. To make a JSON file you simply write the string to the file like you would for any other text. At the end just make sure to save the file with the .json extension instead of .txt.
Additionally, we’ll see how we can create our own contract resolver with which we can define how the mapping from object to JSON and vice versa is performed. For example, we can set a specific property of an object to get serialized as text instead of a number or we can change the name of a property when serialized/deserialized, etc.
Update: Since this post was written Microsoft added JSON serialization/deserialization as part of .NET(System.Text.Json namespace), consider checking it out here.
Let’s have a look at the code below to see how to perform JSON serialization.
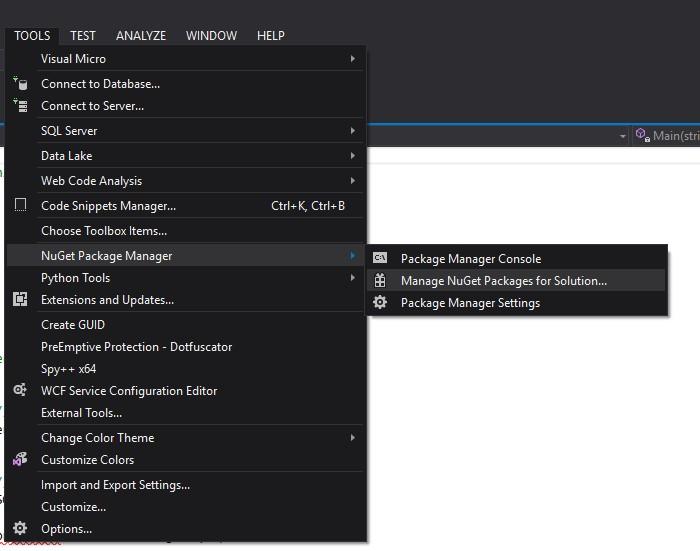
First, a JSON library from Newsoft has to be installed otherwise we will get an error. The library will be installed with the Nuget package manager.

Open Nuget.
Look for Newsoft.json, select it, add it to the project and click install.
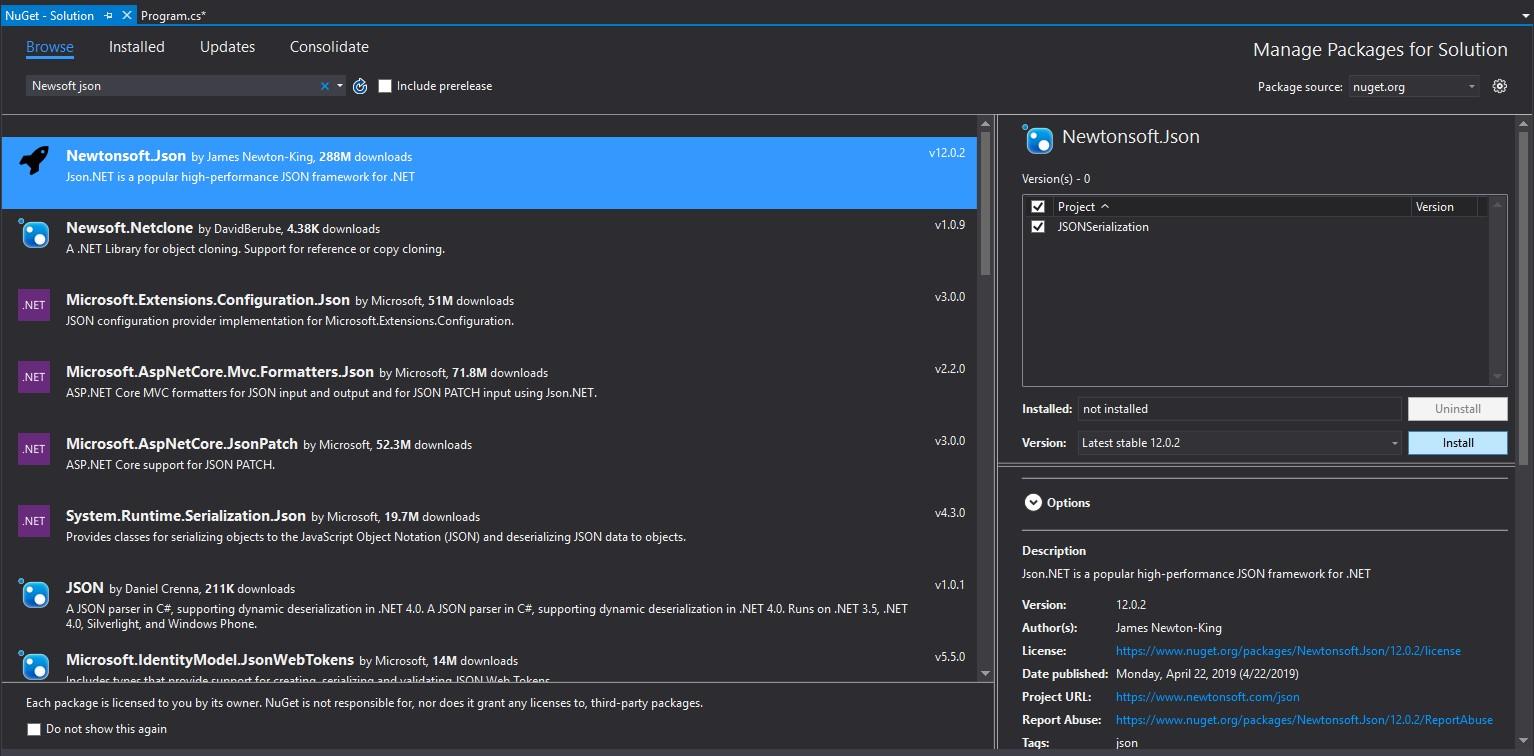
Confirm and wait for it to install.


No more errors.
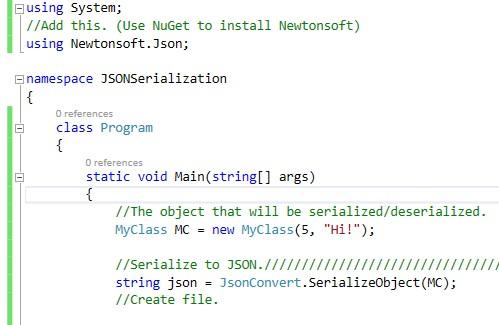
Code:
using System;
//Add this. (Use NuGet to install Newtonsoft library)
using Newtonsoft.Json;

namespace JSONSerialization
{
    class Program
    {
        static void Main(string[] args)
        {
            //The object that will be serialized/deserialized.
            MyClass MC = new MyClass(5, "Hi!");


            //Serialize to JSON.////////////////////////////////////////////////
            string json = JsonConvert.SerializeObject(MC);

            Console.WriteLine("JSON: " + json);
            Console.WriteLine();


            //Deserialize from JSON.///////////////////////////////////////////
            MyClass MCDeserializedFromJSON = JsonConvert.DeserializeObject<MyClass>(json);

            Console.WriteLine("MyFirstProperty: " + MCDeserializedFromJSON.MyFirstProperty + " MySecondProperty: " + MCDeserializedFromJSON.MySecondProperty);
            Console.ReadLine();
        }
    }

    //Make sure the class that will be serialized is public.
    //Also all the members of the class that will be serialized must be public.
    public class MyClass
    {
        public int MyFirstProperty { get; set; }
        public string MySecondProperty { get; set; }

        public MyClass()
        {

        }

        public MyClass(int a, string b)
        {
            MyFirstProperty = a;
            MySecondProperty = b;
        }
    }
}
Resulting output:

Custom Contract Resolver Code:
using Newtonsoft.Json;
using Newtonsoft.Json.Serialization;
using System.Reflection;

namespace JSONSerialization
{
    class Program
    {
        static void Main(string[] args)
        {
            //The object that will be serialized/deserialized.
            MyClass MC = new MyClass(5, "Hi!");


            //Serialize to JSON.////////////////////////////////////////////////

            //Here we can set the JsonSerializerSettings to use our own custom contract resolver instead of the default one.
            var settings = new JsonSerializerSettings
            {
                ContractResolver = new CustomContractResolver(),
                /*Here you can set other settings like formatting, what to do with null values, etc.
                Formatting = Formatting.Indented,
                NullValueHandling = NullValueHandling.Ignore,
                DefaultValueHandling = DefaultValueHandling.Populate,
                MissingMemberHandling = MissingMemberHandling.Ignore
                */
            };

            string json = JsonConvert.SerializeObject(MC, settings);

            Console.WriteLine("JSON: " + json);
            Console.WriteLine();
        }
    }

    //Make sure the class that will be serialized is public.
    //Also all the members of the class that will be serialized must be public.
    public class MyClass
    {
        public int MyFirstProperty { get; set; }
        public string MySecondProperty { get; set; }

        public MyClass()
        {

        }

        public MyClass(int a, string b)
        {
            MyFirstProperty = a;
            MySecondProperty = b;
        }
    }

    //Here we define our custom contract resolver.
    public class CustomContractResolver : DefaultContractResolver
    {
        protected override JsonProperty CreateProperty(MemberInfo member, MemberSerialization memberSerialization)
        {
            //We'll do something silly like renaming MySecondProperty to MyThirdProperty.
            //But you get the idea, you can do whatever you want.

            JsonProperty property = base.CreateProperty(member, memberSerialization);

            if (property.PropertyName == "MySecondProperty")
            {
                property.PropertyName = "MyThirdProperty";
            }

            return property;
        }

        //Or you can just override the property name resolver like so:
        /*protected override string ResolvePropertyName(string name)
        {
            if (name == "MySecondProperty")
                return "MyThirdProperty";
            else
                return name;
        }*/
    }
}
Resulting output:


About
In this code snippet, we will learn about binary serialization in C#.
Serialization is when you take an object and convert it to a stream of bytes that can be then stored in a file, database or memory. This is useful if you want to store the state of your objects or send them over the network(for example an API). Of course, you can also deserialize a file/database entry back into an object.
Note: See also how to do JSON or XML serialization.
In the code example, we will make a class and serialize it to a file using the BinaryFormatter. But to make the class serializable in the first place the ISerializable interface has to be implemented. To do that the GetObjectData method has to be defined and implemented.
Let’s have a look at the code below to see how to perform binary serialization.
Code:
using System;
using System.IO;
using System.Runtime.Serialization;
using System.Runtime.Serialization.Formatters.Binary;
namespace Serialization
{
class Program
{
static void Main(string[] args)
{
//Create an instance of MyClass.
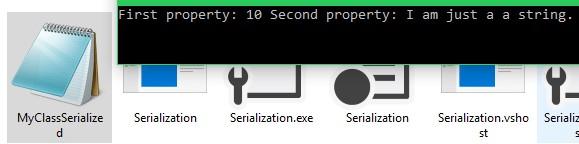
MyClass MC = new MyClass(10, "I am just a a string.");
//Serialize MC
serialize(MC);
//Deserialize MC from file to new obejct MCDeserialized.
MyClass MCDeserialized = deserialize(MC);
//Write out MCDeserialized properties.
Console.WriteLine("First property: " + MCDeserialized.MyFirstProperty + " Second property: " + MCDeserialized.MySecondProperty);
Console.ReadLine();
}
public static void serialize(MyClass MC)
{
//Make file.
Stream stream = File.Open("MyClassSerialized.obj", FileMode.Create);
BinaryFormatter bfWrite = new BinaryFormatter();
//Serialize the object data to a file.
bfWrite.Serialize(stream, MC);
stream.Close();
}
public static MyClass deserialize(MyClass MC)
{
//Open file.
Stream streamRead = File.Open("MyClassSerialized.obj", FileMode.Open);
BinaryFormatter bfRead = new BinaryFormatter();
//Deserailze file back to object.
MyClass MCDeserialized = (MyClass)bfRead.Deserialize(streamRead);
streamRead.Close();
return MCDeserialized;
}
}
//Indicates that MyClass is serializable.
[Serializable()]
//We will use the ISerializable interface to make this class serializable.
class MyClass : ISerializable
{
public int MyFirstProperty { get; set; }
public string MySecondProperty { get; set; }
//We will make this field unserializable.
[NonSerialized()]
public int MyNonSerializableFiled;
//Just a standard constructor that initilaizes our class upon creation.
public MyClass(int a, string b)
{
MyFirstProperty = a;
MySecondProperty = b;
}
//GetObjectData is the method that will perform the seraialiazion.
//SerializationInfo will contain our data. In this case we won't be using SerializationContext.
public void GetObjectData(SerializationInfo info, StreamingContext context)
{
//Here we assign a key to our properties and add them to info.
info.AddValue("Prop1", MyFirstProperty);
info.AddValue("Prop2", MySecondProperty);
}
//To deserialize data back to an object we will simnply create a constructor that takes in SerializationInfo info and StreamingContext ctxt.
//Than we get the values from info an assign them back to our object's properties.
public MyClass(SerializationInfo info, StreamingContext ctxt)
{
//Get the values from info and assign them to the properties
MyFirstProperty = (int)info.GetValue("Prop1", typeof(int));
MySecondProperty = (string)info.GetValue("Prop2", typeof(string));
}
}
} Resulting output:
About
In this code snippet, we will learn how to do XML serialization in C#.
Serialization is when you take an object and convert it to a stream of bytes that can be then stored in a file, database or memory. This is useful if you want to store the state of your objects or send them over the network(for example an API). Of course, you can also deserialize a file/database entry back into an object.
Note: See also do JSON or binary serialization.
Unlike in the binary serialization example, we won’t be using the ISerializable interface here. First, we will create a stream that will be used to make a file. Then we will create an XMLSerializer object and use its serialize/deserialize methods to serialize/deserialize our object.
Let’s have a look at the code below to see how to perform XML serialization.
Code:
using System;
using System.IO;
//Add this using statement.
using System.Xml.Serialization;
namespace XML
{
class Program
{
static void Main(string[] args)
{
//The object that will be serialized/deserialized.
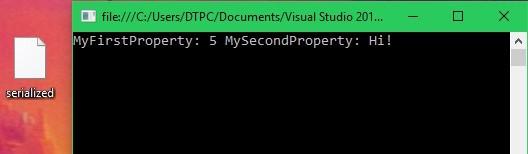
MyClass MC = new MyClass(5, "Hi!");
//Path of the XML file.
string path = "C:\\Users\\DTPC\\Desktop\\serialized.xml";
/*//The more verbose way.
//Initialize XML serializer.
XmlSerializer xs = new XmlSerializer(typeof(MyClass));
//Variable for the XML.
var xml = "";
//First create an xml string and than write it to a file.
using (var stringW = new StringWriter())
{
using (XmlWriter writer = XmlWriter.Create(stringW))
{
xs.Serialize(writer, MC);
xml = stringW.ToString(); // Your XML
}
}
//Save XML to file.////////////////////////////////////////////////
//Initialize StramWriter by passing it the path of the file.
StreamWriter sw = File.CreateText(path);
//Write xml to the file.
sw.Write(xml);
sw.Close();
*/
//Another more compact way to make an xml file.///////////////////////////////////////////////////////////////////
//Serialize to file.////////////////////////////////////////////////
//Create file.
using (var stream = new FileStream(path, FileMode.Create))
{
//Serialize.
var xml = new XmlSerializer(typeof(MyClass));
xml.Serialize(stream, MC);
}
//Deserialize from file.///////////////////////////////////////////
MyClass MCDeserializedFromXML = null;
//Open file.
using (var stream = new FileStream(path, FileMode.Open) )
{
//Deserialize.
var xml = new XmlSerializer(typeof(MyClass));
MCDeserializedFromXML = (MyClass)xml.Deserialize(stream);
}
Console.WriteLine("MyFirstProperty: " + MCDeserializedFromXML.MyFirstProperty + " MySecondProperty: " + MCDeserializedFromXML.MySecondProperty);
Console.ReadLine();
}
}
//Make sure the class that will be serailized is public.
//Also all the members of the class that will be serialized must be public.
public class MyClass
{
public int MyFirstProperty { get; set; }
public string MySecondProperty { get; set; }
public MyClass()
{
}
public MyClass(int a, string b)
{
MyFirstProperty = a;
MySecondProperty = b;
}
}
} Resulting output:
XML File:
