About
In this code snippet, we will learn how to read and write to Azure Tables using C#.
Azure Tables are great for large amounts of nonstructured(NoSQl) schema-less data. The data is stored as key-value pairs.
Note: You can learn more about how tables work and how to partition them here.
Note: You can use Azure Storage Explorer to inspect and edit Tables manually.
Let’s see how to use Azure Tables with C# in the code examples below.
Prerequisites:
Before getting started you need to install the Azure Tables client library NuGet package into your project: Azure.Data.Tables and add the following using statement at the top of your code file.
using Azure.Data.Tables;
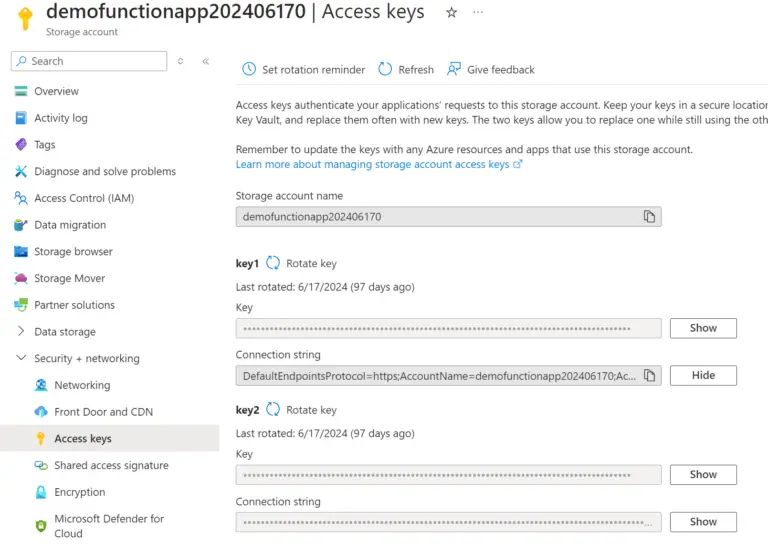
Next, you need to get the connection string to your storage account. You can find it if you go to the storage account in the Azure portal and select “Access Keys”. We will need this in the code snippets below.
Note: It’s a good idea to save it as an environmental variable an not hardcode it as a string.
Code:
First, we need to create a model for the table structure. This model must implement the ITableEntity interface.
public class MyTestTable : ITableEntity
{
    //Required properties
    public string PartitionKey { get; set; }
    public string RowKey { get; set; }
    public DateTimeOffset? Timestamp { get; set; }
    public ETag ETag { get; set; }

    //Custom properties
    public string Data1 { get; set; }
    public int Data2 { get; set; }
}
This next code snippet demonstrates how to connect to your Azure storage account, create/select a table, and perform writing operations such as insertions, updates, and deletions.
private static void WriteOperations()
{
    //Set connection string and the table name.
    string connectionString = "your_connection_string"; //Environment.GetEnvironmentVariable("AzureWebJobsStorage");
    string tableName = "MyTable";

    //Create the table client.
    TableClient tableClient = new TableClient(connectionString, tableName);

    //Create the table if it doesn't exist already.
    tableClient.CreateIfNotExists(); //Or you can delte a like so: tableClient.Delete();

    //Create a new entity(table row).
    MyTestTable entity = new MyTestTable
    {
        PartitionKey = "partition1",
        RowKey = "key123",
        Data1 = "Hello World!",
        Data2 = 1337
    };

    //Adds the entity to the table.
    tableClient.AddEntity(entity);

    //Updates an existiong entity in the table.
    tableClient.UpdateEntity(entity, ETag.All, TableUpdateMode.Replace);

    //Adds the entity to the table if it doesn't exist yet, otherwise it updates it.
    tableClient.UpsertEntity(entity);

    //Deletes the entity from the table.
    //tableClient.DeleteEntity(entity);
}
This code snippet demonstrates how to query one or multiple results from the table. The query is made using the OData filter syntax.
private static void ReadOperations()
{
    //Set connection string and the table name.
    string connectionString = "your_connection_string"; //Environment.GetEnvironmentVariable("AzureWebJobsStorage");
    string tableName = "MyTable";

    //Create the table client.
    TableClient tableClient = new TableClient(connectionString, tableName);

    //Set the partition and row keys of the entity to retrieve.
    string partitionKey = "partition1";
    string rowKey = "key123";

    //Read single entity.
    //MyTestTable entity = tableClient.GetEntity<MyTestTable>(partitionKey, rowKey);
    //Console.WriteLine($"Data1: {entity.Data1}, Data2: {entity.Data2}");

    //Read multiple entities.
    Pageable<MyTestTable> entities = tableClient.Query<MyTestTable>(filter: "PartitionKey eq 'partition1'"); //This will query all the rows from the table where the partition key is 'partition1'.

    //Iterate through the results.
    foreach (MyTestTable entity in entities)
    {
        Console.WriteLine($"Data1: {entity.Data1}, Data2: {entity.Data2}");
    }
} 