Home


About
In this code snippet, we will learn how to use the as operator in C#.
The as operator is used to cast objects into different types. It is similar to the is operator. They can both be used to check if an object is of a certain type.
If the conversion is successful the converted object gets returned else a null will be returned.
Let’s have a look at the code below to see how to use the as operator.
Code:
using System;
using System.Collections.Generic;

namespace As
{
    class Program
    {
        static void Main(string[] args)
        {
            //List of objects that we will check the type of.
            List<object> list = getList();

            //Counters.
            int myClassCount = 0;
            int mySecondClassCount = 0;

            foreach (var item in list)
            {
                //Item has to be cast to MyClass. But if the item isn't of type MyClass we will get an exception.
                //MyClass myClassCheck = (MyClass)item;

                //To avoid that we should use "as" to perform the cast.
                //The as operator casts the object if the type matches up and returns null if it doesn't.
                MyClass myClassCheck = item as MyClass;

                if (myClassCheck != null)
                {
                    myClassCount++;
                }

                MySecondClass mySecondClassCheck = item as MySecondClass;

                if (mySecondClassCheck != null)
                {
                    mySecondClassCount++;
                }
            }

            Console.WriteLine("There were " + myClassCount + " instances of MyClass and " + mySecondClassCount + " instances of MySecondClass in this list.");
            Console.ReadLine();
        }

        //This method returns a list filled with either MyClass or MySecondClass instances, depending on the random value.
        public static List<object> getList()
        {
            List<object> list = new List<object>();
            Random rand = new Random();

            for (int i = 0; i < 10; i++)
            {
                if (rand.Next(1, 2 + 1) > 1)
                {
                    var classObject = new MyClass();
                    list.Add(classObject);
                }
                else
                {
                    var classObject = new MySecondClass();
                    list.Add(classObject);
                }
            }
            return list;
        }

        class MyClass
        {
        }

        class MySecondClass
        {
        }
    }
}
Resulting output:
About
In this code snippet, we will learn how to use the is operator in C#.
The is operator is very similar to the as operator. They can both be used to check if an object is of a certain type. Additionally as can be used to perform type casting.
If the object matches the specified data type true gets returned else false will be returned.
Let’s have a look at the code below to see how to use the is operator.
Code:
using System;
using System.Collections.Generic;

namespace Is
{
    class Program
    {
        static void Main(string[] args)
        {
            //List of objects that we will check the type of.
            List<object> list = getList();

            //Counters.
            int myClassCount = 0;
            int mySecondClassCount = 0;

            //We will use the "is" operator to check if a variable is of a certain type.
            foreach (var item in list)
            {
                //The is operator returns true if the object type matches up and false if it doesn't.
                if (item is MyClass)
                {
                    myClassCount++;
                }
                else if (item is MySecondClass)
                {
                    mySecondClassCount++;
                }
            }

            Console.WriteLine("There were " + myClassCount + " instances of MyClass and " + mySecondClassCount + " instances of MySecondClass in this list.");
            Console.ReadLine();
        }

        //This method returns a list filled with either MyClass or MySecondClass instances, depending on the random value.
        public static List<object> getList()
        {
            List<object> list = new List<object>();
            Random rand = new Random();

            for (int i = 0; i < 10; i++)
            {
                if (rand.Next(1, 2 + 1) > 1)
                {
                    var classObject = new MyClass();
                    list.Add(classObject);
                }
                else
                {
                    var classObject = new MySecondClass();
                    list.Add(classObject);
                }
            }
            return list;
        }

        class MyClass
        {
        }

        class MySecondClass
        {
        }
    }
}
Resulting output:

About
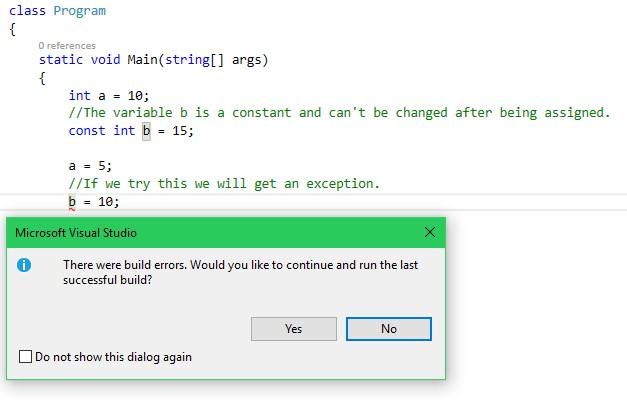
In this code snippet, we will learn about constants in C#.
A constant is a variable that is marked with the const keyword. Such a variable can only have its value set once at compile-time, after that it can’t be changed anymore.
Note: There are also readonly variables, see how they differ from const here.
Let’s have a look at the code below to see how to declare a constant variable.
Code:
using System;

namespace constants
{
    class Program
    {
        static void Main(string[] args)
        {
            int a = 10;
            //The variable b is a constant and can't be changed after being assigned.
            const int b = 15;

            a = 5;
            //If we try this we will get an exception.
            //b = 10;

            Console.WriteLine("a: " + a + " b:" + b);
            Console.ReadLine();
        }
    }
}
Resulting output:
About
In this code snippet, we will take a look at conversion operator overloading in C#.
Conversion operators can be overloaded just like regular operators. This is useful when you want to be able to convert your custom object to another type. We have two types of conversions, implicit and explicit. Implicit conversion can be “just done” no special syntax is required. Meanwhile, explicit conversion requires casting.
Let’s look at the code example below to see how to overload conversion operators.
Code:
using System;

namespace conversionOperatorOverloading2
{
    class Program
    {
        static void Main(string[] args)
        {
            int num = 2;

            //Cast num of type int to type of MyNumberClass.
            MyNumberClass number = (MyNumberClass)num;
            //This can be done implicitly so there is really no need to do this: (MyNumberClass)
            MyNumberClass number2 = num;


            //Cast MyNumberClass to int. This must be done explicitly like so: (int)
            Console.WriteLine("Int value of number: " + (int)number);

            Console.ReadLine();
        }

        class MyNumberClass
        {
            public string Number { get; set; }

            public MyNumberClass(string number)
            {
                Number = number;
            }

            public static explicit operator int(MyNumberClass display)
            {
                //Here we perform the conversion from our custom type to an int.
                switch (display.Number)
                {
                    case "zero": return 0;
                    case "one": return 1;
                    case "two": return 2;
                    case "three": return 3;
                    //You get the idea...
                    default: return 0;
                }
            }

            public static implicit operator MyNumberClass(int num)
            {
                //Here we perform the conversion from int to our custom type.
                switch (num)
                {
                    case 0 : return new MyNumberClass("zero");
                    case 1: return new MyNumberClass("one");
                    case 2: return new MyNumberClass("two");
                    case 3: return new MyNumberClass("three");
                    //You get the idea...
                    default: return new MyNumberClass("zero");
                }
            }
        }
    }
}
Resulting output:

About
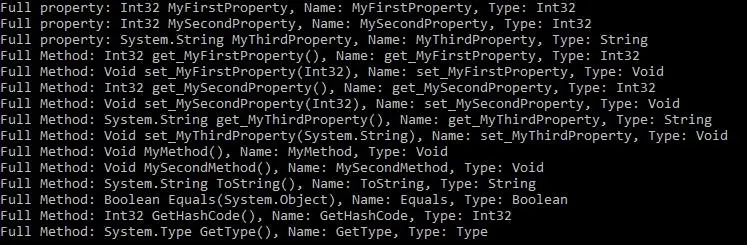
In this code snippet, we will take a look at reflection in C#.
Reflection is used to get metadata(information) about an object at runtime. We can get members(properties, methods) of objects and their data types. Reflection is also used for late binding. The ability to see the metadata of an object is for example, useful is when you use generics, as you don’t necessarily know the data type of a generic member until the object is created.
Let’s look at the code example below to see how reflection is used.
Code:
using System;
//Add this.
using System.Reflection;

namespace Reflection
{
    class Program
    {
        static void Main(string[] args)
        {
            //Specify namespace.class and get back a Type object that contains all the info about namespace.class.
            Type T = Type.GetType("Reflection.MyClass");

            //Or ...

            Type T2 = typeof(MyClass);

            //Get methods, classes, properties, ... and save them in an array.
            PropertyInfo[] properties =  T.GetProperties();
            MethodInfo[] methods = T.GetMethods();

            //Iterate through array and write out the attributes of your methods, classes, properties, ....
            foreach (var property in properties)
            {
                Console.WriteLine("Full property: "+property+", Name: "+property.Name + ", Type: " + property.PropertyType.Name);
            }

            foreach (var method in methods)
            {
                Console.WriteLine("Full Method: " + method + ", Name: " + method.Name + ", Type: " + method.ReturnType.Name);
            }

            Console.ReadLine();
        }
    }

    class MyClass
    {
        public int MyFirstProperty { get; set; }
        public int MySecondProperty { get; set; }
        public string MyThirdProperty { get; set; }

        public void MyMethod()
        {
            Console.WriteLine("MyMethod did this.");

        }

        public void MySecondMethod()
        {
            Console.WriteLine("MySecondMethod did this.");
        }

    }
}
Resulting output:

About
In this code snippet, we will take a look at operator overloading in C#.
Just like methods, operators can be overloaded too. In the code below we have an example with geometric shapes. If we use the + operator on two objects of GeomentricShapes we get an error. This happens because the compiler doesn’t know what is supposed to happen when the + operator is used on a GeomentricShapes object. We have to overload the + operator and write the code to be executed when two GeomentricShapes objects are added together.
Let’s look at the code example below to see how to overload operators.
Code:
using System;
namespace OperatorOverloading
{
class Program
{
static void Main(string[] args)
{
Square square1 = new Square(15, 20);
Square square2 = new Square(33, 8);
Console.WriteLine("Square 1 Area: " + square1.Area);
Console.WriteLine("Square 1 Circumference: " + square1.Circumference);
Console.WriteLine("");
Console.WriteLine("Square 2 Area: " + square2.Area);
Console.WriteLine("Square 2 Circumference: " + square2.Circumference);
Console.WriteLine("");
Console.WriteLine("");
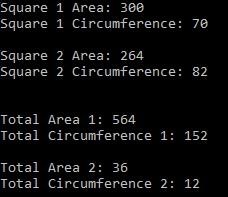
GeometricShapes geoShape = square1 + square2;
Console.WriteLine("Total Area 1: " + geoShape.Area);
Console.WriteLine("Total Circumference 1: " + geoShape.Circumference);
Console.WriteLine("");
GeometricShapes geoShape2 = square1 - square2;
Console.WriteLine("Total Area 2: " + geoShape2.Area);
Console.WriteLine("Total Circumference 2: " + geoShape2.Circumference);
Console.WriteLine("");
Console.ReadLine();
}
}
class GeometricShapes
{
public double Area { get; set; }
public double Circumference { get; set; }
public GeometricShapes()
{
}
public GeometricShapes(double area, double circumference)
{
this.Area = area;
this.Circumference = circumference;
}
//Operator overloading.
public static GeometricShapes operator +(GeometricShapes shape1, GeometricShapes shape2)
{
//Here we define what happens when the + operator will be used on a GeometricShapes instance.
return new GeometricShapes((shape1.Area + shape2.Area), (shape1.Circumference + shape2.Circumference));
}
public static GeometricShapes operator -(GeometricShapes shape1, GeometricShapes shape2)
{
//Here we define what happens when the - operator will be used on a GeometricShapes instance.
return new GeometricShapes(Math.Abs(shape1.Area - shape2.Area), Math.Abs(shape1.Circumference - shape2.Circumference));
}
}
class Square : GeometricShapes
{
public double SideA { get; set; }
public double SideB { get; set; }
public Square(double sideA, double sideB)
{
this.SideA = sideA;
this.SideB = SideB;
this.Area = sideA * sideB;
this.Circumference = (sideA * 2) + (sideB * 2);
}
}
} Resulting output:
About
In this code snippet, we will take a look at attributes in C#.
Attributes are used to add additional information(metadata) to code. For example, you can use [Serializable] to indicate that a class can be serialized. Or as I will demonstrate in the code example a method can be marked as obsolete and Visual Studio will warn you when you attempt to use the obsolete method.
There are also assembly attributes that can be used to set things like the assembly version, culture, title, etc. Here is a practical example of an assembly level attribute being used to give access to all types marked with the internal access modifier to another assembly.
Note: You can even create your own custom attributes.
Let’s look at the code example below to see how to use attributes.
Code:
using System;

namespace Attributes
{
    class Program
    {
        static void Main(string[] args)
        {
            HelloClass.helloMethod();

            HelloClass.helloMethod("Me");
        }
    }

    class HelloClass
    {
        [ObsoleteAttribute("Use helloMethod(\"name\"). If there is no name put in an empty string as parameter.")]
        public static void helloMethod()
        {
            Console.WriteLine("Hello World");
            Console.ReadLine();
        }

        public static void helloMethod(string name)
        {
            if (name == "")
            {
                Console.WriteLine("Hello World");
                Console.ReadLine();
            }
            else
            {
                Console.WriteLine("Hello " + name);
                Console.ReadLine();
            }
        }
    }
} 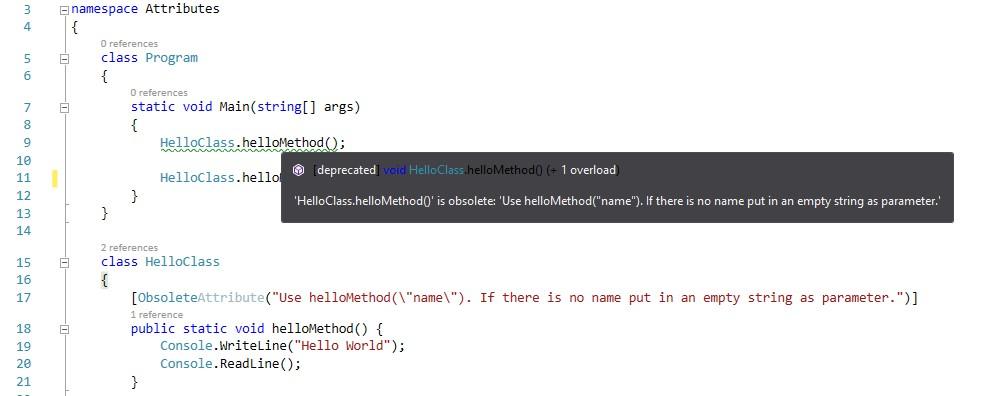
As you can see Visual Studio warns us that the method we are trying to invoke(call) is obsolete and displays the message we typed in earlier.
Resulting output:
About
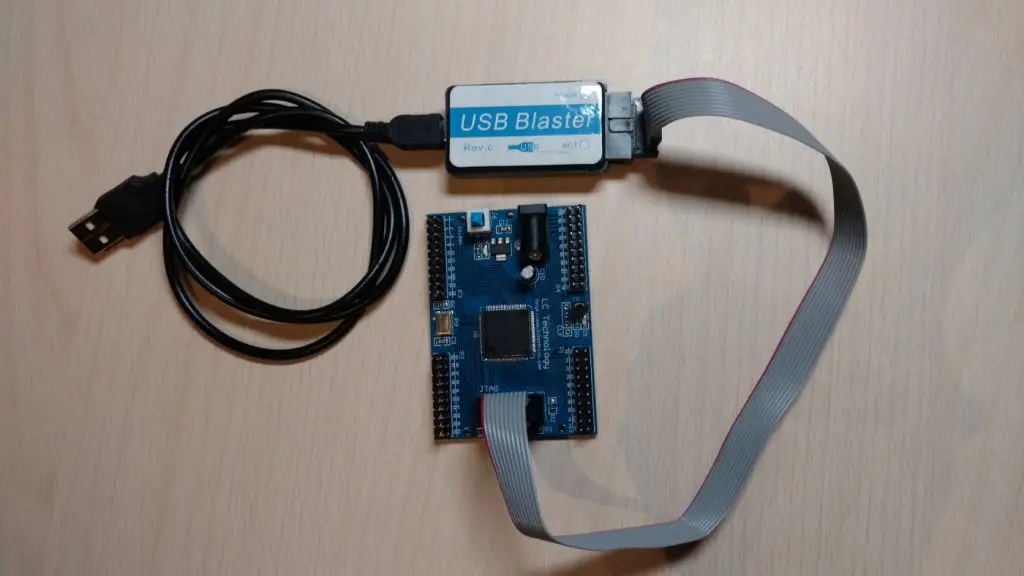
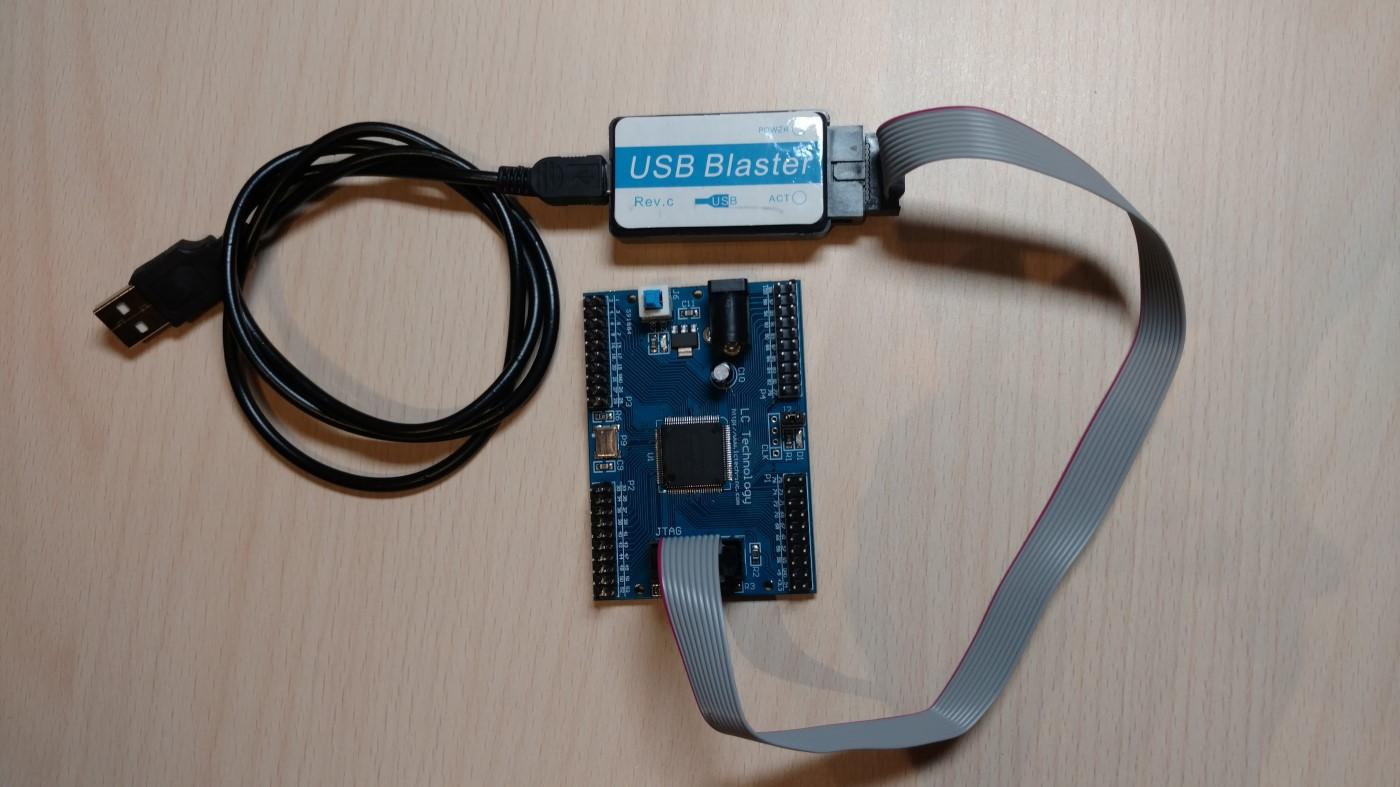
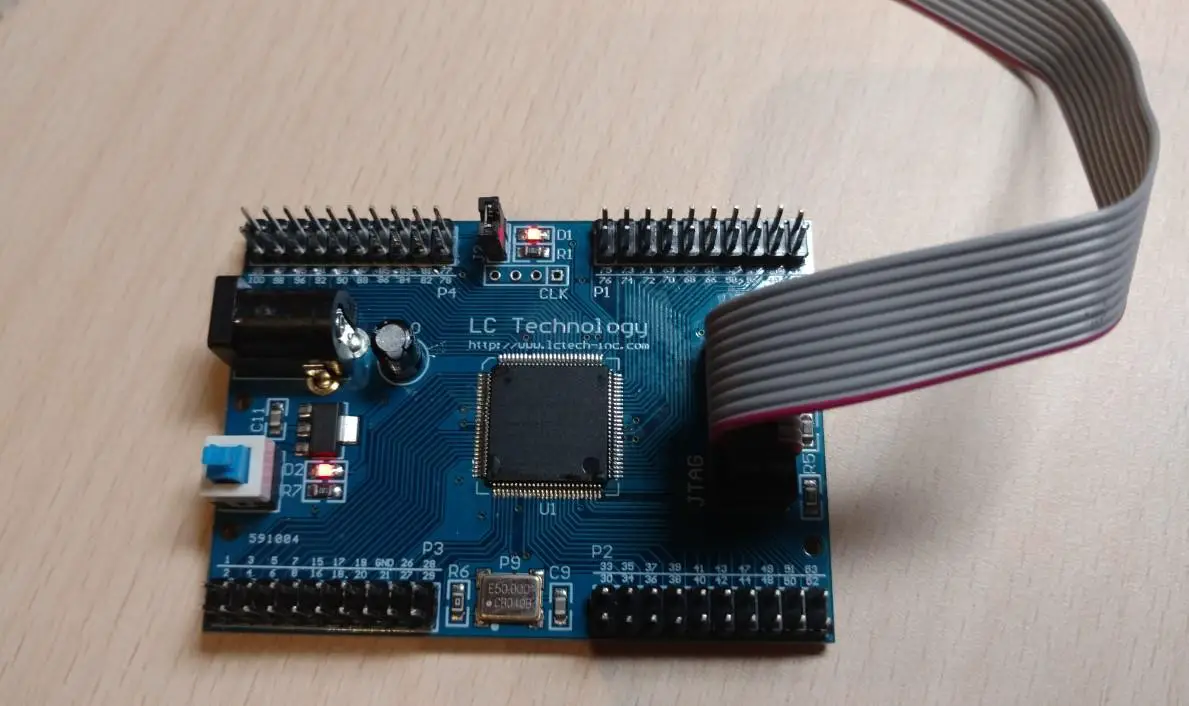
This tutorial will cover the hardware and software setup for the MAX II EPM240 CPLD. We will also make a simple logic design in Quartus to upload to the CPLD.
This little dev board can be picked up on eBay or Aliexpress for around 10 bucks(including the USB blaster). It’s cheap, easy and simple compared to some of the other FPGA dev boards. Despite that, I didn’t find a lot of tutorials and projects(compared to the Arduino stuff) with this board so I thought I’d make a tutorial.
Hardware Used
- #adAmazon LinkMAX II EMP240 CPLD Development Board
Documentation Files
Software setup
First, you will have to download and install Quartus 13.1 (there are other versions that support the MAX II CPLD but I will be using 13.1).
You can find Quartus 13.1 web edition here on Intels website but you will have to make an account and register as a company to be able to download the software(apparently you can just make up a company as they don’t really check).
Alternatively, you can go on pirate bay, search for Quartus 13.1 web edition and download it from there.
After having downloaded Quartus go ahead and install it. I am not going to cover the installation here as it’s just like installing any other program. Check all the boxes, agree to everything, click next without reading, … you know the drill ;).
Hardware setup
Connect the USB blaster to your computer. I believe that any drivers should get installed automatically so you don’t have to worry about that. If they don’t you can perform a manual install:
Connect the programmer, open device manager, find your device, open the properties and select the driver tab, click update driver, “Browse my computer for drivers” and select the “path to Quartus installation”\quartus\drivers\
Next, connect the ribbon JTAG cable from the USB blaster to the development board.
Usually, the CPLD will already have a blink “program” uploaded to it, so you should see the top LED starting to blink. The bottom left one is the power indicator LED.
Logic design
Making a project
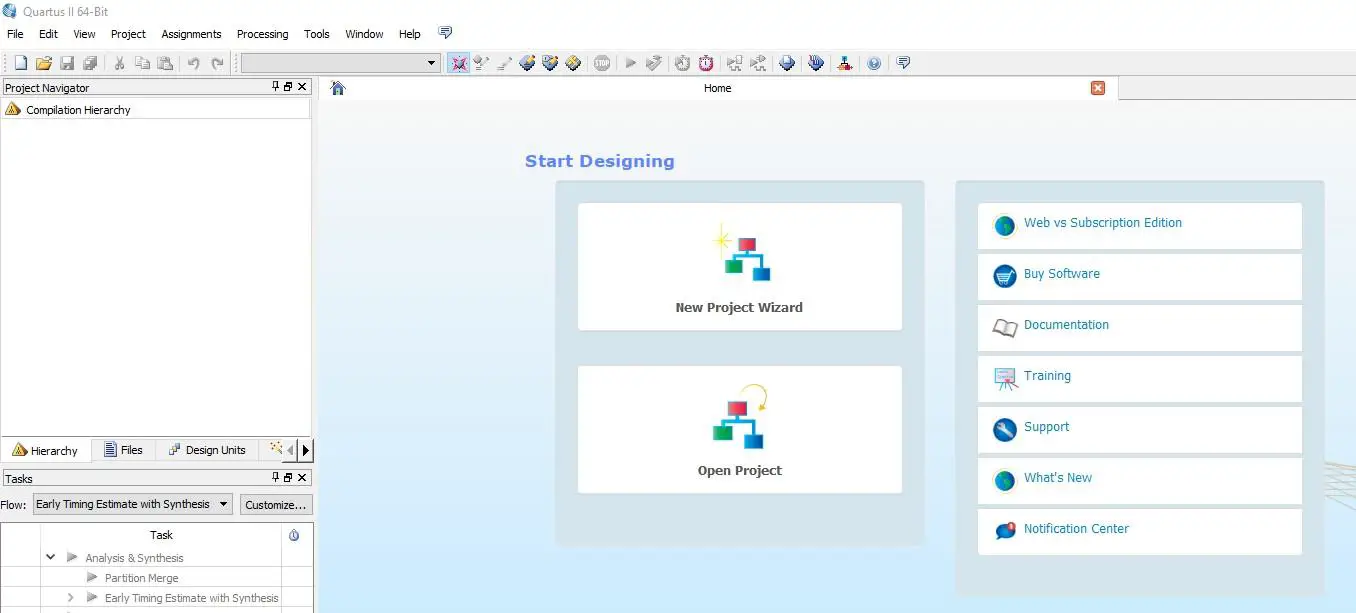
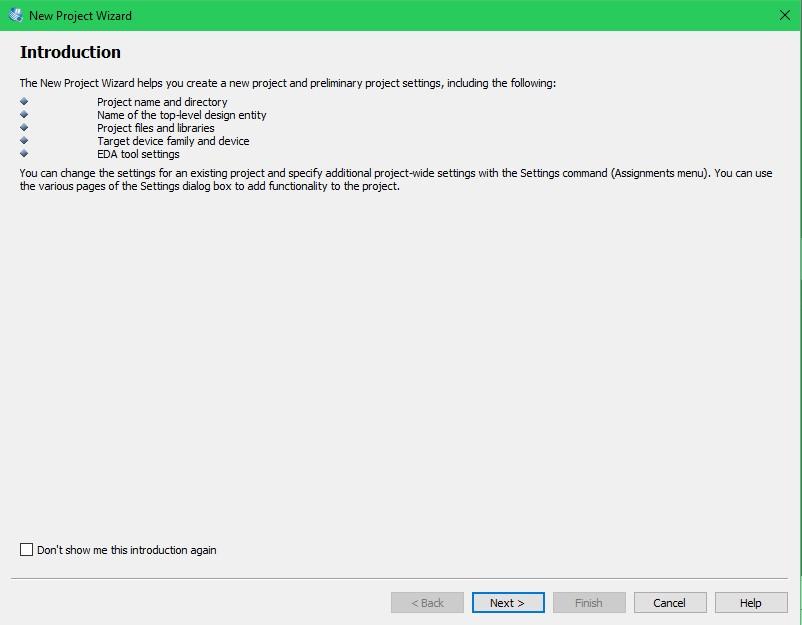
First, open up Quartus and start a new project using the project wizard.
Click next.
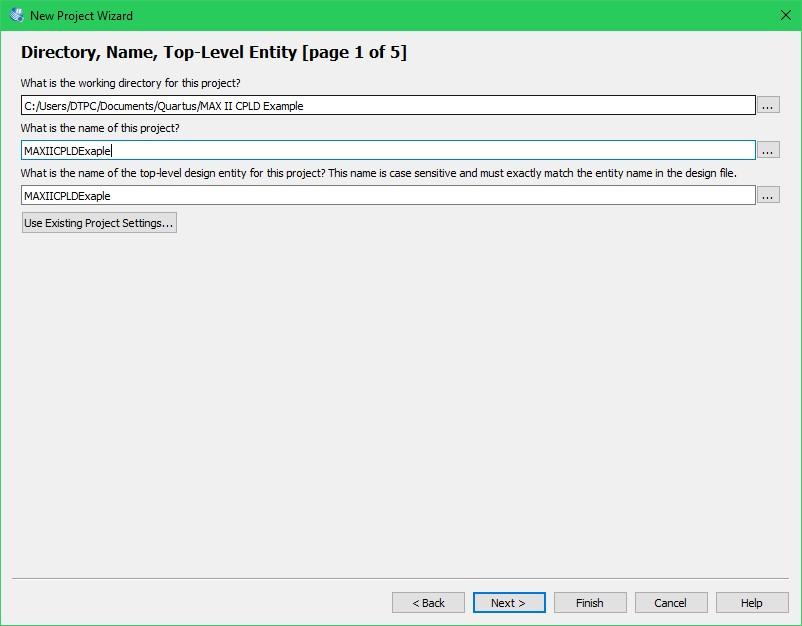
Name your project and set the path to where you want to save it then click next.
Just skip this one and click next.

Select the MAX II Device family. Under Available devices select the CPLD that you have on your board. In my case, it’s the EPM204T100C5. If you are using the same development board it should(to be sure you can just look at what it says on the chip) be the same for you.

Just click next.

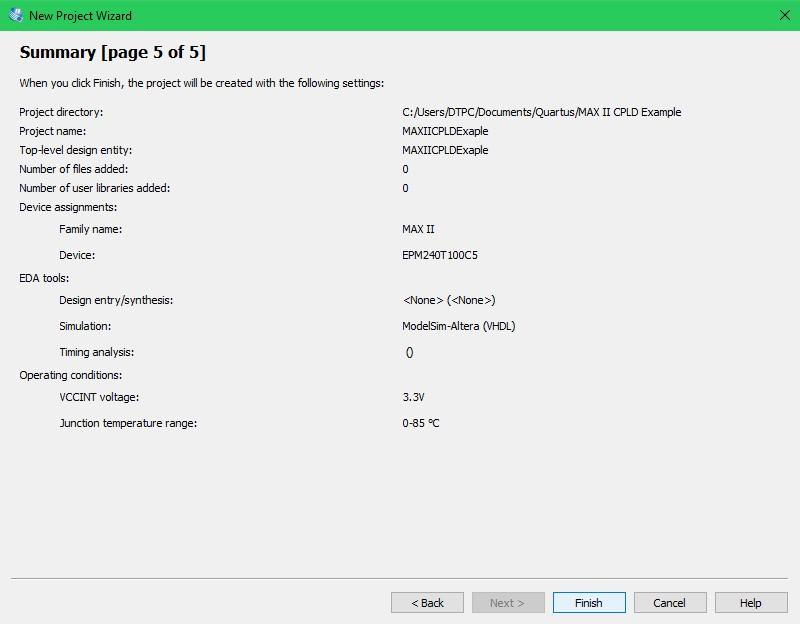
Click finish and we are all done with creating our project.
Making a design
We are going to make the “Hello World!” of digital electronics. A really basic logic design that will blink an LED.
We will take the onboard clock(2 MHz) and lower it’s frequency down to something the human eye can actually perceive as blinking. We will achieve this using a counter that will act as a frequency divider. The counter will be implemented in Verilog HDL. Then we will output the signal to the onboard LED.
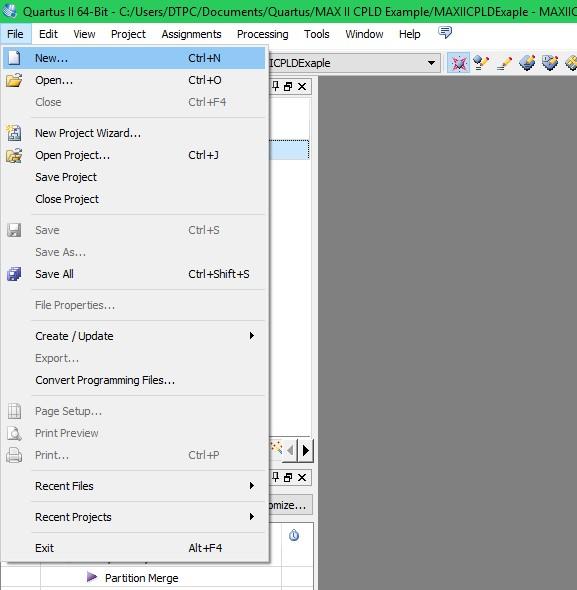
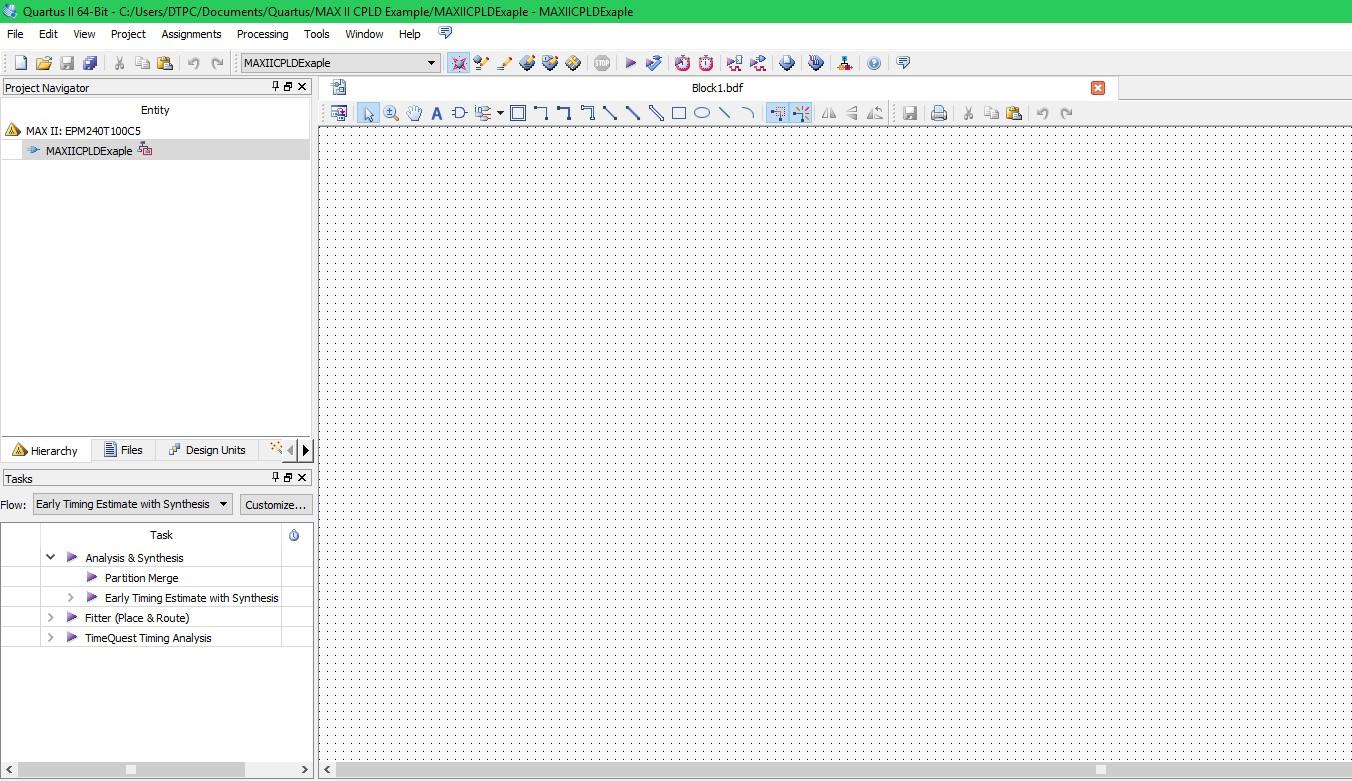
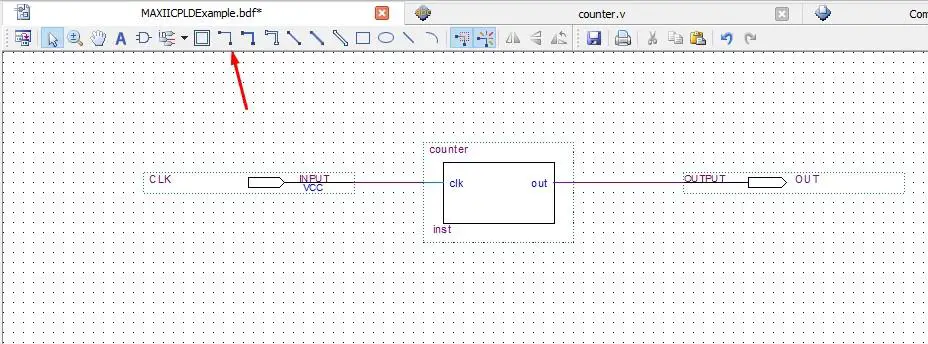
Add a new .bdf file: File > New > Design Files > Block Diagram/Schematic File.

Open the newly added file(on the left side in the project navigator). This is going to be our main design file where we implement all the functionality.
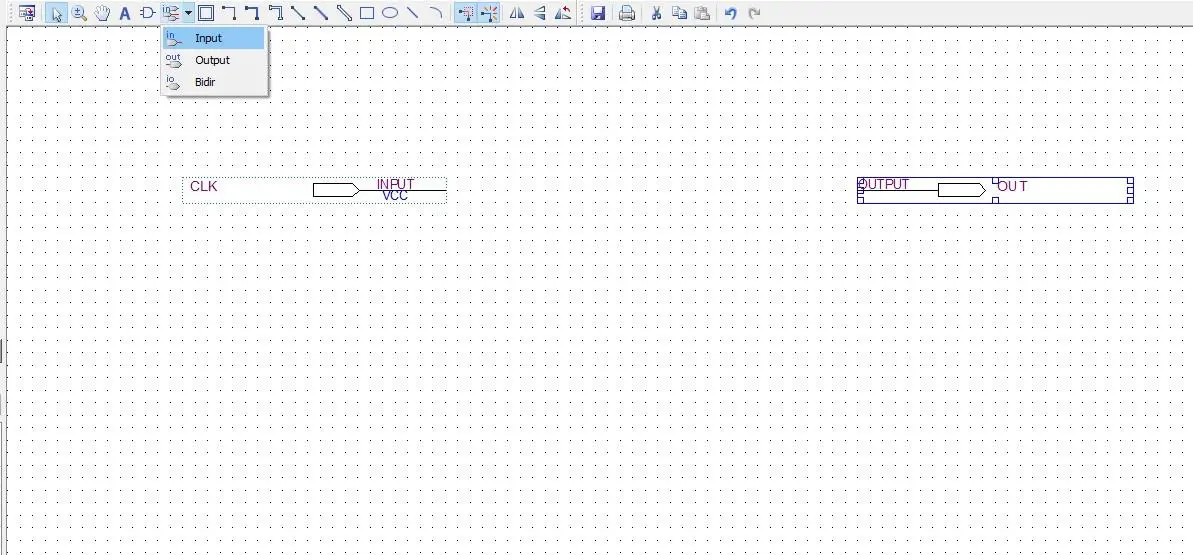
Let’s add an input and name it CLK as this input will get connected to the onboard(on the actual board not in the CPLD) clock. Let’s also add an output named OUT.
In Quartus, we have the option to either draw out discrete logic gates and connect them together or use HDL(hardware definition language). HDL files can be made into “logic block” symbols. These logic blocks can then be used the same way as symbols.
To create the counter in Verilog first add a new Verilog HDL file like so: select File > New > Verilog HDL(similar to adding the .bfd file before). After that paste in the following code:
module counter(clk, out);
	input clk;
	output out;

	reg out;

	reg[23:0] count;

	always @(posedge clk) begin
	   count <= count + 1'b1;
	   out <= count[23];
	end
endmodule
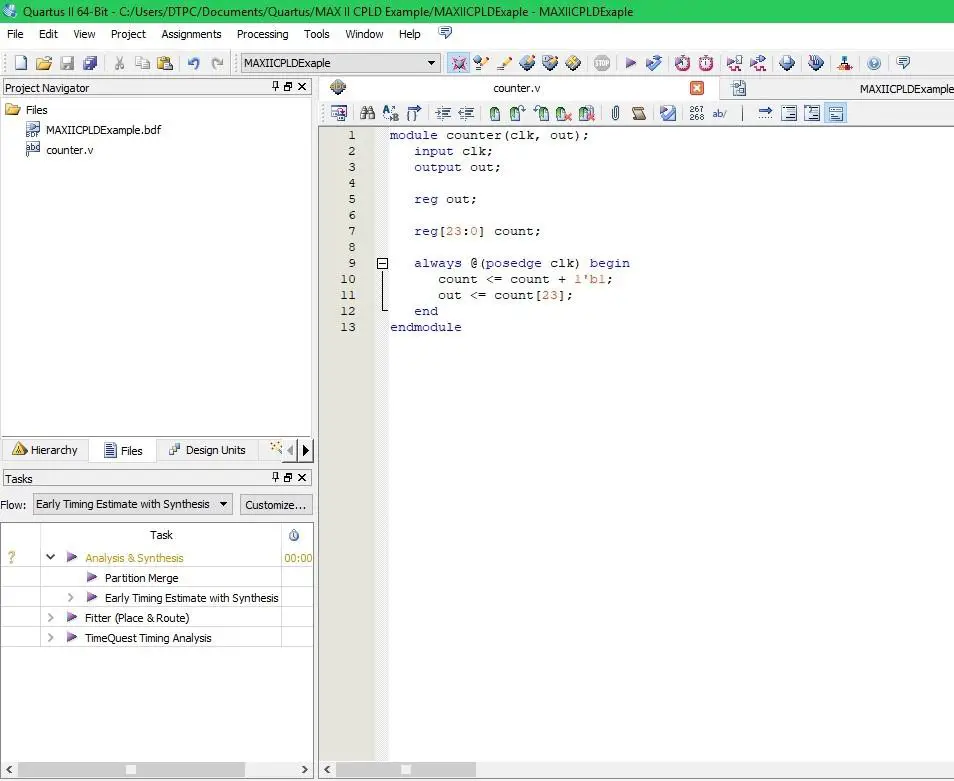
This is what you should have now. I won’t go into details about Verilog in this post, but the code above makes a counter that can be used for a frequency divider. For now, you don’t have to understand it. We just want to get the LED blinking.
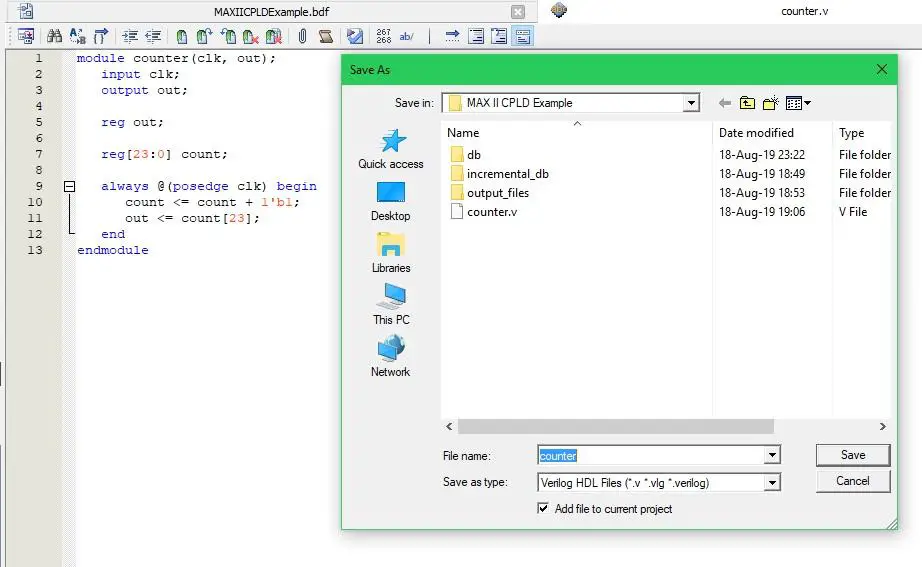
Save the Verilog file by: File > Save As.
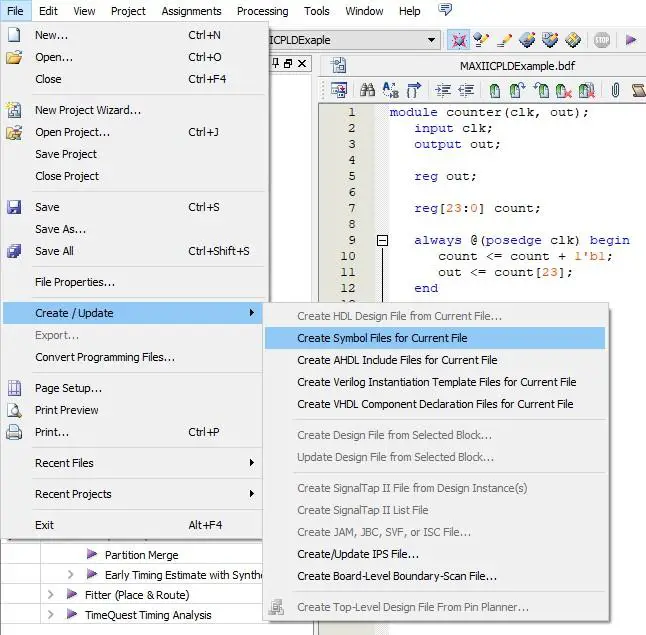
Now we need to make a logic block symbol out of our Verilog code. Select File > Create/Update > Create Symbol Files for Current File.
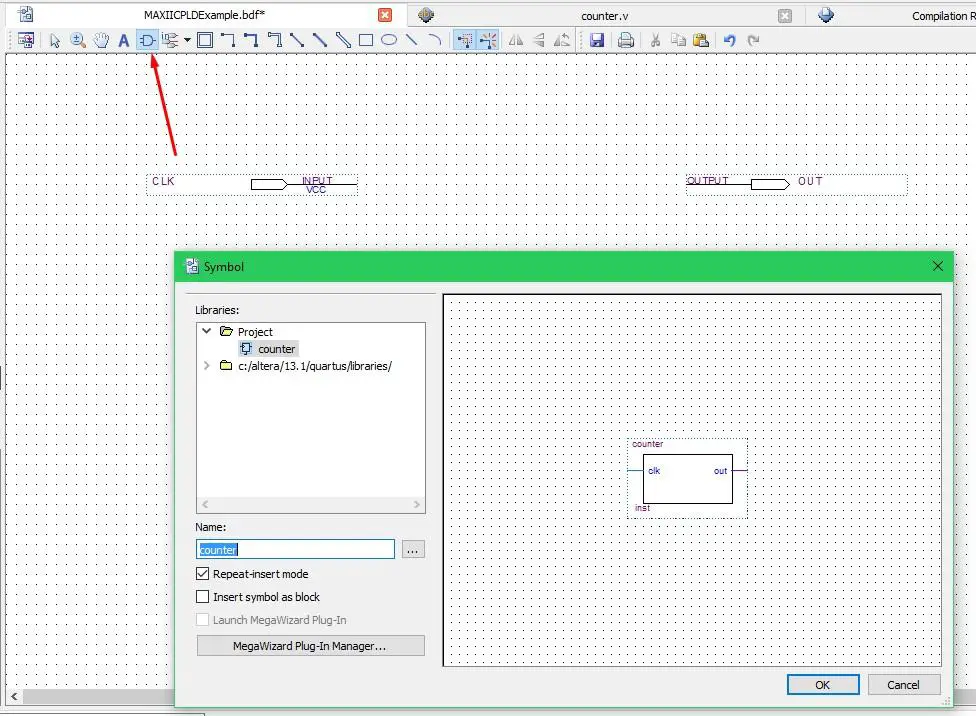
Switch back to the main file and click the add symbol button. Open the project folder and there you should see the counter symbol we have just created. Select it and add it to the main file.
Connect the CLK input to the counter clk input and connect the counter out to the OUT output. This can be done using the line tool.
OK, great we are all done with the design itself. What we have to do now is assign the input and output to actual pins. This can be done using the pin planner tool.
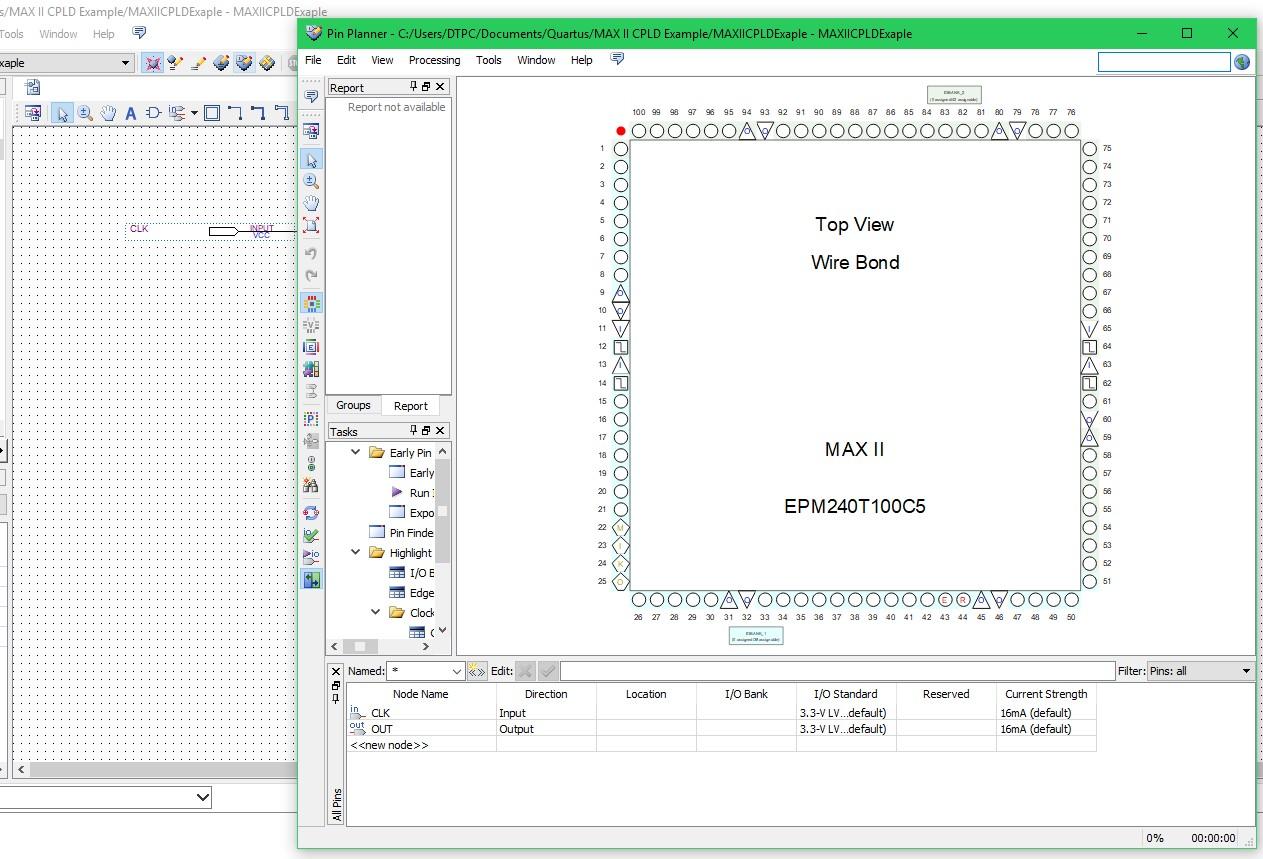
Click on the location cell of the CLK input and write PIN_12 this pin has a clock signal connected to it on the development board. For the OUT output write PIN_77 which is the pin that connects to the onboard LED.
Note: If the inputs aren’t visible under Node Name column compile the project(by pressing the play button in the toolbar).
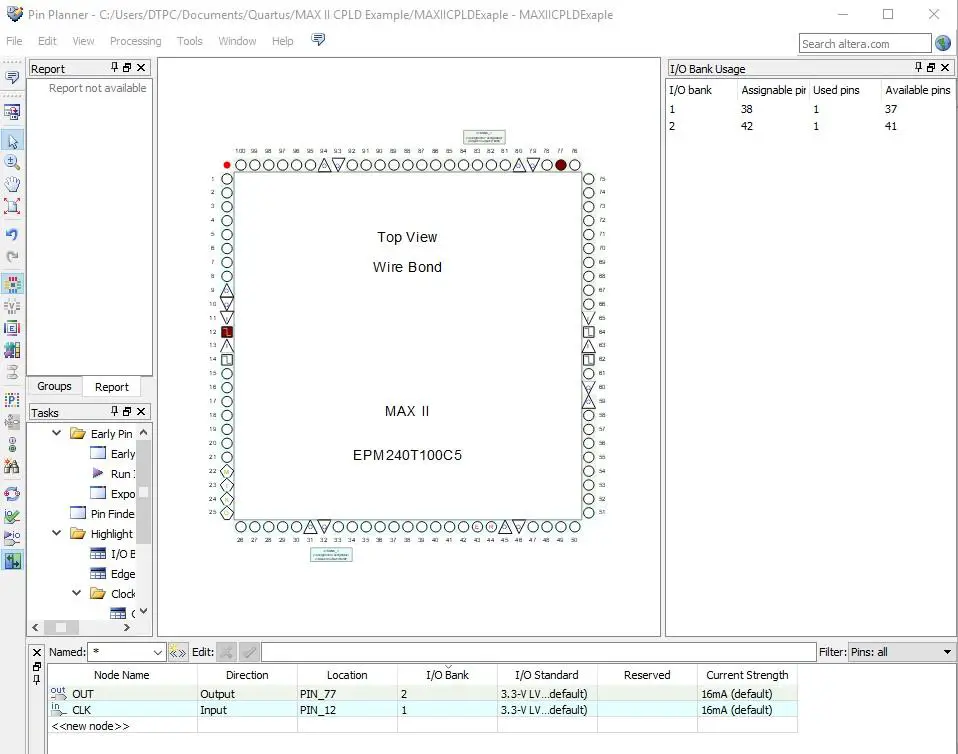
The pins are now assigned and you can also see them graphically represented on the picture above. The pin planner can now be closed.
Note: The pin numbering in the pin planner directly corresponds to the pin numbering on the development board.
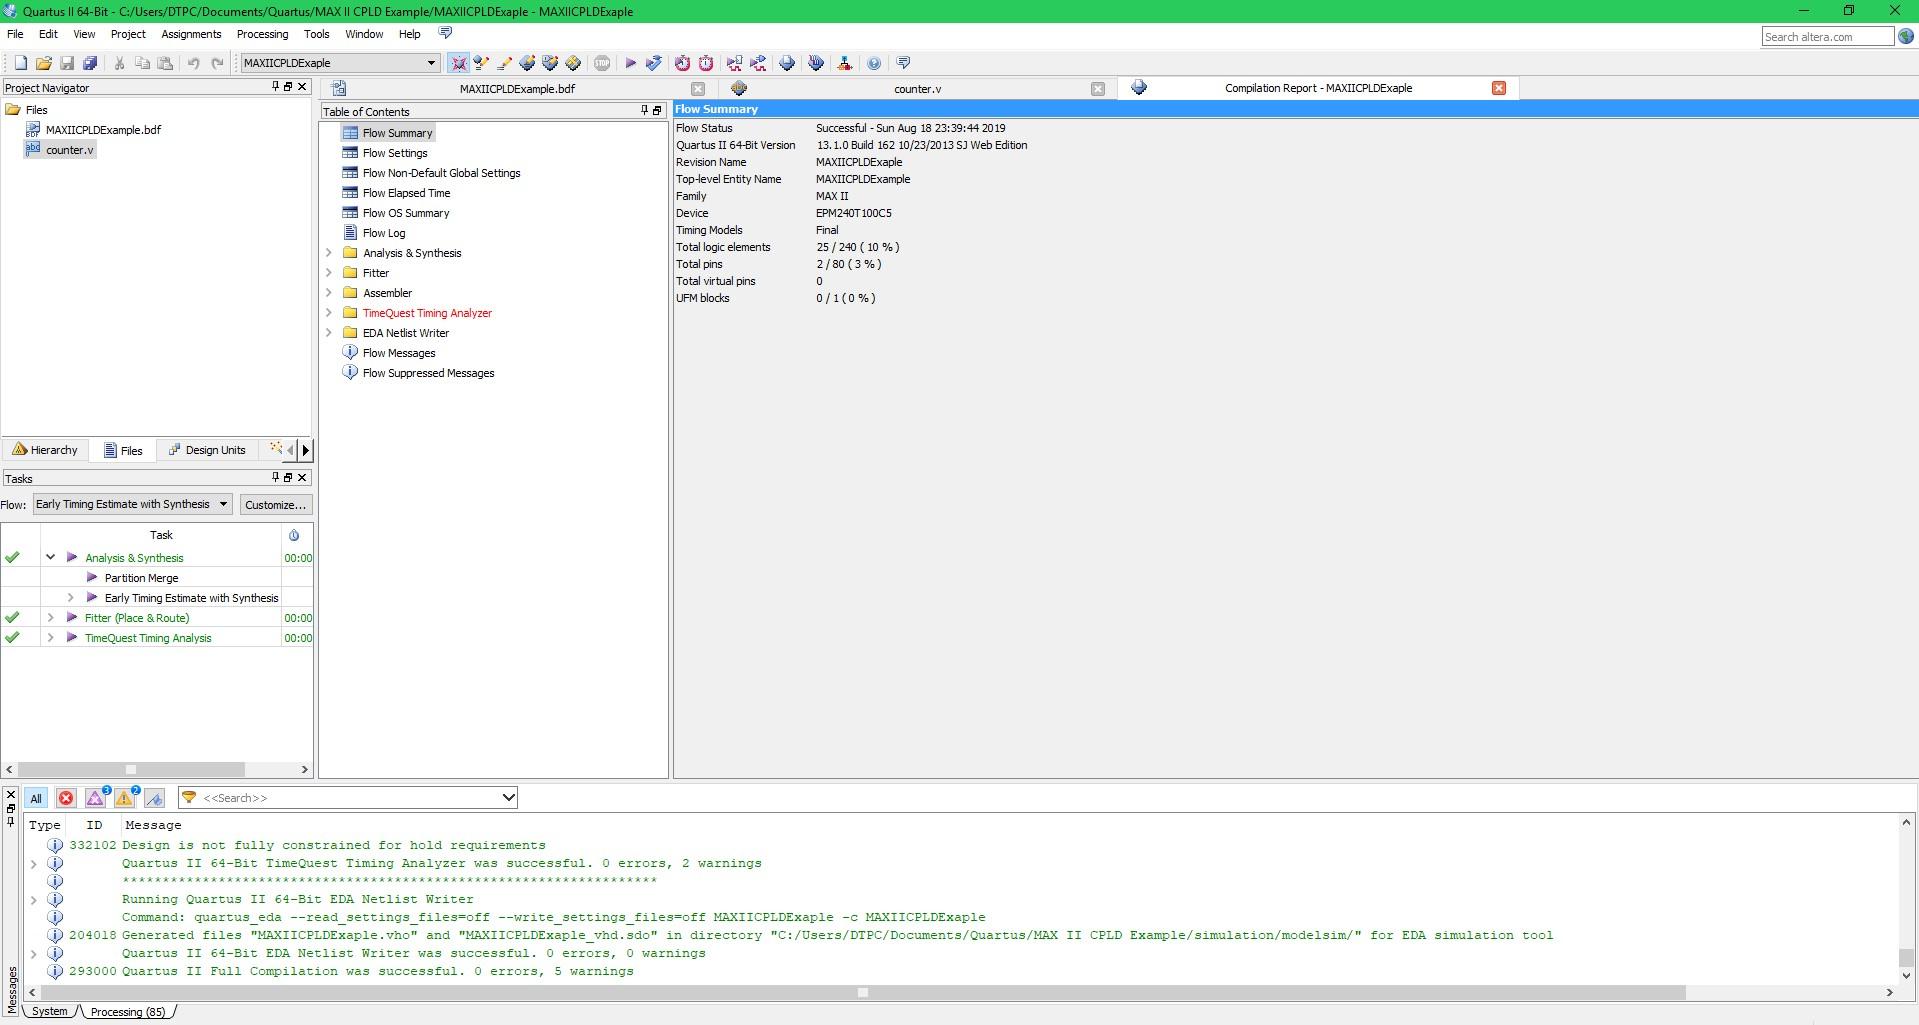
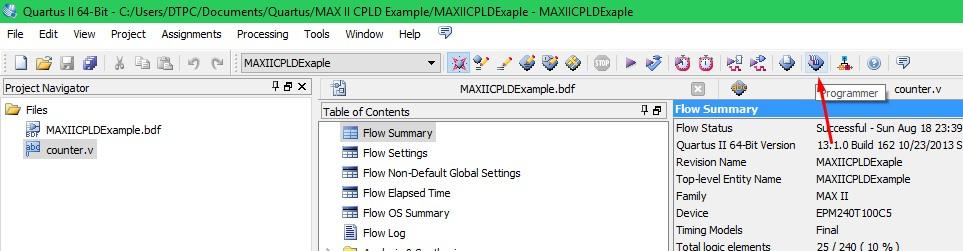
Next, the project has to be compiled to a bitstream(.sof file). This can be done by pressing the play button in the toolbar.

Success!
Now all that is left to do is to program the CPLD. To do so open up the programmer.
Once the programmer opens click hardware setup and selects the USB-Blaster. When you have highlighted/selected your USB blaster you can close the window.

Tick the first box under Program/Configure and press Start to program your board.
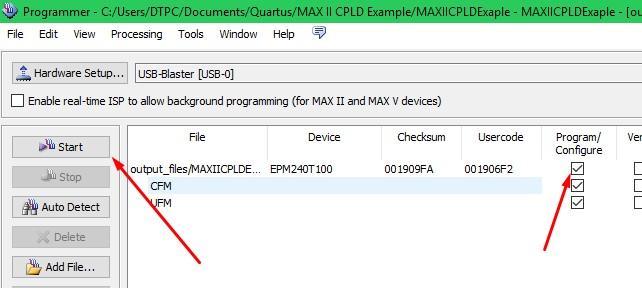
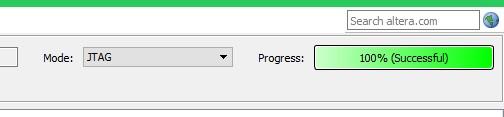
“Successful programming” and FINALLY!!!! we are done. The LED on your board should now be blinking.
Result
The output frequency can be altered by changing this line of Verilog code:
from: out <= count[23];
to: out <= count[18];
The lower number you put in the fewer times the input signal will get divided. As a result, the output frequency will be higher. You can see that in the second part of the video. The LED looks as if it’s always on because the frequency is too high. But you can see the waveform captured with a logic analyzer on the screen.
About
In this code snippet, we will take a look at preprocessor directives in C#.
Preprocessor directives are statements that get executed before compilation. They are designated by the # sign.
Preprocessor directives can, for example, be useful when debugging code. Suppose we make an if statement that checks whether the program is in debug mode. If so we would enable some diagnostic output otherwise we wouldn’t.
You might ask yourself why can’t I do this using a standard if statement. Well, you can, but that if statement is going to stay in your code. Meanwhile, any preprocessor directives will get executed at compile time and will be removed from the code itself.
Here is a complete list of preprocessor directives.
Let’s look at the code example below to see how to make use of preprocessor directives.
Code:
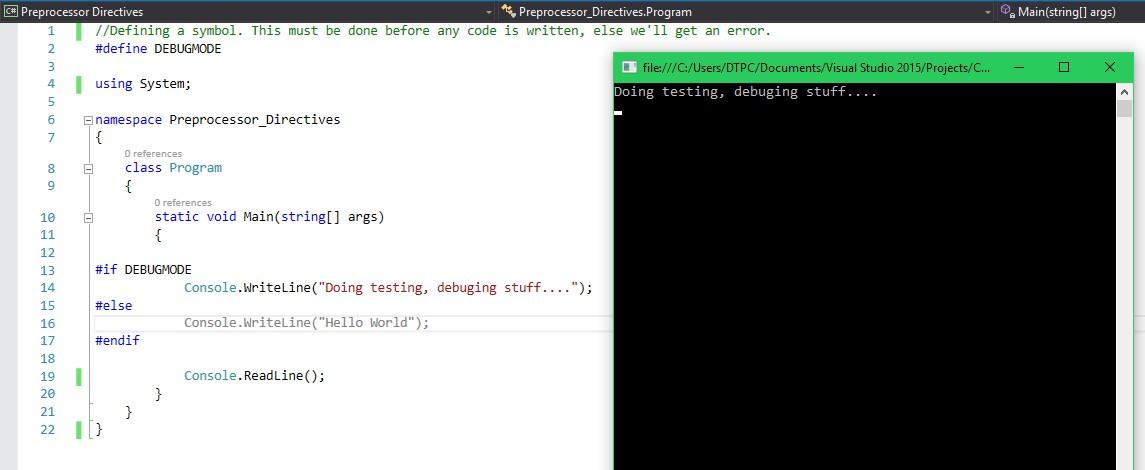
//Defining a symbol. This must be done before any code is written, else we'll get an error.
#define DEBUGMODE
using System;
namespace Preprocessor_Directives
{
    class Program
    {
        static void Main(string[] args)
        {
#if DEBUGMODE
            Console.WriteLine("Doing testing, debuging stuff....");
#else
            Console.WriteLine("Hello World");
#endif
            Console.ReadLine();
        }
    }
}
Resulting output:
DEBUGMODE is defined.
DEBUGMODE is commented out.

About
In this code snippet, we will take a look at GUIDs in C#.
A GUID or a Globally Unique Identifier(also known as a Universally unique identifier) is an alphanumeric sequence of characters that make up a completely unique identifier(at least in theory). One place GUIDs can be used is with databases to serve as a unique ID.
Let’s look at the code example below to see how to make a GUID.
Code:
using System;
namespace guid
{
    class Program
    {
        static void Main(string[] args)
        {
            //GUID creation.
            Guid GUID = Guid.NewGuid();
            //GUID to string conversion.
            string GUIDString = GUID.ToString();
            Console.WriteLine(GUIDString);
            //GUID in string format to guid conversion.
            Guid backToGUID = Guid.Parse(GUIDString);
            Console.ReadLine();
        }
    }
}