Home


About
In this code snippet, we will learn how to use the params keyword in C#.
The params keyword is used to define an array of input parameters for a method. Instead of explicitly defining every single one we can just pass in an array of parameters. As you can imagine when you have a lot of parameters this becomes very useful.
Let’s see the code example below.
Code:
using System;

namespace Params
{
    class Program
    {
        static void Main(string[] args)
        {
            Add(5,10,20,1,7);

            Console.ReadLine();
        }

        //Params is used to define an array of input parameters.
        //As you can imagine this would require a lot more work if every parameter would have to be defined.
        //Also for every different number of parameters we would have to define a separate overloaded method.
        public static void Add(params int[] numbers)
        {
            int sum = 0;

            foreach (var item in numbers)
            {
                sum += item;
            }

            Console.WriteLine(sum);
        }
    }
}
Resulting output:

About
In this code snippet, we will learn how to use access modifiers in C#.
Access modifiers are used to define the access level of types and members. The following access modifiers are available: public, private, protected, internal, protected internal, private protected.
- public members are accessible to everyone.
- private members are only accessible to code inside their class.
- protected members can only be accessed from their class or any derived(child) class.
- internal members can be accessed by any code inside the same assembly.
Let’s see how to use access modifiers in the code example below.
Code:
using System;
namespace AccessModifiers
{
class Program
{
static void Main(string[] args)
{
//Types of access modifiers
//Public members are accessible to everyone.
//Private members are only accessible to code inside their class.
//There are a few more access modifiers such as protected, internal, ...
//Protected members can only be accessed from their class or any derived(child) class.
//Internal members can be accessed by any code inside the same assembly.
MyClass MC = new MyClass();
//Can be accessed outside of the class as it's marked as public.
MC.MyPublicProperty = 10;
//Cannot be accessed outside of the class as it's marked as private.
//MC.MyPrivateProperty = 10;
//This method can be accessed ouotside it's class.
MC.MyPublicMethod();
//This method can't be accessed outside of it's class.
//MC.MyPrivateMethod();
Console.ReadLine();
}
}
class MyClass
{
public int MyPublicProperty { get; set; }
private int MyPrivateProperty { get; set; }
public void MyPublicMethod()
{
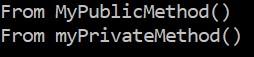
Console.WriteLine("From MyPublicMethod()");
//This method can only be called from inside its class.
MyPrivateMethod();
}
private void MyPrivateMethod()
{
Console.WriteLine("From myPrivateMethod()");
}
}
} Resulting output:
About
In this code snippet, we will learn about methods in C#.
A method is basically a code block with a name. It can have input parameters to pass data into the code block and it can have a return type to return data out of the code block. A method can be called by writing its name followed by a set of parentheses.
Methods can be designated as static meaning you don’t have to make an instance of the method’s class to use it. They also have an access modifier(public, private, …) which determines who that method can be called or invoked by.
Methods allow us to break code up into smaller code blocks that only perform one or a couple functions. Very importantly methods allow us to reuse code and thus make it easier to understand and maintain. For example, if we have to fix a bug or add a feature we only have to do it once in the method.
Let’s see how to implement and use a method in the code below.
Code:
using System;
namespace Methods
{
class Program
{
static void Main(string[] args)
{
//A method is called by writing its name followned by a set of parentheses.
MyMethod();
//This method will return a value.
Console.WriteLine(MySecondMethod());
//This method takes a string as an input parameter.
MyThirdMethod("From MyThird Method");
Console.ReadLine();
}
//This method is of type void and doesn't return any values.
public static void MyMethod()
{
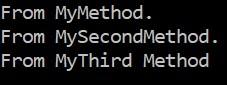
Console.WriteLine("From MyMethod.");
}
//This method is of type string and returns a string.
public static string MySecondMethod()
{
return "From MySecondMethod.";
}
//This method has an input parameter.
public static void MyThirdMethod(string text)
{
Console.WriteLine(text);
}
}
} Resulting output:

About
In this code snippet, we will learn about generics in C#.
You can make generic classes, properties, methods, and parameters. If we make something generic this means it doesn’t have a type. Or better said the type is determined at compile time.
This can be very useful. For example, let’s say we have a method called display() that takes some text in as an input parameter and then writes that text to the console window. If we want to write out an int we first have to convert it into a string. But if we make the input parameter generic we don’t have to worry about converting to the correct data type. Also, method return types can be generic as well.
Generic classes can have constraints applied to them. This will limit the types that can be used.
Let’s see how to implement generics in the code example below.
Code:
using System;
namespace Generics
{
class Program
{
static void Main(string[] args)
{
//Generic method.
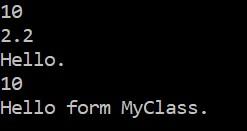
display<int>(10);
display<double>(2.2);
display<string>("Hello.");
//Generic class with generic properties and methods.
MyClass<int> mc1 = new MyClass<int>(10);
mc1.displayMyProperty<int>();
MyClass<string> mc2 = new MyClass<string>("Hello form MyClass.");
mc2.displayMyProperty<string>();
MyConstrainedClass<int> mcc = new MyConstrainedClass<int>();
//This will throw an error at compile time as object is a reference type
//and we made a constraint only allowing value types like int.
//MyConstrainedClass<object> mcc = new MyConstrainedClass<object>();
Console.ReadLine();
}
//Method with a generic input parameter. The "<T>" makes a method generic.
public static void display<T>(T inputData)
{
Console.WriteLine(inputData);
}
}
//Classes(and structs) can be generic too. The "<T>" makes a class generic.
class MyClass<T>
{
//The "<T>" makes the property generic.
public T MyProperty { get; set; }
public MyClass(T inputData)
{
MyProperty = inputData;
}
//Method with a generic return type and a generic input parameter. The "<T>" makes a method generic.
public static T aGenericMethod<T>(T inputData)
{
//This is a pointless method ... It just shows that a method can have a generic input parameter and return type.
return inputData;
}
//Method with a generic input parameter. The "<T>" makes a method generic.
public void displayMyProperty<T>()
{
//The "aGenericMethod" just passes the value of "MyProperty" through it... Again this is useless but it's just to show how generics work.
Console.WriteLine(aGenericMethod(MyProperty));
}
}
//Generic classes can also have constraints applied to them. This will limit the generic types that can be used.
//See possible constraints here: https://learn.microsoft.com/en-us/dotnet/csharp/programming-guide/generics/constraints-on-type-parameters
class MyConstrainedClass<T> where T : struct //This will only allow value types to be used.
{
//The "<T>" makes the property generic.
public T MyProperty { get; set; }
}
} Resulting output:

About
In this code snippet, we’ll take a look at classes in C#.
A class is like a blueprint to make an instance of an object. Inside a class, you can define class members like methods, properties, etc. Depending on the access modifier(public, private, …) set for each member we can control to who that specific member will be accessible.
Once you create a class you must create an instance of it to make an object. Only after creating an instance of a class can you access its members. Except if you mark a class member as static then you will be able to use it without creating an instance of its class.
Let’s look at the code example below to see how to make a class.
Code:
using System;

namespace @class
{
    class Program
    {
        static void Main(string[] args)
        {
            //Creating an instance of MyClass.
            MyClass MC = new MyClass();

            //Calling the MyMethod() method from the object of MyClass.
            MC.MyMethod();

            //Assigining values to our properties.
            MC.MyProperty = 10;
            MC.MySecondProperty = 15;

            //Getting the values from our properties.
            Console.WriteLine(MC.MyProperty);
            Console.WriteLine(MC.MySecondProperty);

            Console.ReadLine();
        }
    }

    class MyClass
    {
        //Visual studio shortcut for implementing a property:
        //1. write: prop
        //or write: propfull
        //2. pres TAB twice

        //Short way of implementing a property.
        public int MyProperty { get; set; }

        //Long way of implementing a property.
        //You can for example add some code for validation.
        //This way you can ensure that a value fits in a certain range of values before assigning it.
        private int myVar;

        public int MySecondProperty
        {
            get { return myVar; }
            set
            {
                if (value > 0)
                {
                    myVar = value;
                }
            }
        }

        public void MyMethod()
        {
            Console.WriteLine("Hi.");
        }
    }
}
Resulting output:
About
In this code snippet, we will learn how to implement indexers in C#.
Indexers allow classes to be indexed just like arrays. To retrieve or set a value you just provide an index inside a set of square brackets just like you would for an array.
Let’s see how to implement and use indexers in the code snippet below.
Code:
using System;
namespace Indexer
{
class Program
{
static void Main(string[] args)
{
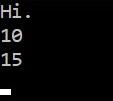
int[] intArr = new int[5] { 5,2,3,8,7 };
MyClass MC = new MyClass(intArr);
//Get element at the third index.
Console.WriteLine(MC[3]);
//Set the value using an indexer.
MC[3] = 20;
//Lets check the value again.
Console.WriteLine(MC[3]);
Console.ReadLine();
}
}
class MyClass
{
public int[] IntArray { get; set; }
public MyClass(int[] intArray)
{
IntArray = intArray;
}
//Indexer is defined with the "this" keyword.
public int this[int index]
{
get
{
return this.IntArray[index];
}
set
{
this.IntArray[index] = value;
}
}
}
} Resulting output:

About
In this code snippet, we’ll take a look at what the ref keyword does in C#.
Variables can be passed either by value or by reference.
Usually, we do it by value meaning you pass just the value and not the variable itself. So, any changes made locally inside the method scope won’t be seen outside of the method scope.
Meanwhile, if we pass a variable as a reference is essentially like passing in the variable itself. Any changes made locally inside the method to the variable will occur outside of the method scope as well.
Let’s see the code example below.
Code:
using System;
namespace PassByReference
{
class Program
{
static void Main(string[] args)
{
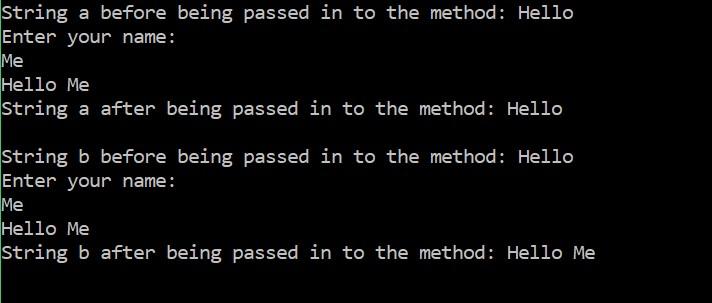
string a = "Hello ";
string b = "Hello ";
Console.WriteLine("String a before being passed in to the method: " + a);
writeToConsole(a);
Console.WriteLine("String a after being passed in to the method: " + a);
Console.WriteLine("");
Console.WriteLine("String b before being passed in to the method: " + b);
writeToConsole(ref b);
Console.WriteLine("String b after being passed in to the method: " + b);
Console.ReadLine();
}
public static void writeToConsole(ref string inputString)
{
//Prompt user for name.
Console.WriteLine("Enter your name: ");
//Read user input.
string consoleInput = Console.ReadLine();
//Combine strings.
inputString = inputString + consoleInput;
//Write to console.
Console.WriteLine(inputString);
}
public static void writeToConsole(string inputString)
{
//Prompt user for name.
Console.WriteLine("Enter your name: ");
//Read user input.
string consoleInput = Console.ReadLine();
//Combine strings.
inputString = inputString + consoleInput;
//Write to console.
Console.WriteLine(inputString);
}
}
} Resulting output:
About
In this code snippet, we will learn about exceptions in C#.
When an error occurs in an application an exception will be thrown. If it’s left unhandled the application will crash. Exceptions also get thrown if you try to access a resource on your computer that is unavailable. For example, a file that doesn’t exist or is already opened by another program.
To prevent your application form crashing you must always implement exception handling with the try catch block when dealing with resources that you have no direct control over(files, networking, COM ports, …).
When you write your own code you can also throw exceptions to indicate that an error has occurred. And if you need you can also make custom exceptions.
To create our own exception we simply create a class and make it inherit from the Exception class. Any custom properties and methods can be added to our new custom exception class. You then throw and handle the custom exception the same way you would any other exception.
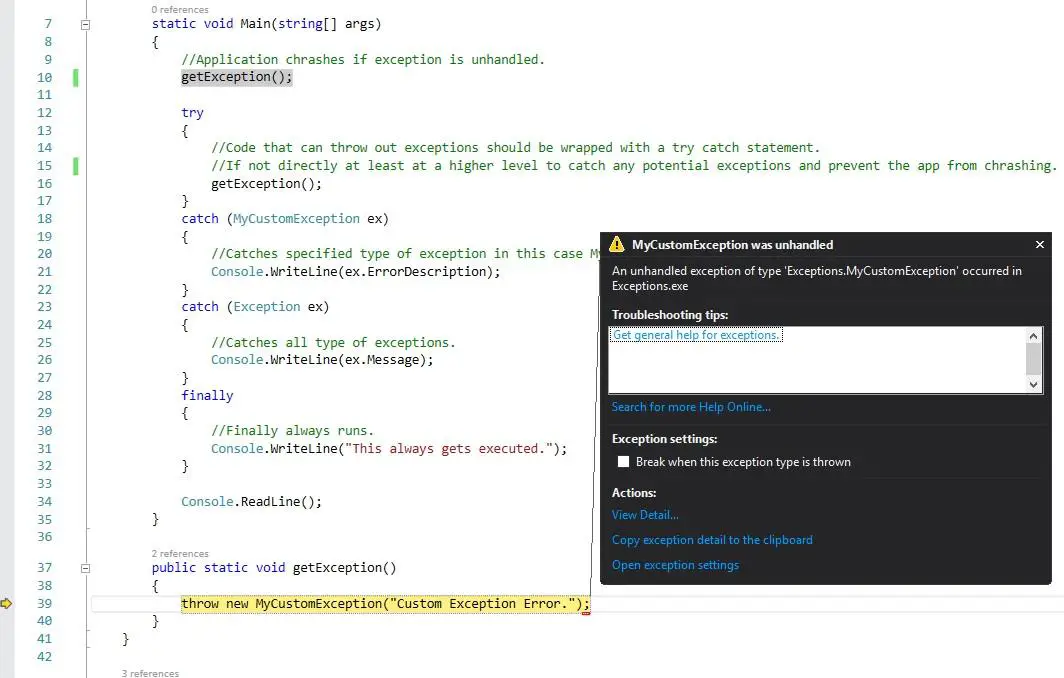
Let’s see how to handle, throw and make custom exceptions in the code example below.
Code:
using System;
namespace Exceptions
{
class Program
{
static void Main(string[] args)
{
//Application crashes if exception is unhandled.
//getException();
try
{
//Code that can throw out exceptions should be wrapped with a try catch statement.
//If not directly at least at a higher level to catch any potential exceptions to prevent the app from crashing.
getException();
}
catch (MyCustomException ex)
{
//Catches specified type of exception in this case MyCustomException.
Console.WriteLine(ex.ErrorDescription);
}
catch (Exception ex)
{
//Catches all type of exceptions.
Console.WriteLine(ex.Message);
}
finally
{
//Finally always runs.
Console.WriteLine("This always gets executed.");
}
Console.ReadLine();
}
public static void getException()
{
throw new MyCustomException("Custom Exception Error.");
}
}
class MyCustomException : Exception
{
//To create a custom exception we simply make a class and make it inherit from the Exception class.
public string ErrorDescription { get; set; }
public MyCustomException(string error)
{
ErrorDescription = error;
}
}
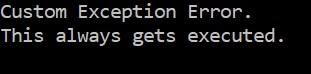
} Result
What happens if the exception is left unhandled.
Handling the exception.

About
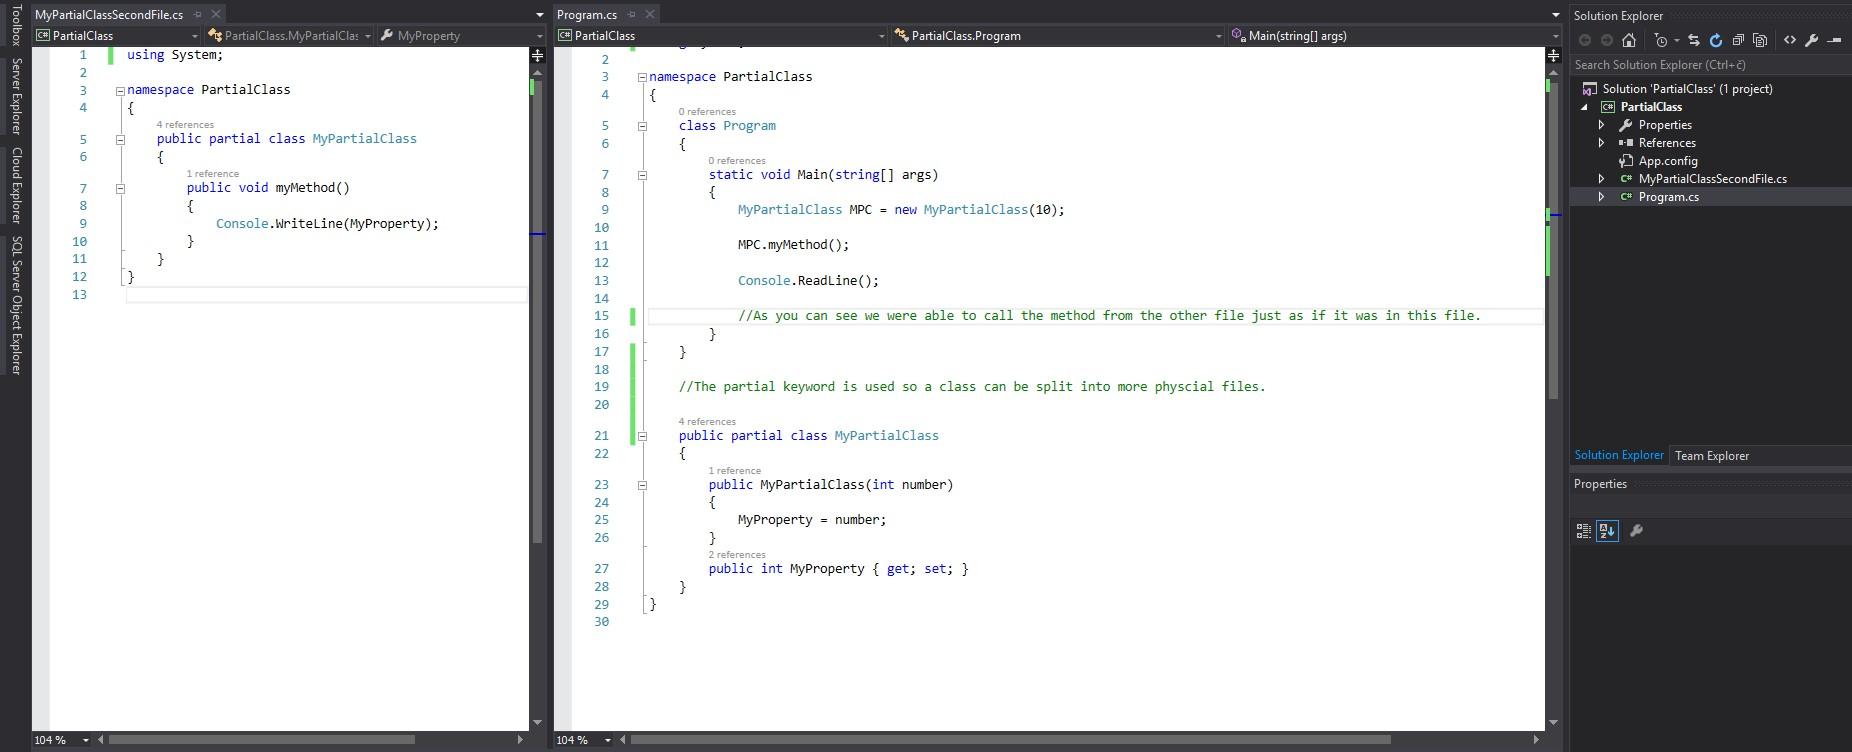
In this code snippet, we will found out what partial classes are in C#.
If a class is marked with the partial keyword a class with the same name can be declared in another file. Both of the classes will now share everything between them and act as one. The partial keyword basically allows us to split up a class into different parts that can be put into different files.
Let’s look at the code below to see how to make a partial class.
Code:
First file
using System;

namespace PartialClass
{
    class Program
    {
        static void Main(string[] args)
        {
            MyPartialClass MPC = new MyPartialClass(10);

            MPC.myMethod();

            Console.ReadLine();

            //As you can see we were able to call the method from the other file just as if it was in this file.
        }
    }

    //The partial keyword is used so a class can be split into more physcial files.

    public partial class MyPartialClass
    {
        public MyPartialClass(int number)
        {
            MyProperty = number;
        }
        public int MyProperty { get; set; }
    }
}
Second file
using System;

namespace PartialClass
{
    public partial class MyPartialClass
    {
        public void myMethod()
        {
            Console.WriteLine(MyProperty);
        }
    }
}
Example in Visual Studio
Resulting output:
About
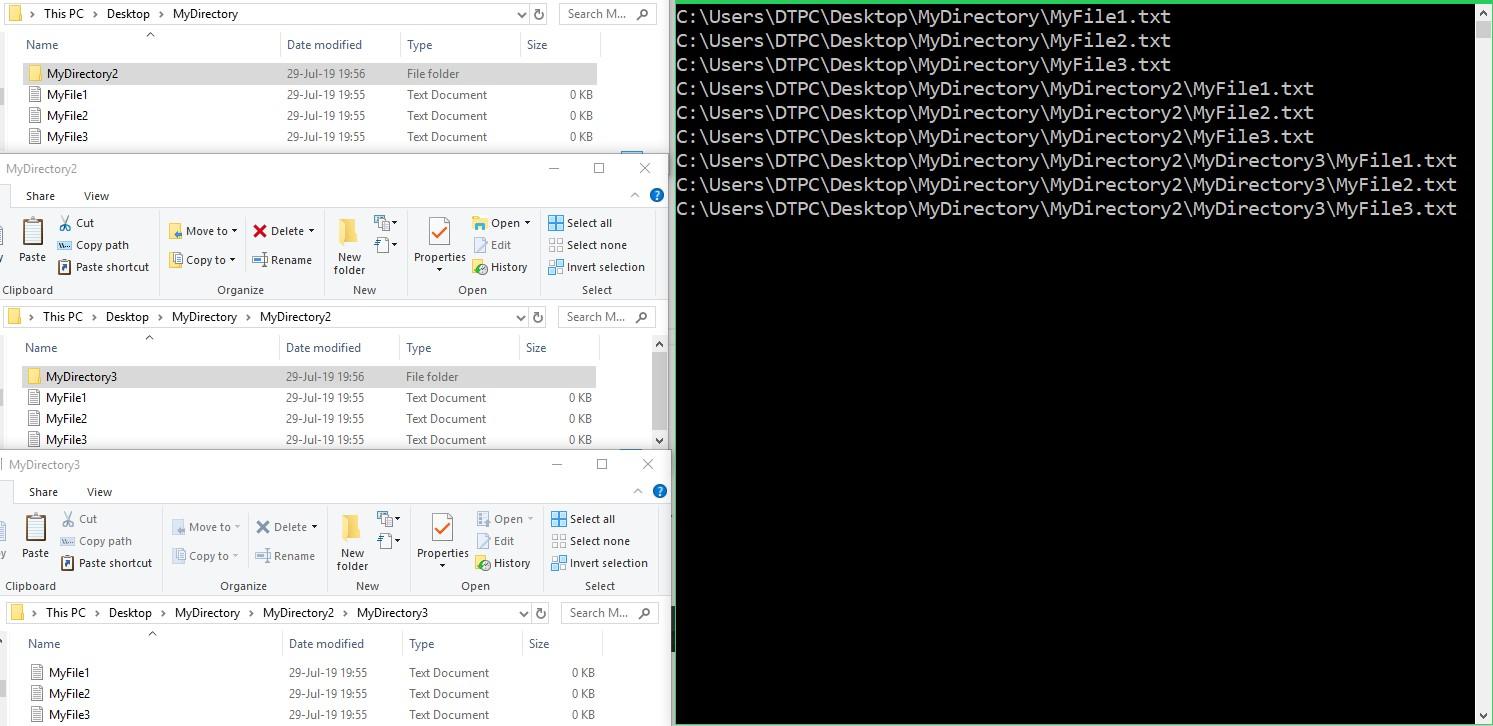
In this post, we will see how to recursively iterate through files and folders in C#.
To recursively iterate through the file system we will first call the getFileNames() method and pass it the path of our directory as an input parameter. The method will first get and then print all the files in the provided directory. After that, it will get all the directories. If there are any the getFileNames() method will call itself for every directory and pass the path as the parameter, else the recursion will stop.
If you want to know more about recursion itself check out this post I made.
Let’s see the code example below.
Code:
using System;
using System.IO;

namespace RecursiveFileIterator
{
    class Program
    {
        static void Main(string[] args)
        {
            getFileNames("C:\\Users\\DTPC\\Desktop\\MyDirectory");

            Console.ReadLine();
        }

        public static void getFileNames(string path)
        {
            //Get files and print their names.
            var files = Directory.GetFiles(path);

            foreach (var file in files)
            {
                Console.WriteLine(file);
            }

            //Get directories.
            var directories = Directory.GetDirectories(path);

            //Get the directories and call getFileNames() to get the members of that directory.
            foreach (var directory in directories)
            {
                getFileNames(directory);
            }
        }
    }
}
Result