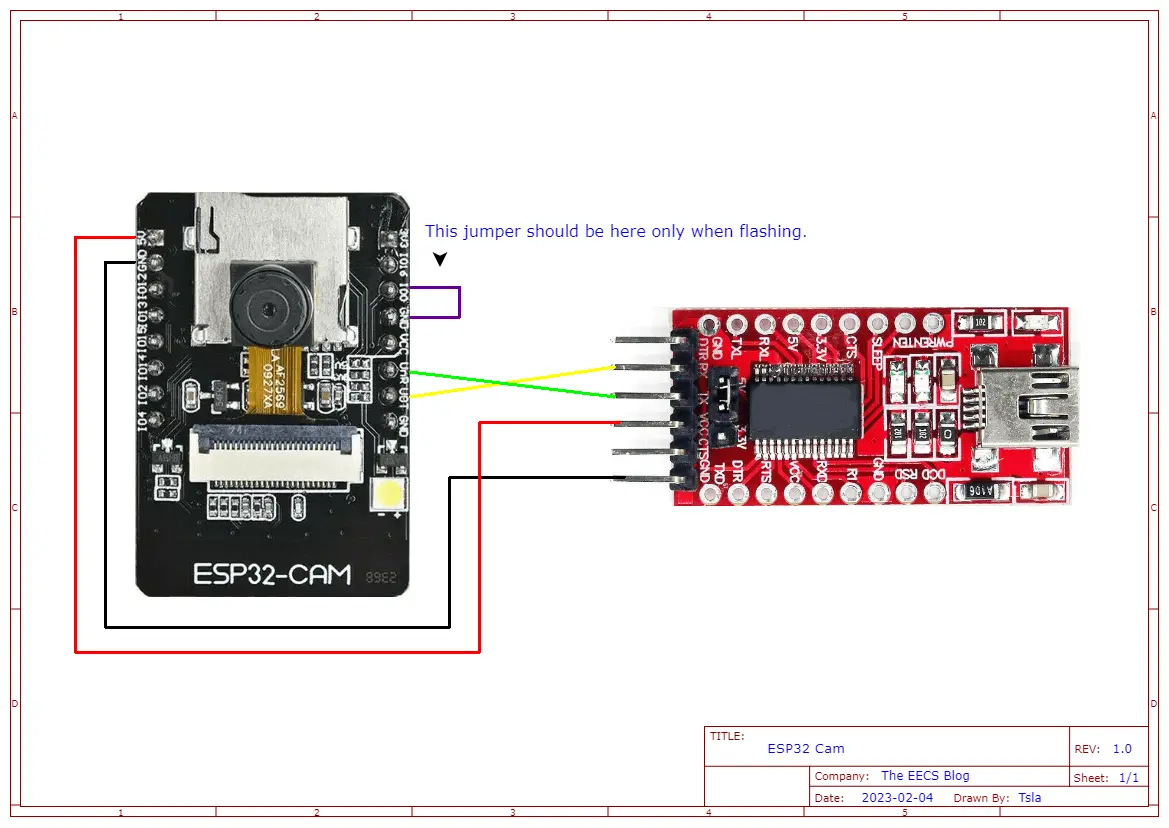
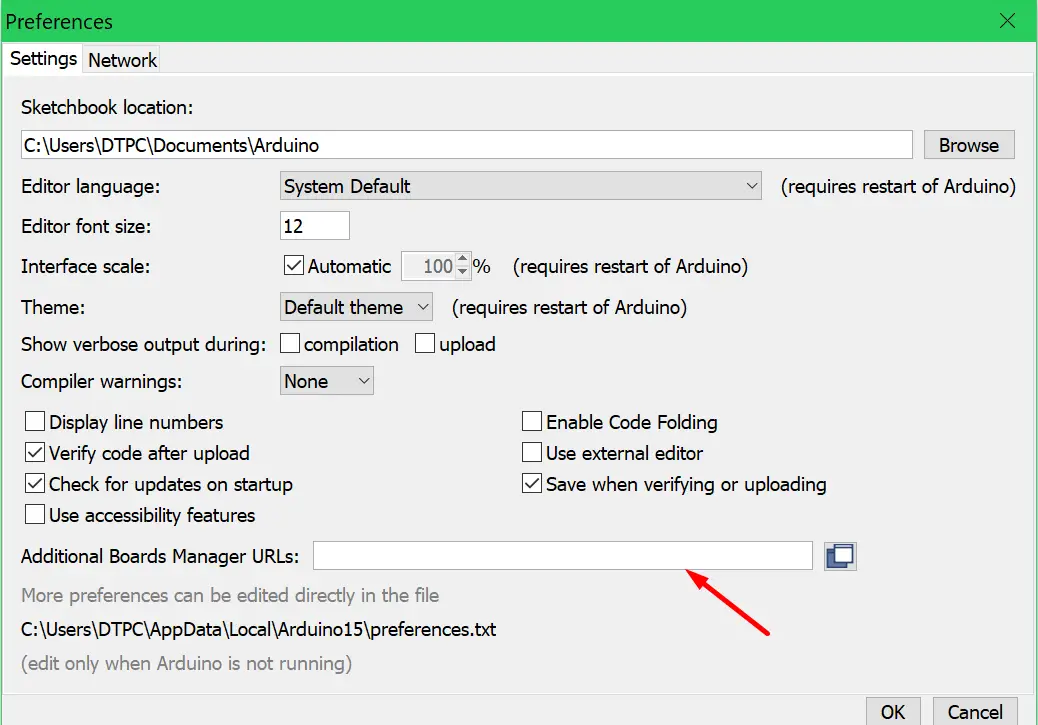
When the Preferences window opens up paste this URL https://raw.githubusercontent.com/espressif/arduino-esp32/gh-pages/package_esp32_index.json into the input box.
Note: If you have a URL from another board added put the ESP32 URL after that one and separate them with a comma like so: your first url,your second url
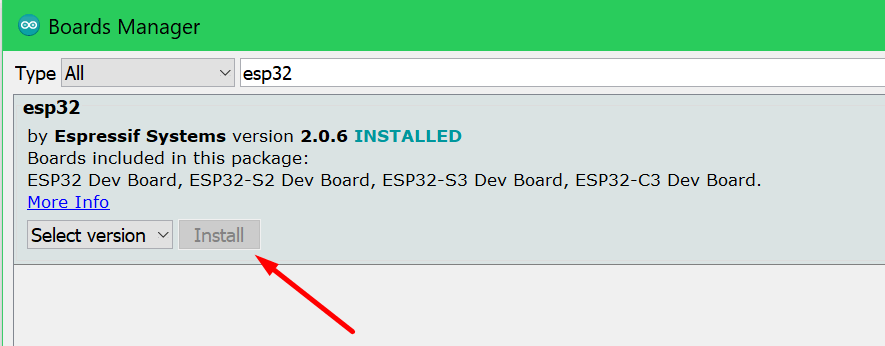
Open the Boards Manager under Tools -> Board -> Boards Manager… Then type esp32 and install the esp32 boards.
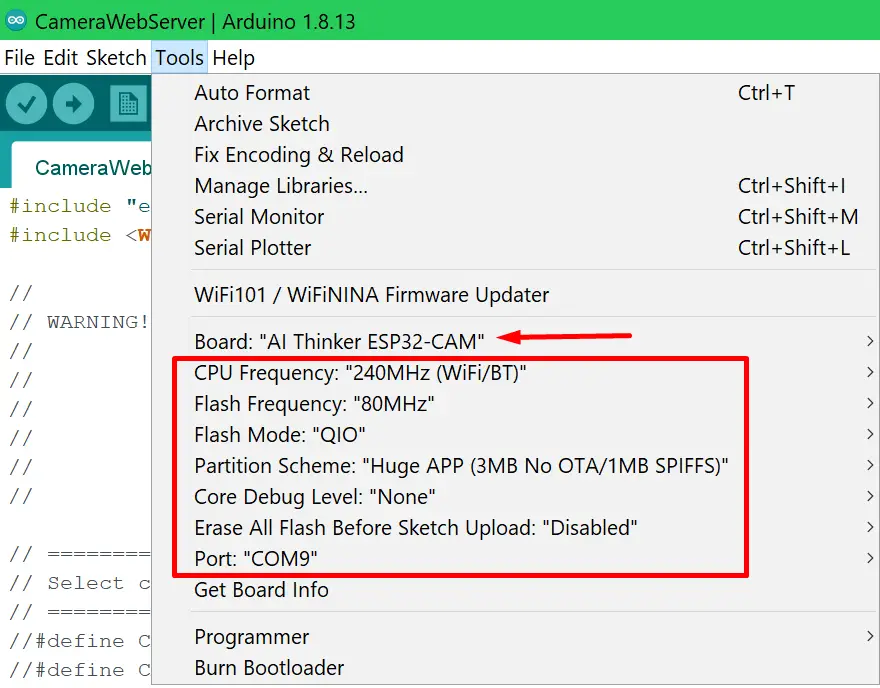
Select your board like so Tools -> Board -> ESP32 Arduino -> AI Thinker ESP32-CAM and then set the rest of the settings like in the image below:
Firmware
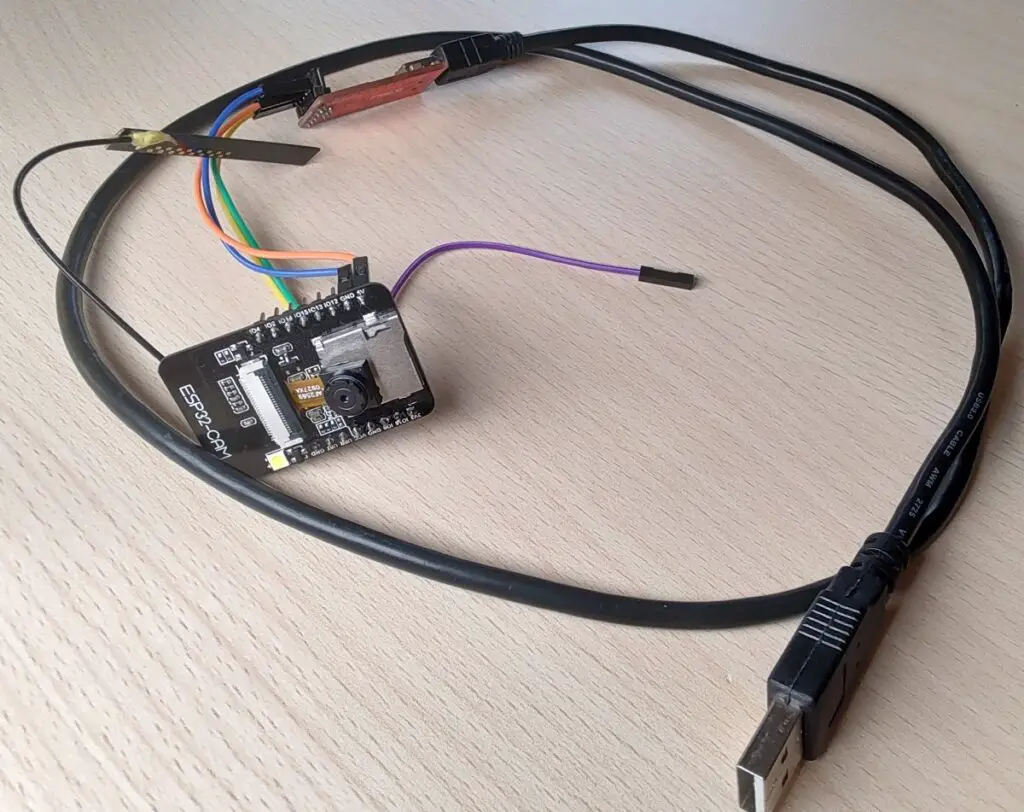
You can download the ESP32 Web Camera firmware from the official Espressif GitHub here or from the fork I made here(in case the previous link stops working at some point). You must download the entire ESP repository and copy out the arduino-esp32/libraries/ESP32/examples/Camera/CameraWebServer folder.
Open up the .ino file from the CameraWebServer project folder. Then uncomment theCAMERA_MODEL_AI_THINKERboard and comment out any other. Finally set your wifi network and password.
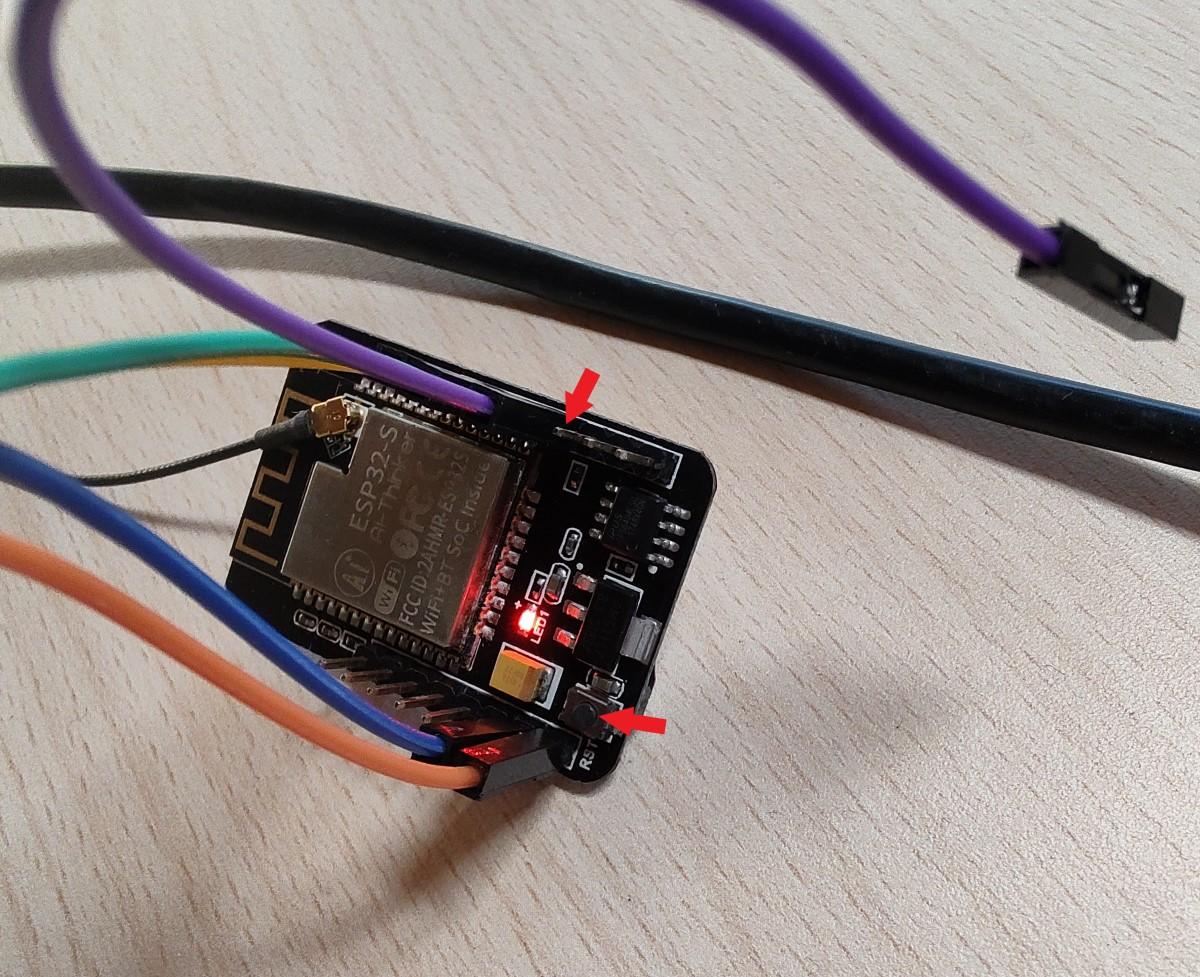
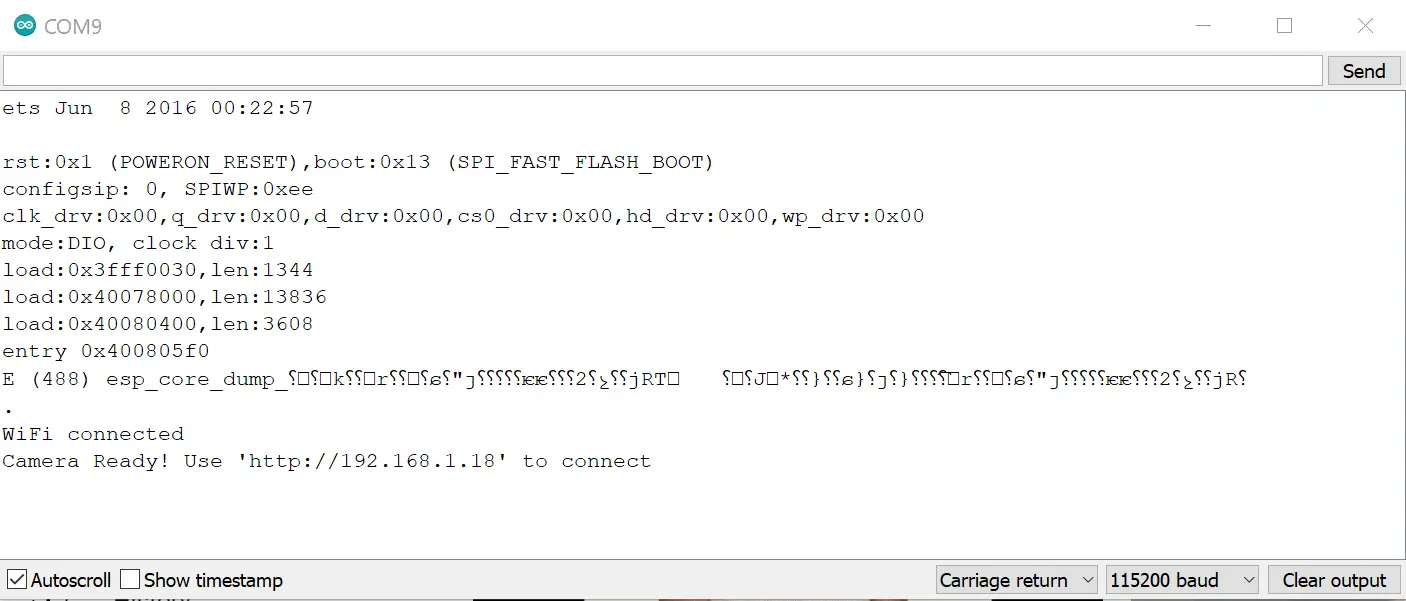
Upload the firmware. When that’s done open the serial port monitor in the Arduino IDE Tools > Serial Monitor. Remove the jumper and press the reset button on the board.
When the board reboots it will print its IP address in the serial monitor.
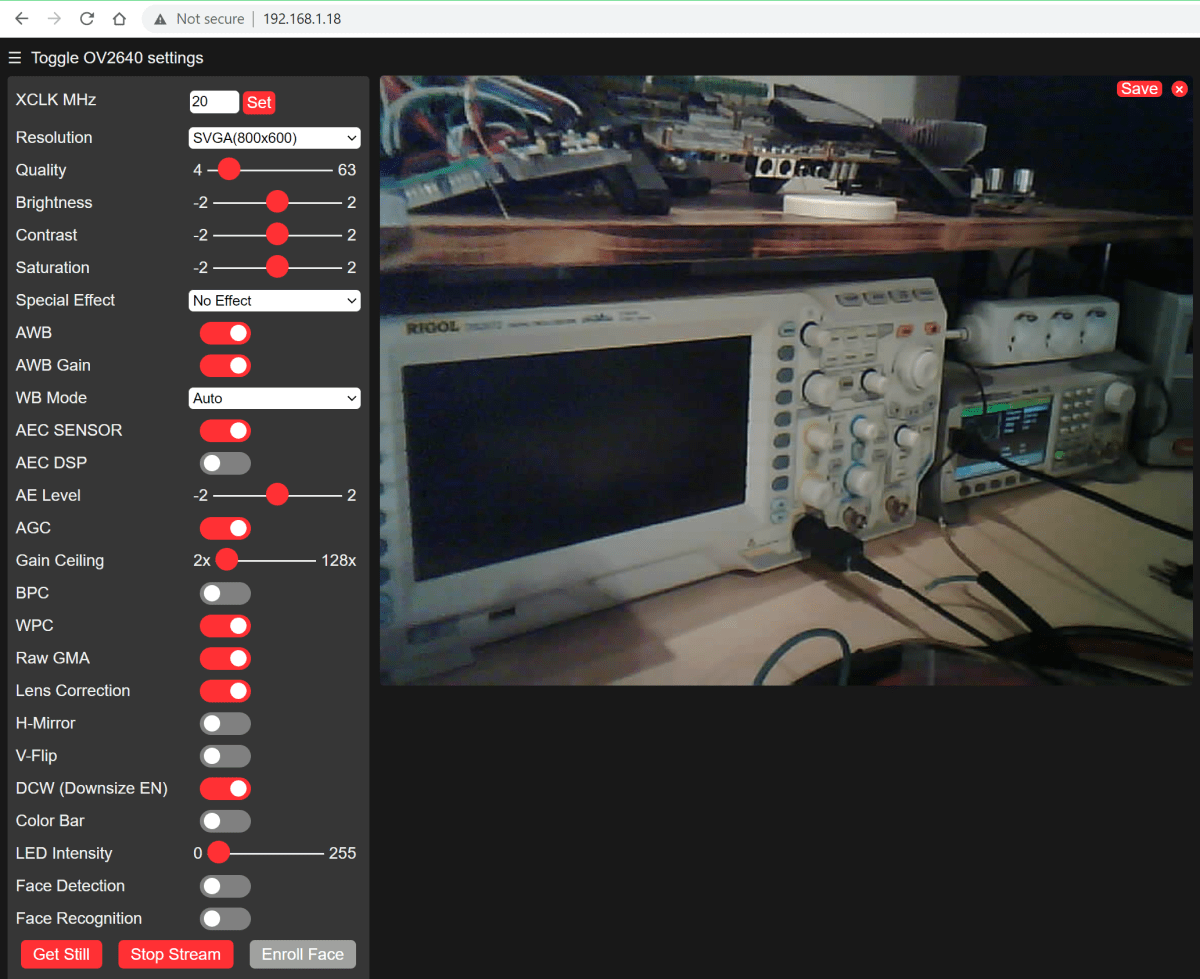
Paste the IP into the browser and the camera interface will appear. Click the Start Stream button and you should be able to see the live video feed from the ESP32 camera.
About
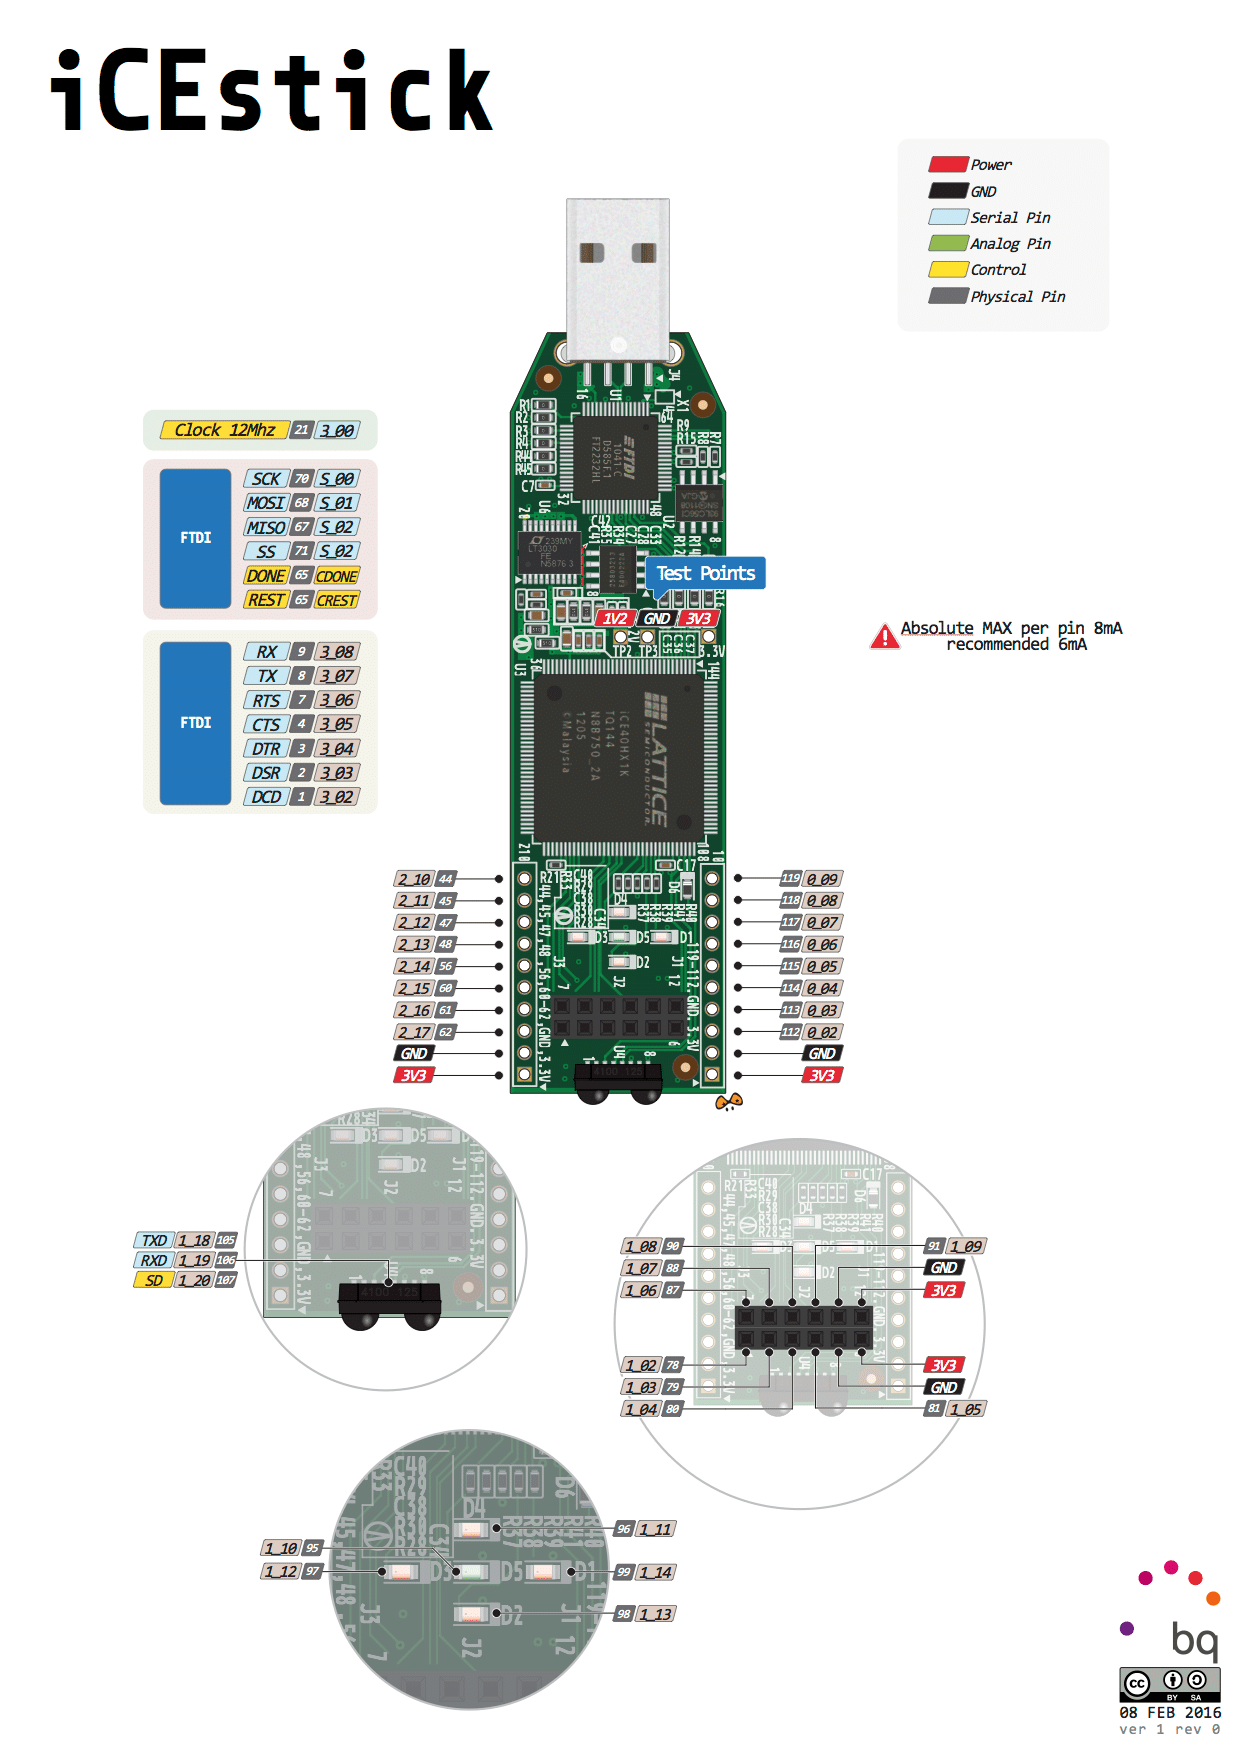
This tutorial will cover the hardware and software setup for the icestick development board that uses an iCE40 FPGA. The IceStorm open source toolchain will be used for programming the board instead of the vendor tools. For the demonstration, we’ll make a simple binary counter that will display its value with the onboard LEDs. The logic design will be defined/coded with Verilog.
First, we have to install all the tools but you will need Linux to do that. If you are already using Linux that’s great else you will either have to use a VM, install Linux or use WSL(Windows subsystem for Linux). I made a tutorial on setting up WSL a couple years ago you can check it out here if you need. However, I will be using Ubuntu running as a VM in VirtualBox.
git clone https://github.com/YosysHQ/icestorm.git icestorm
cd icestorm
make -j$(nproc)
sudo make install
Install arachne pnr.
git clone https://github.com/cseed/arachne-pnr.git arachne-pnr
cd arachne-pnr
make -j$(nproc)
sudo make install
Install next pnr.
git clone https://github.com/YosysHQ/nextpnr nextpnr
cd nextpnr
cmake -DARCH=ice40 -DCMAKE_INSTALL_PREFIX=/usr/local .
make -j$(nproc)
sudo make install
Install yosys.
git clone https://github.com/YosysHQ/yosys.git yosys
cd yosys
make -j$(nproc)
sudo make install
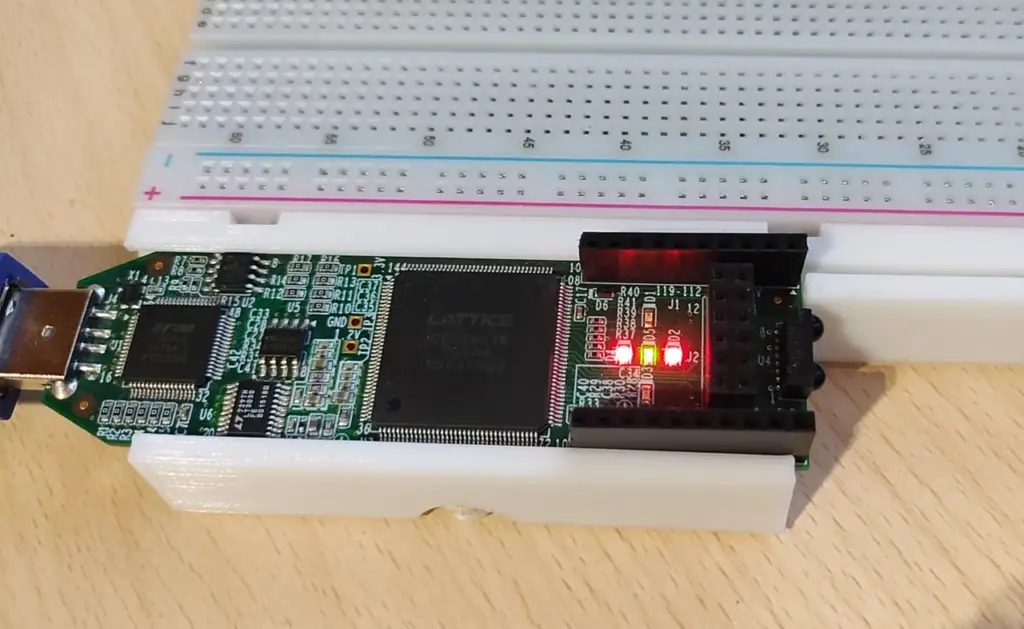
Hardware setup
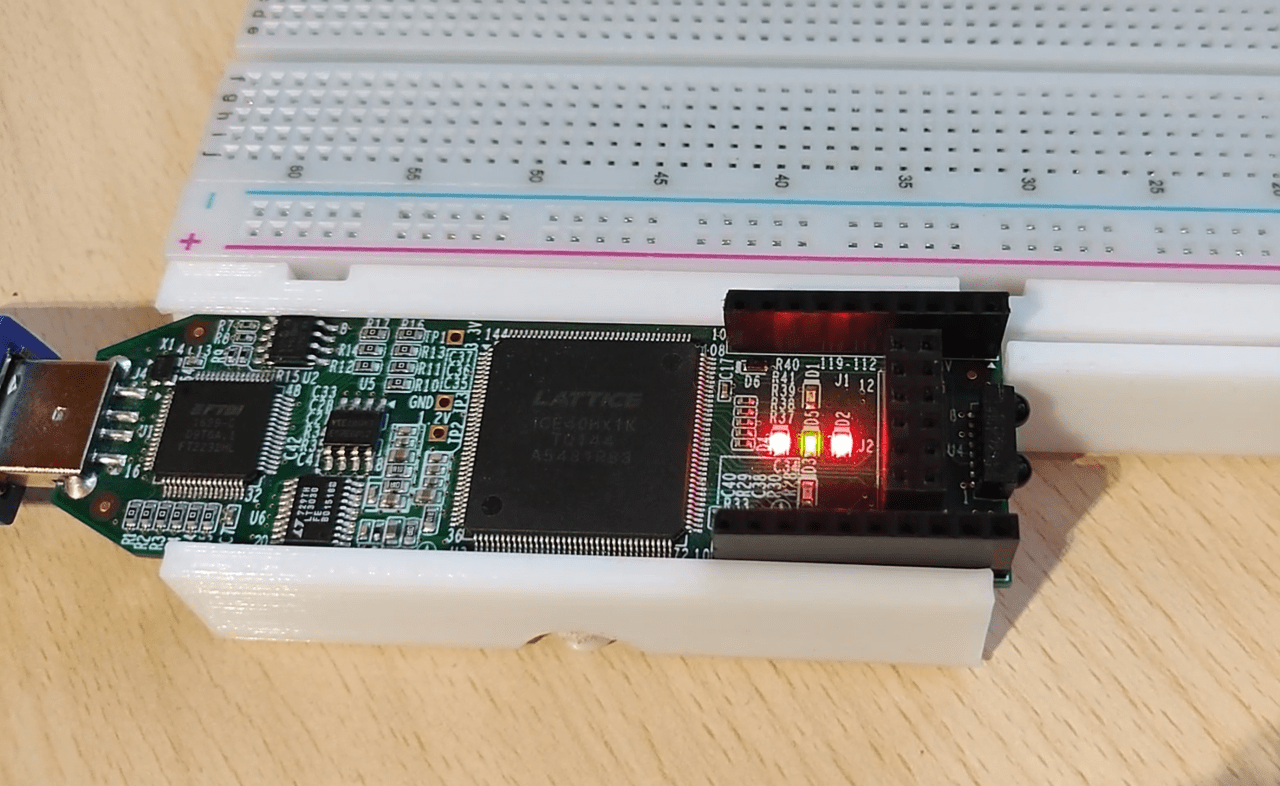
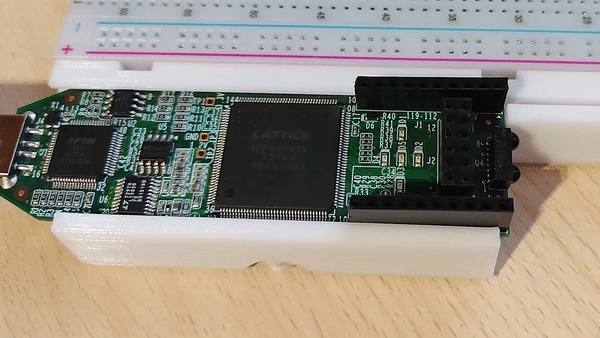
In this tutorial, we’ll be using the onboard LEDs so there isn’t anything else to setup hardware wise except plugging in the board.
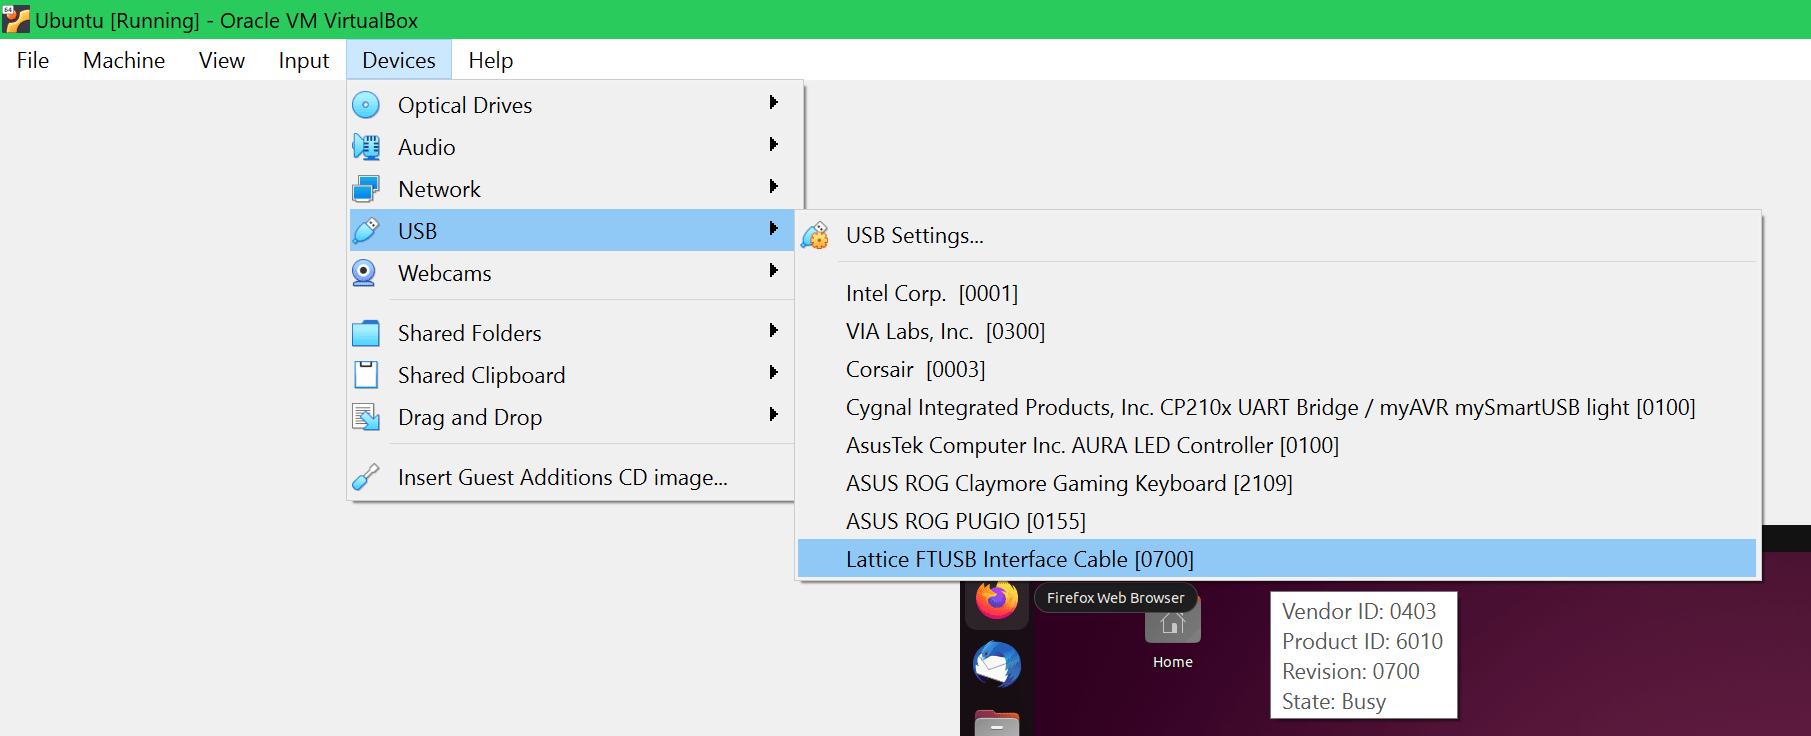
As I said, I’m using a VM in VirtualBox, so I also need to add the USB device to the VM. If you are not using a virtual machine you can skip this part. If you choose to use WSL see how toattach the USB device to WSL here.
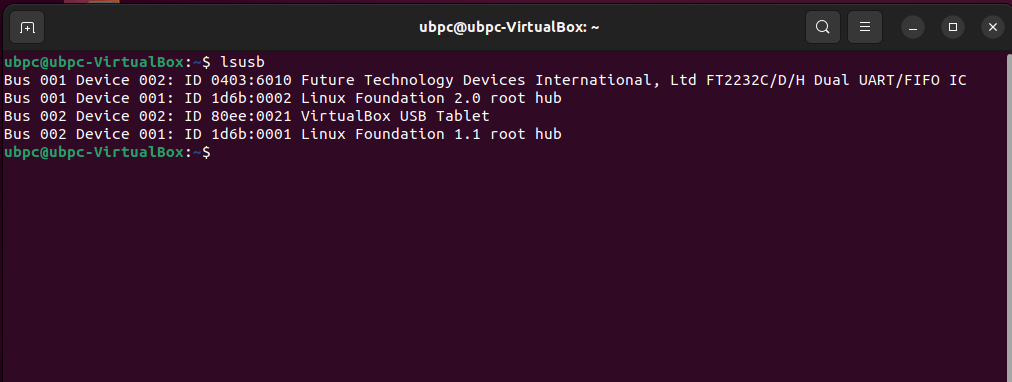
If you run the lsusb command you should be able to see your device(first one is the icestick).
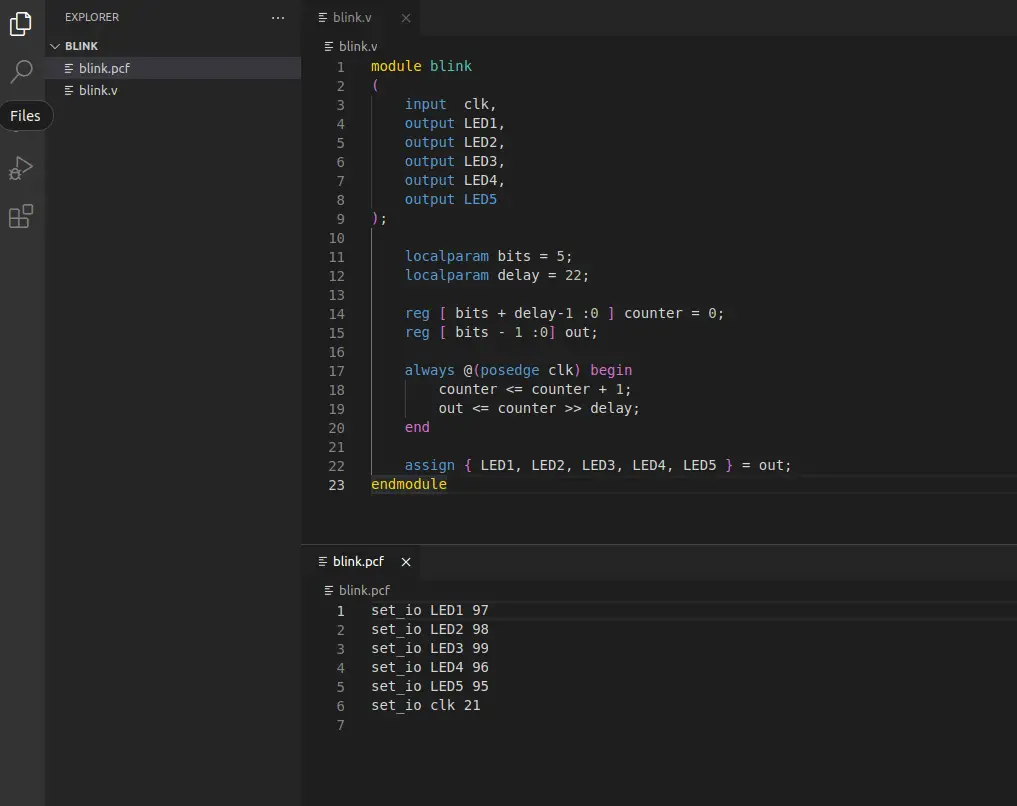
Logic design
You need to create two files blink.v and blink.pcf. Then you need to open both of them in some sort of text editor(I will be using the VS code IDE) and put in the following code.
This is what both files should look like at the end.
Programming
First, we need to do Verilog to node list synthesis with yosys. This will make a blink.blif file from the blink.v file. The -top parameter requires the name of the module we set in the Verilog file(blink in this case).
Next, we need to do place and route with arachne. You need to get the exact part number of your iCE40 FPGA(read markings on the chip)find it in the table below and use the proper options for arachne. -d 1K -P tq144 in this case.
You will also need to include the .pcf and .blif filenames as parameters for arachne. Then with -o you can define the name output text file. In this case, I will just call it blink.txt.
Finally, we can program the FPGA with blink.bin file we made in the previous step.
sudo iceprog blink.bin
After the programming process is over the lights on the board should be counting up in binary.
About
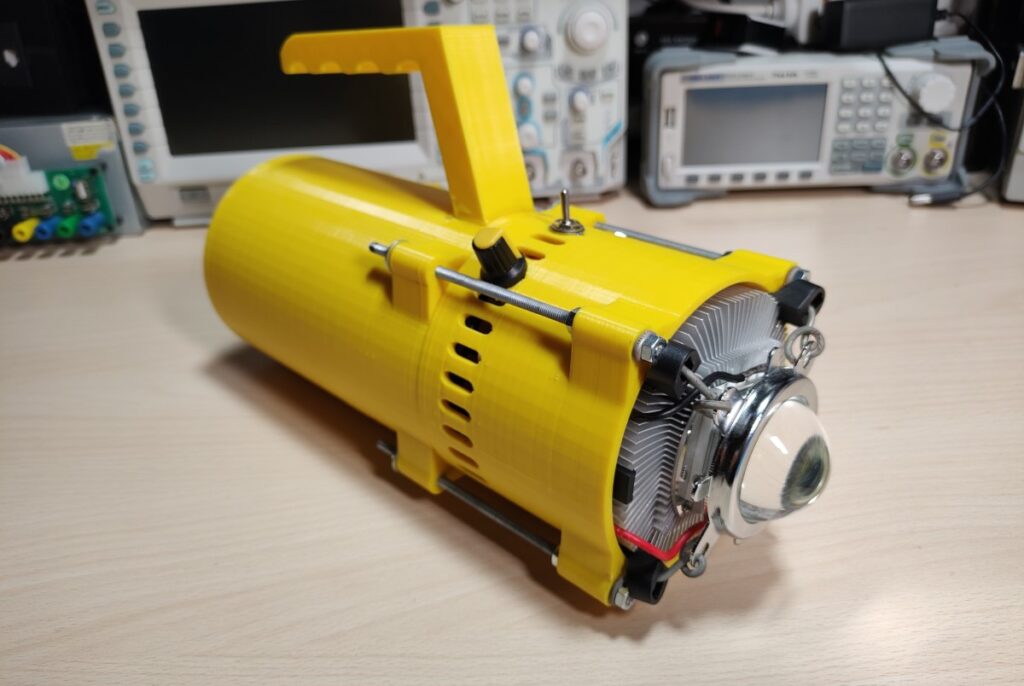
In this post, I’ll show the portable 100W LED torch floodlight I made. I originally bought the 100W LED and lens kit many years ago but have just recently decided I would finally make an LED flashlight out of it. A lot of the flashlights online usually don’t have a very large battery capacity and need to be recharged quite often if you use them for an extended period. The problem is a lot of those flashlights also use 16850 batteries that have to be taken out of the flashlight to be recharged with a charger. This prompted me to create my own flashlight with a large battery capacity that is also easily rechargeable without having to take out the batteries every time.
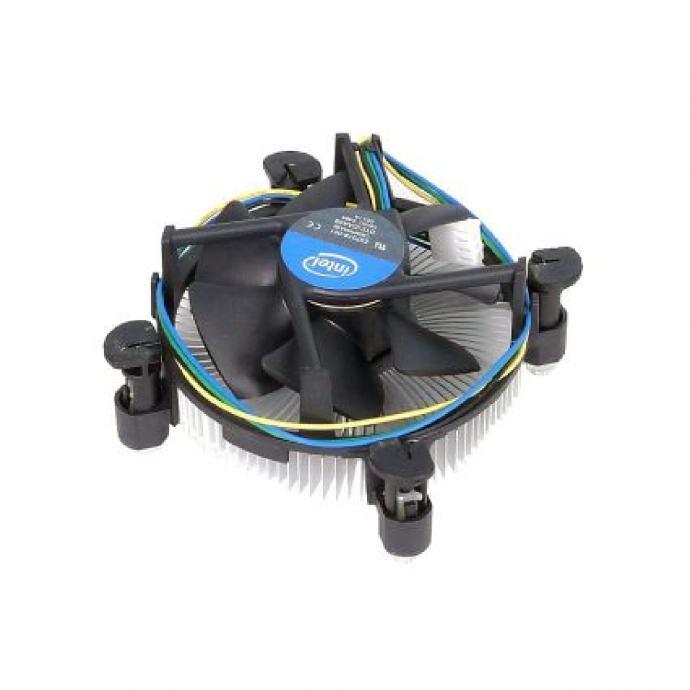
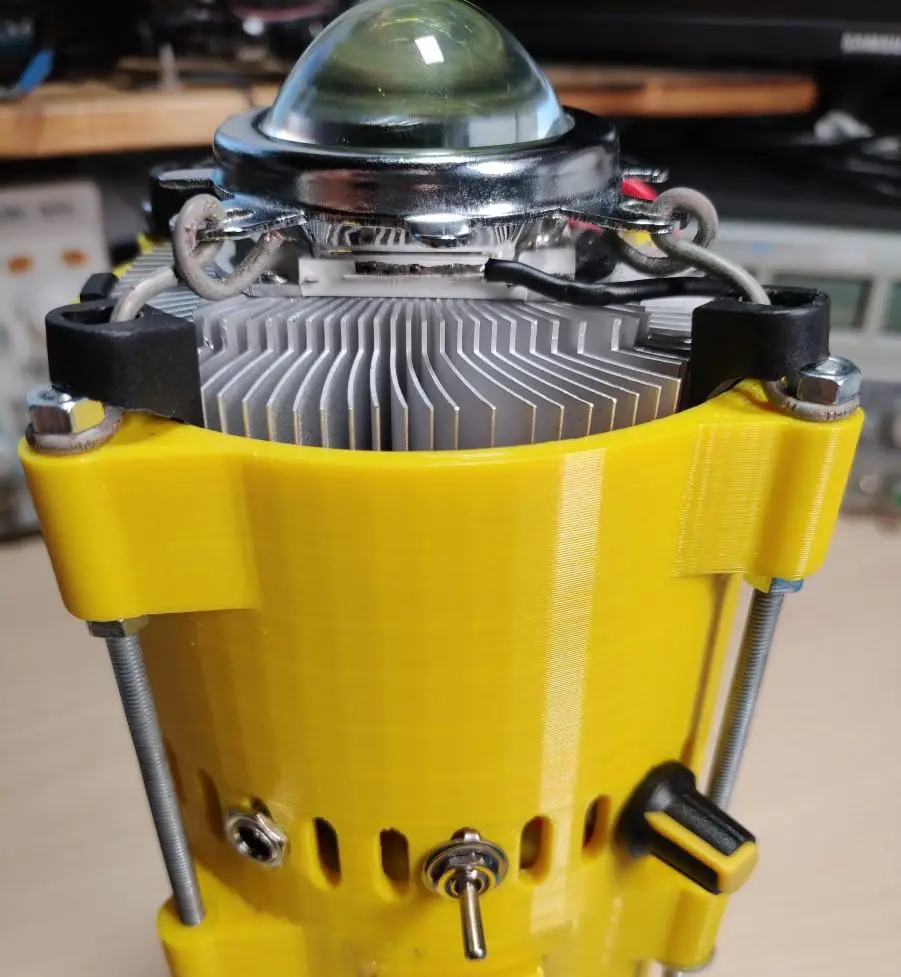
Note: The diameter was a bit too small to fit in the round Intel CPU cooler. I solved this by filing down the plastic edges of the cooler. If you 3D print this consider scaling up the housing so that you get a few extra millimeters of clearance on each side.
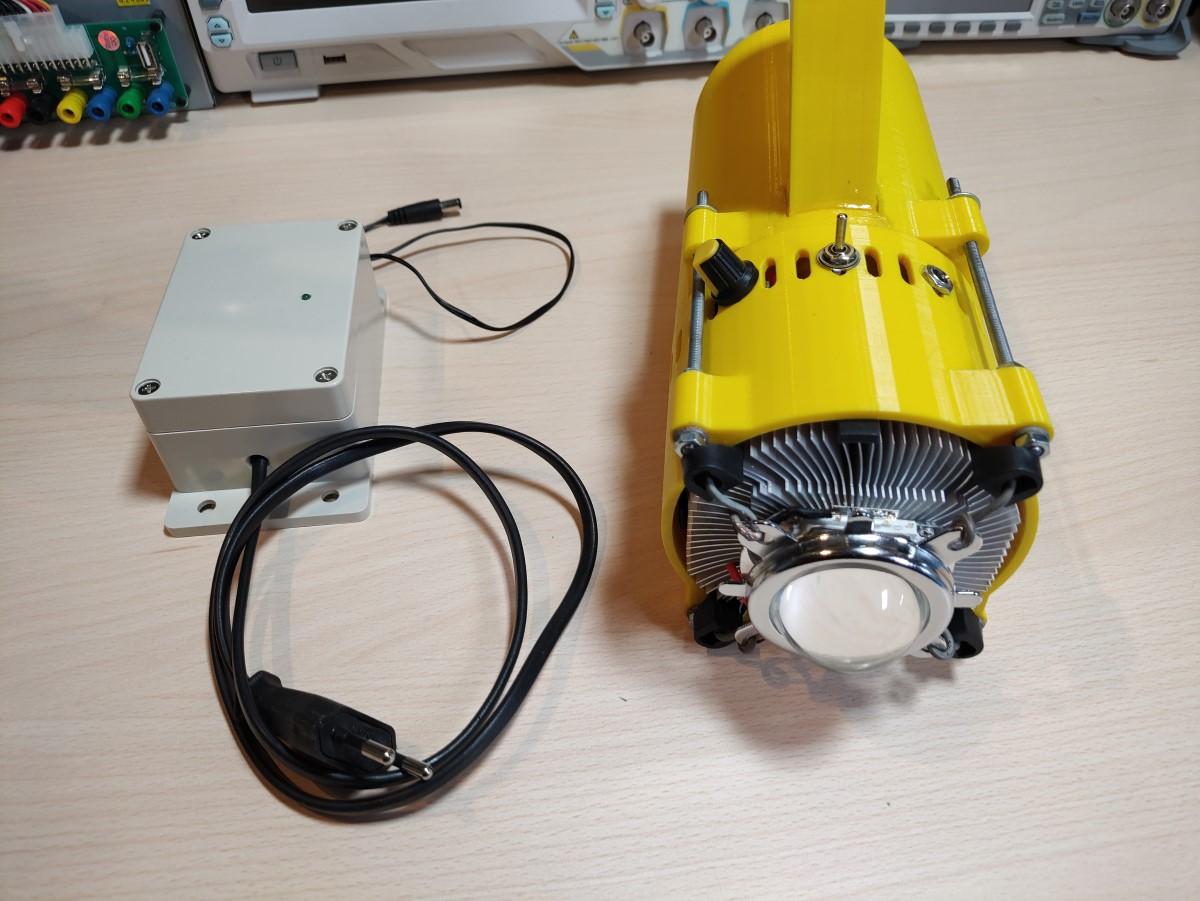
LED Torch
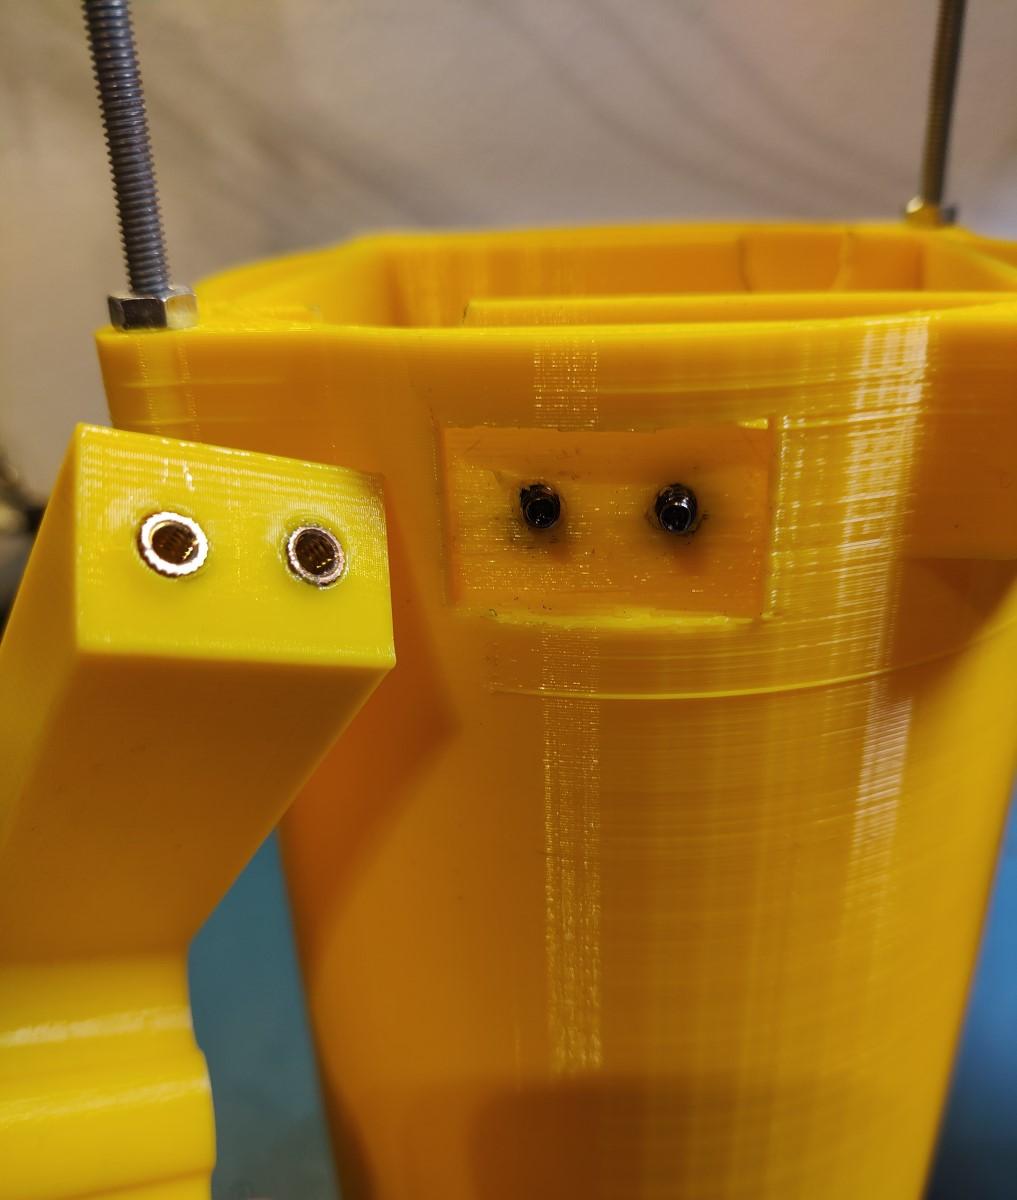
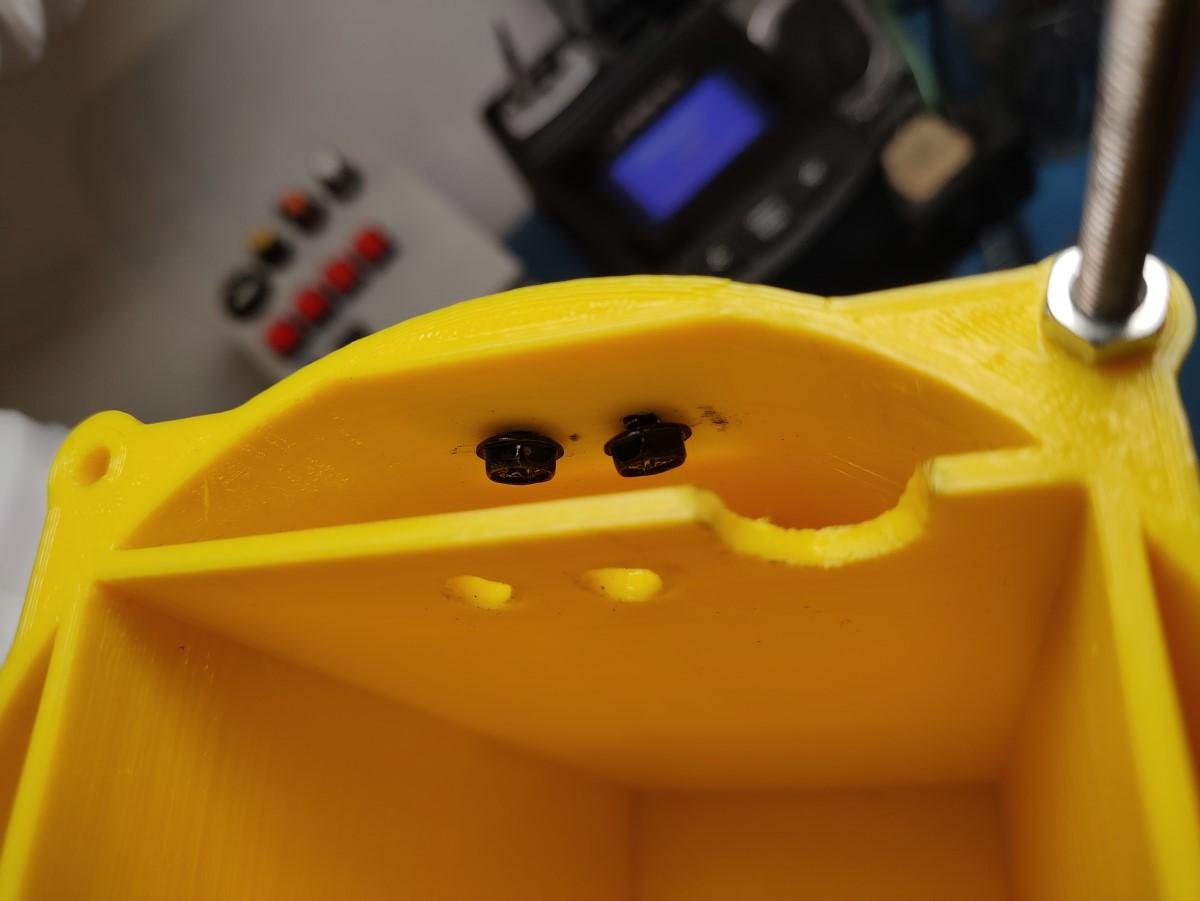
I 3D printed the housing. The handle was printed separately and later attached with some screws and epoxy. Later I also added a metal backplate to reinforce the area as it seemed kind of flimsy.
The 3D print was just a bit undersized and I had to file down the plastic of the CPU cooler to make it fit in the top piece. Also, some of the holes were drilled later because I wasn’t sure how everything is going to fit together when I was first designing the case.
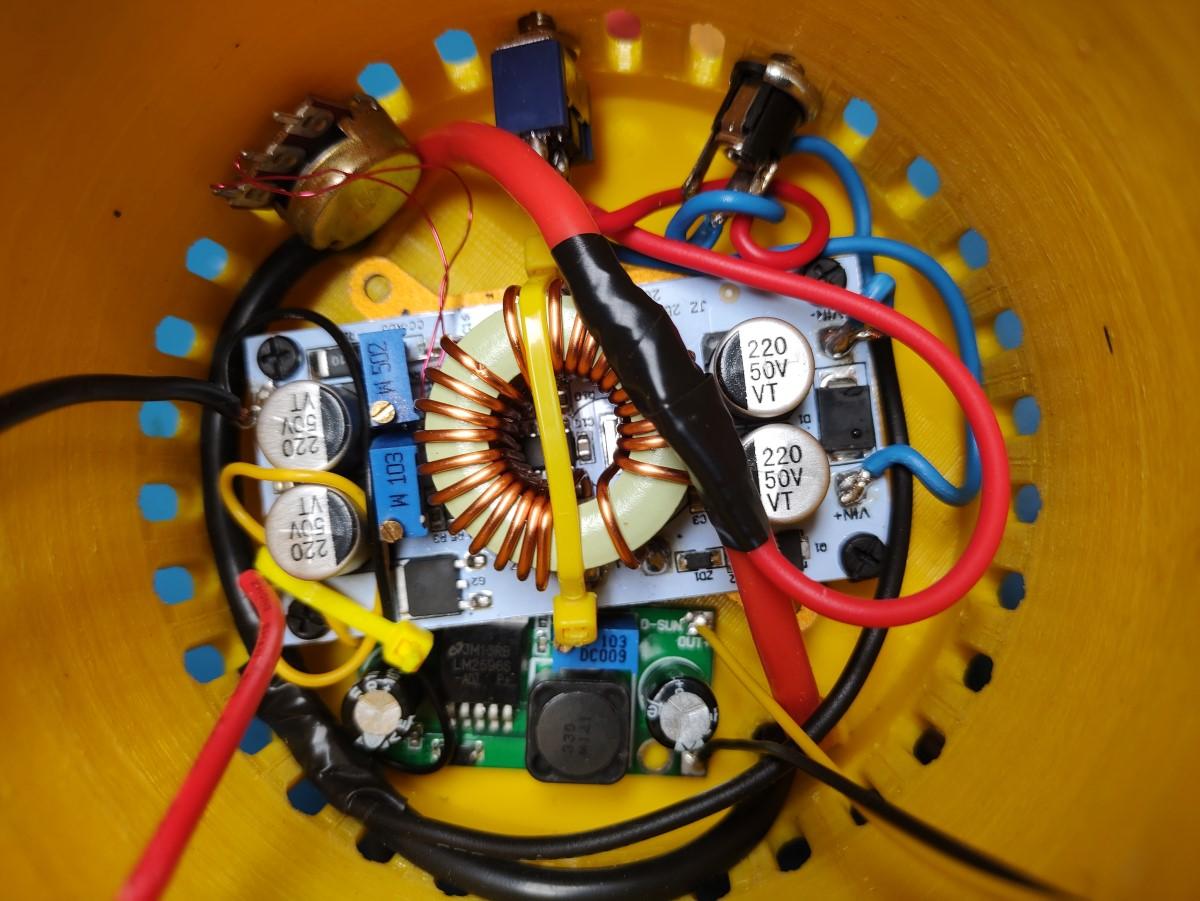
The LED torch is made out of two pieces. The bottom one houses the batteries and the BMS while the top one contains the electronics, heatsink and the LED itself. The two halves are held together with threaded rods and nuts. To hold the lens in place I simply used some thick wire to pull down on the bracket which holds it and the and reflector in place. The LED chip is screwed directly into the heatsink with some screws(even though this might’ve not been necessary). Before doing that I applied some thermal compound between the LED and the heatsink.
The wiring here is a bit oversized for the task but this was the only wire gauge I had(left over from a quadcopter build).
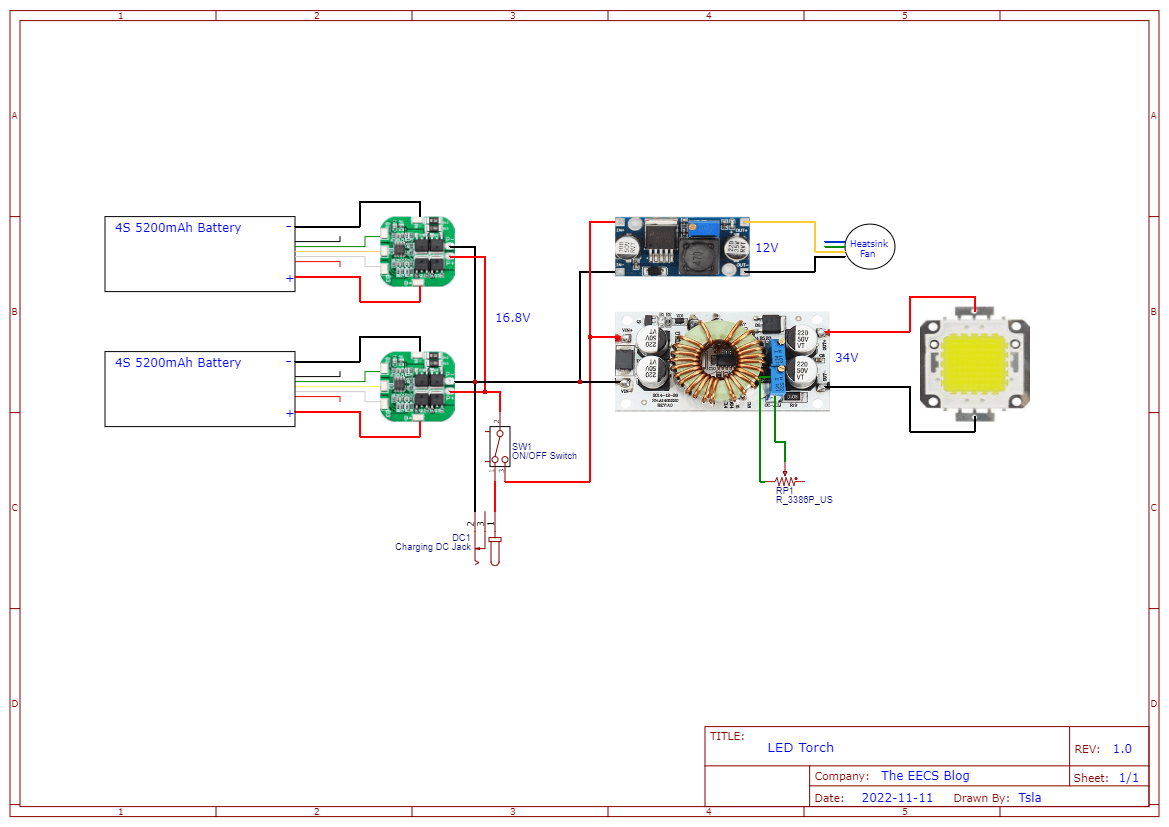
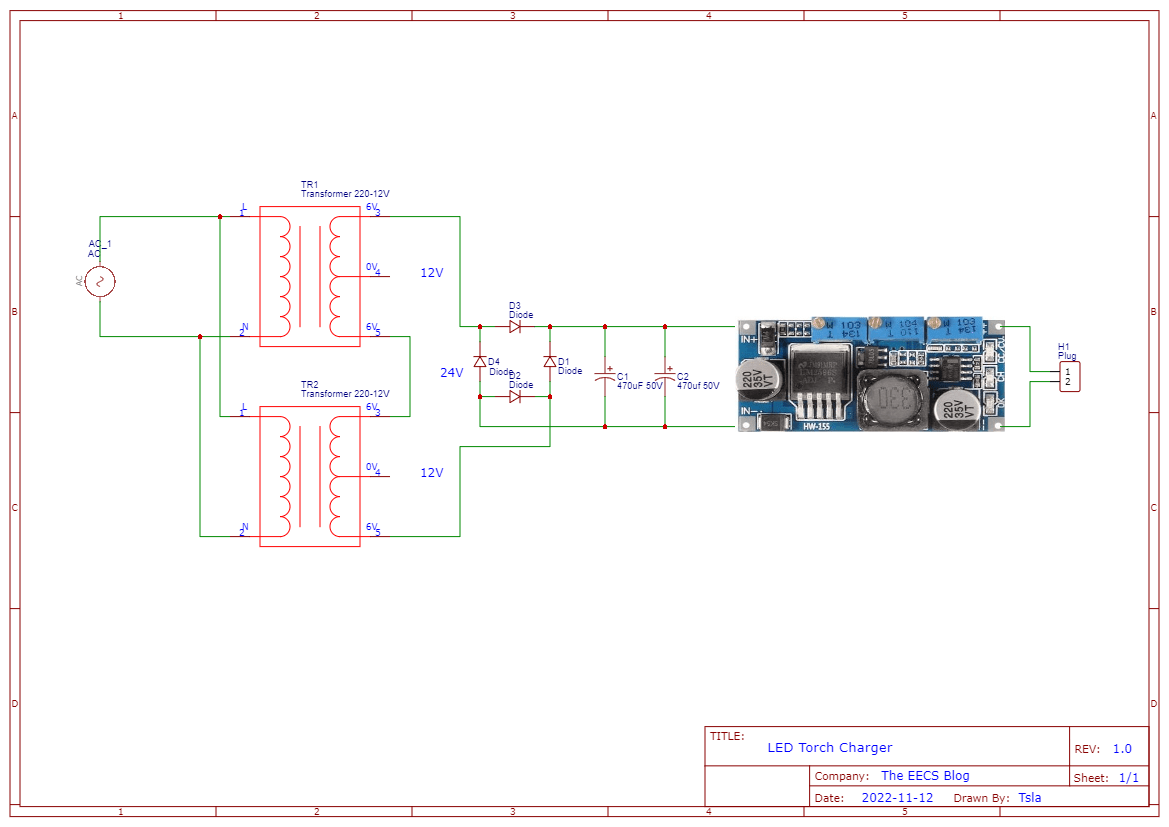
Here is the schematic for all the electronics of the LED torch. The voltage/current has to be set with the trimmer pots according to the specifications of the LED chip(see below).
Charger
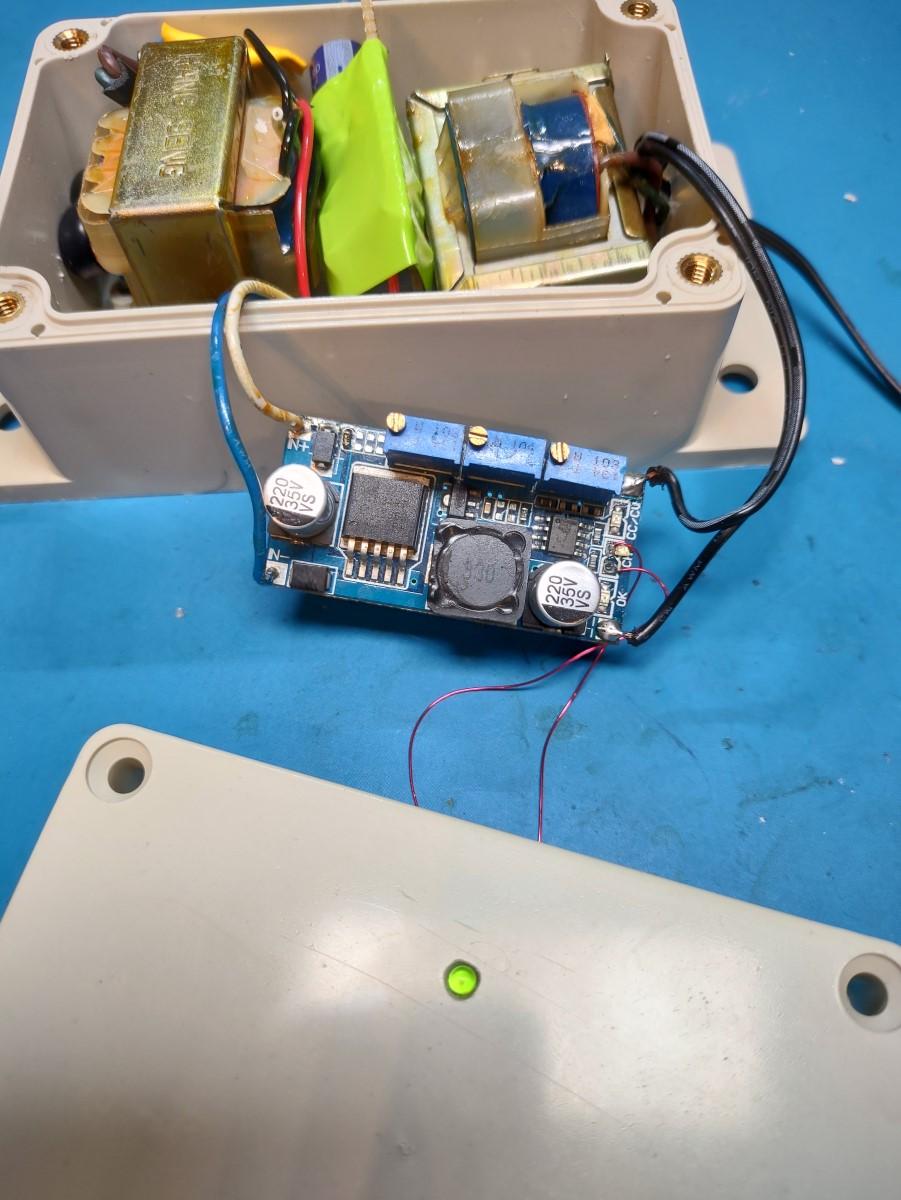
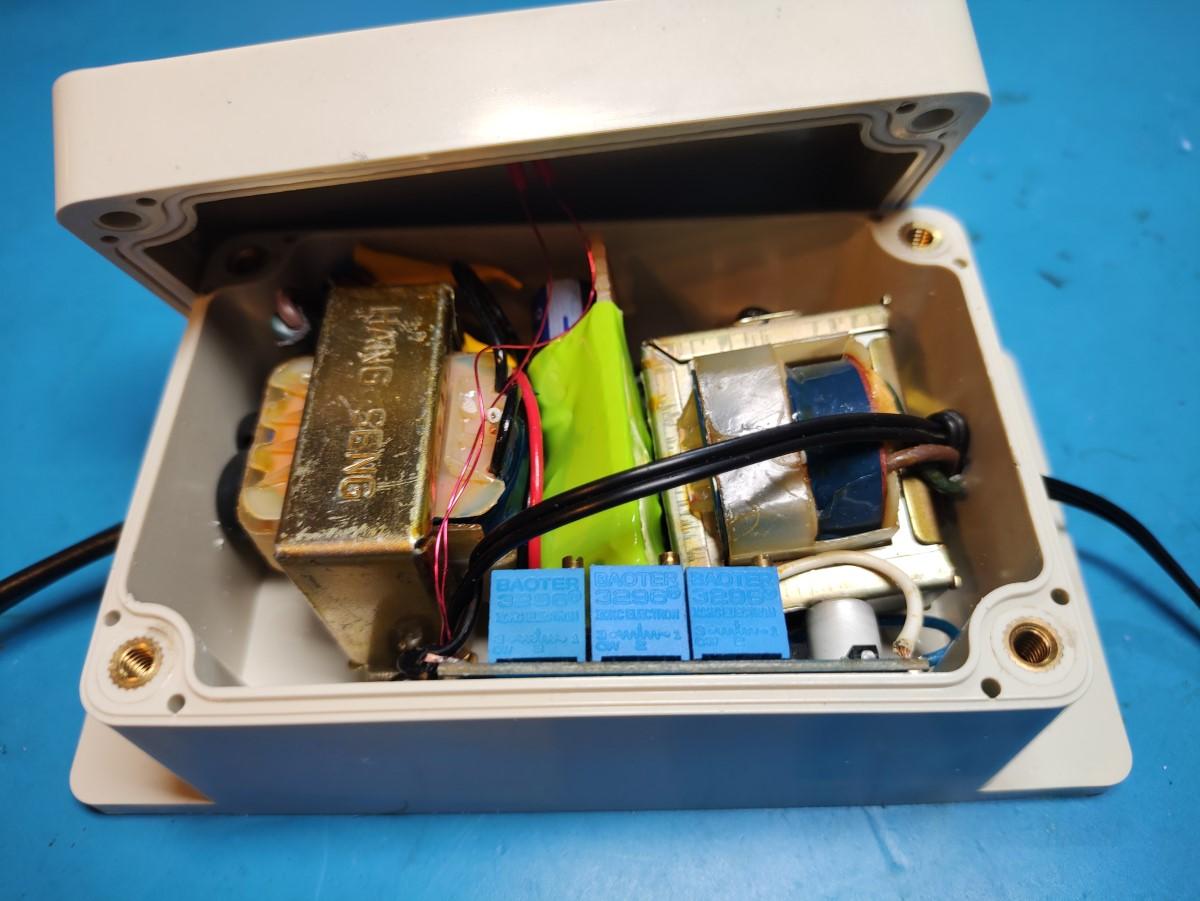
I also built a charger. I didn’t have any power supplies that got to the required 16.8V for charging so I made a good old linear power supply with two transformers joined together. The first board rectifies the AC into DC and the second one does the regulation and charging.
And here it is all assembled. It’s hard to see but both of the transformers are screwed into the case preventing them from moving around.
Here is the schematic for the charger. The charging cutoff voltage(16.8V) and current have to be set with the trimmer pots.
Testing And Demonstration
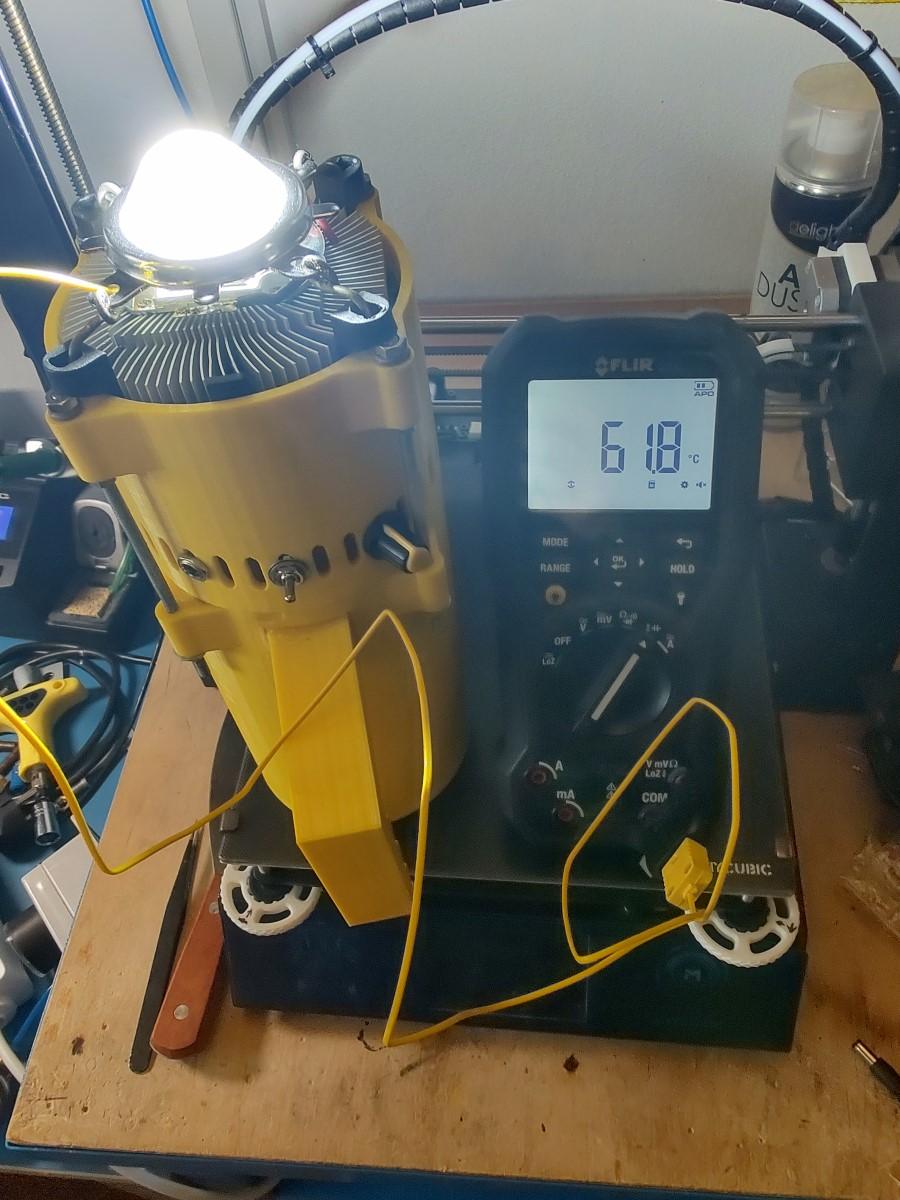
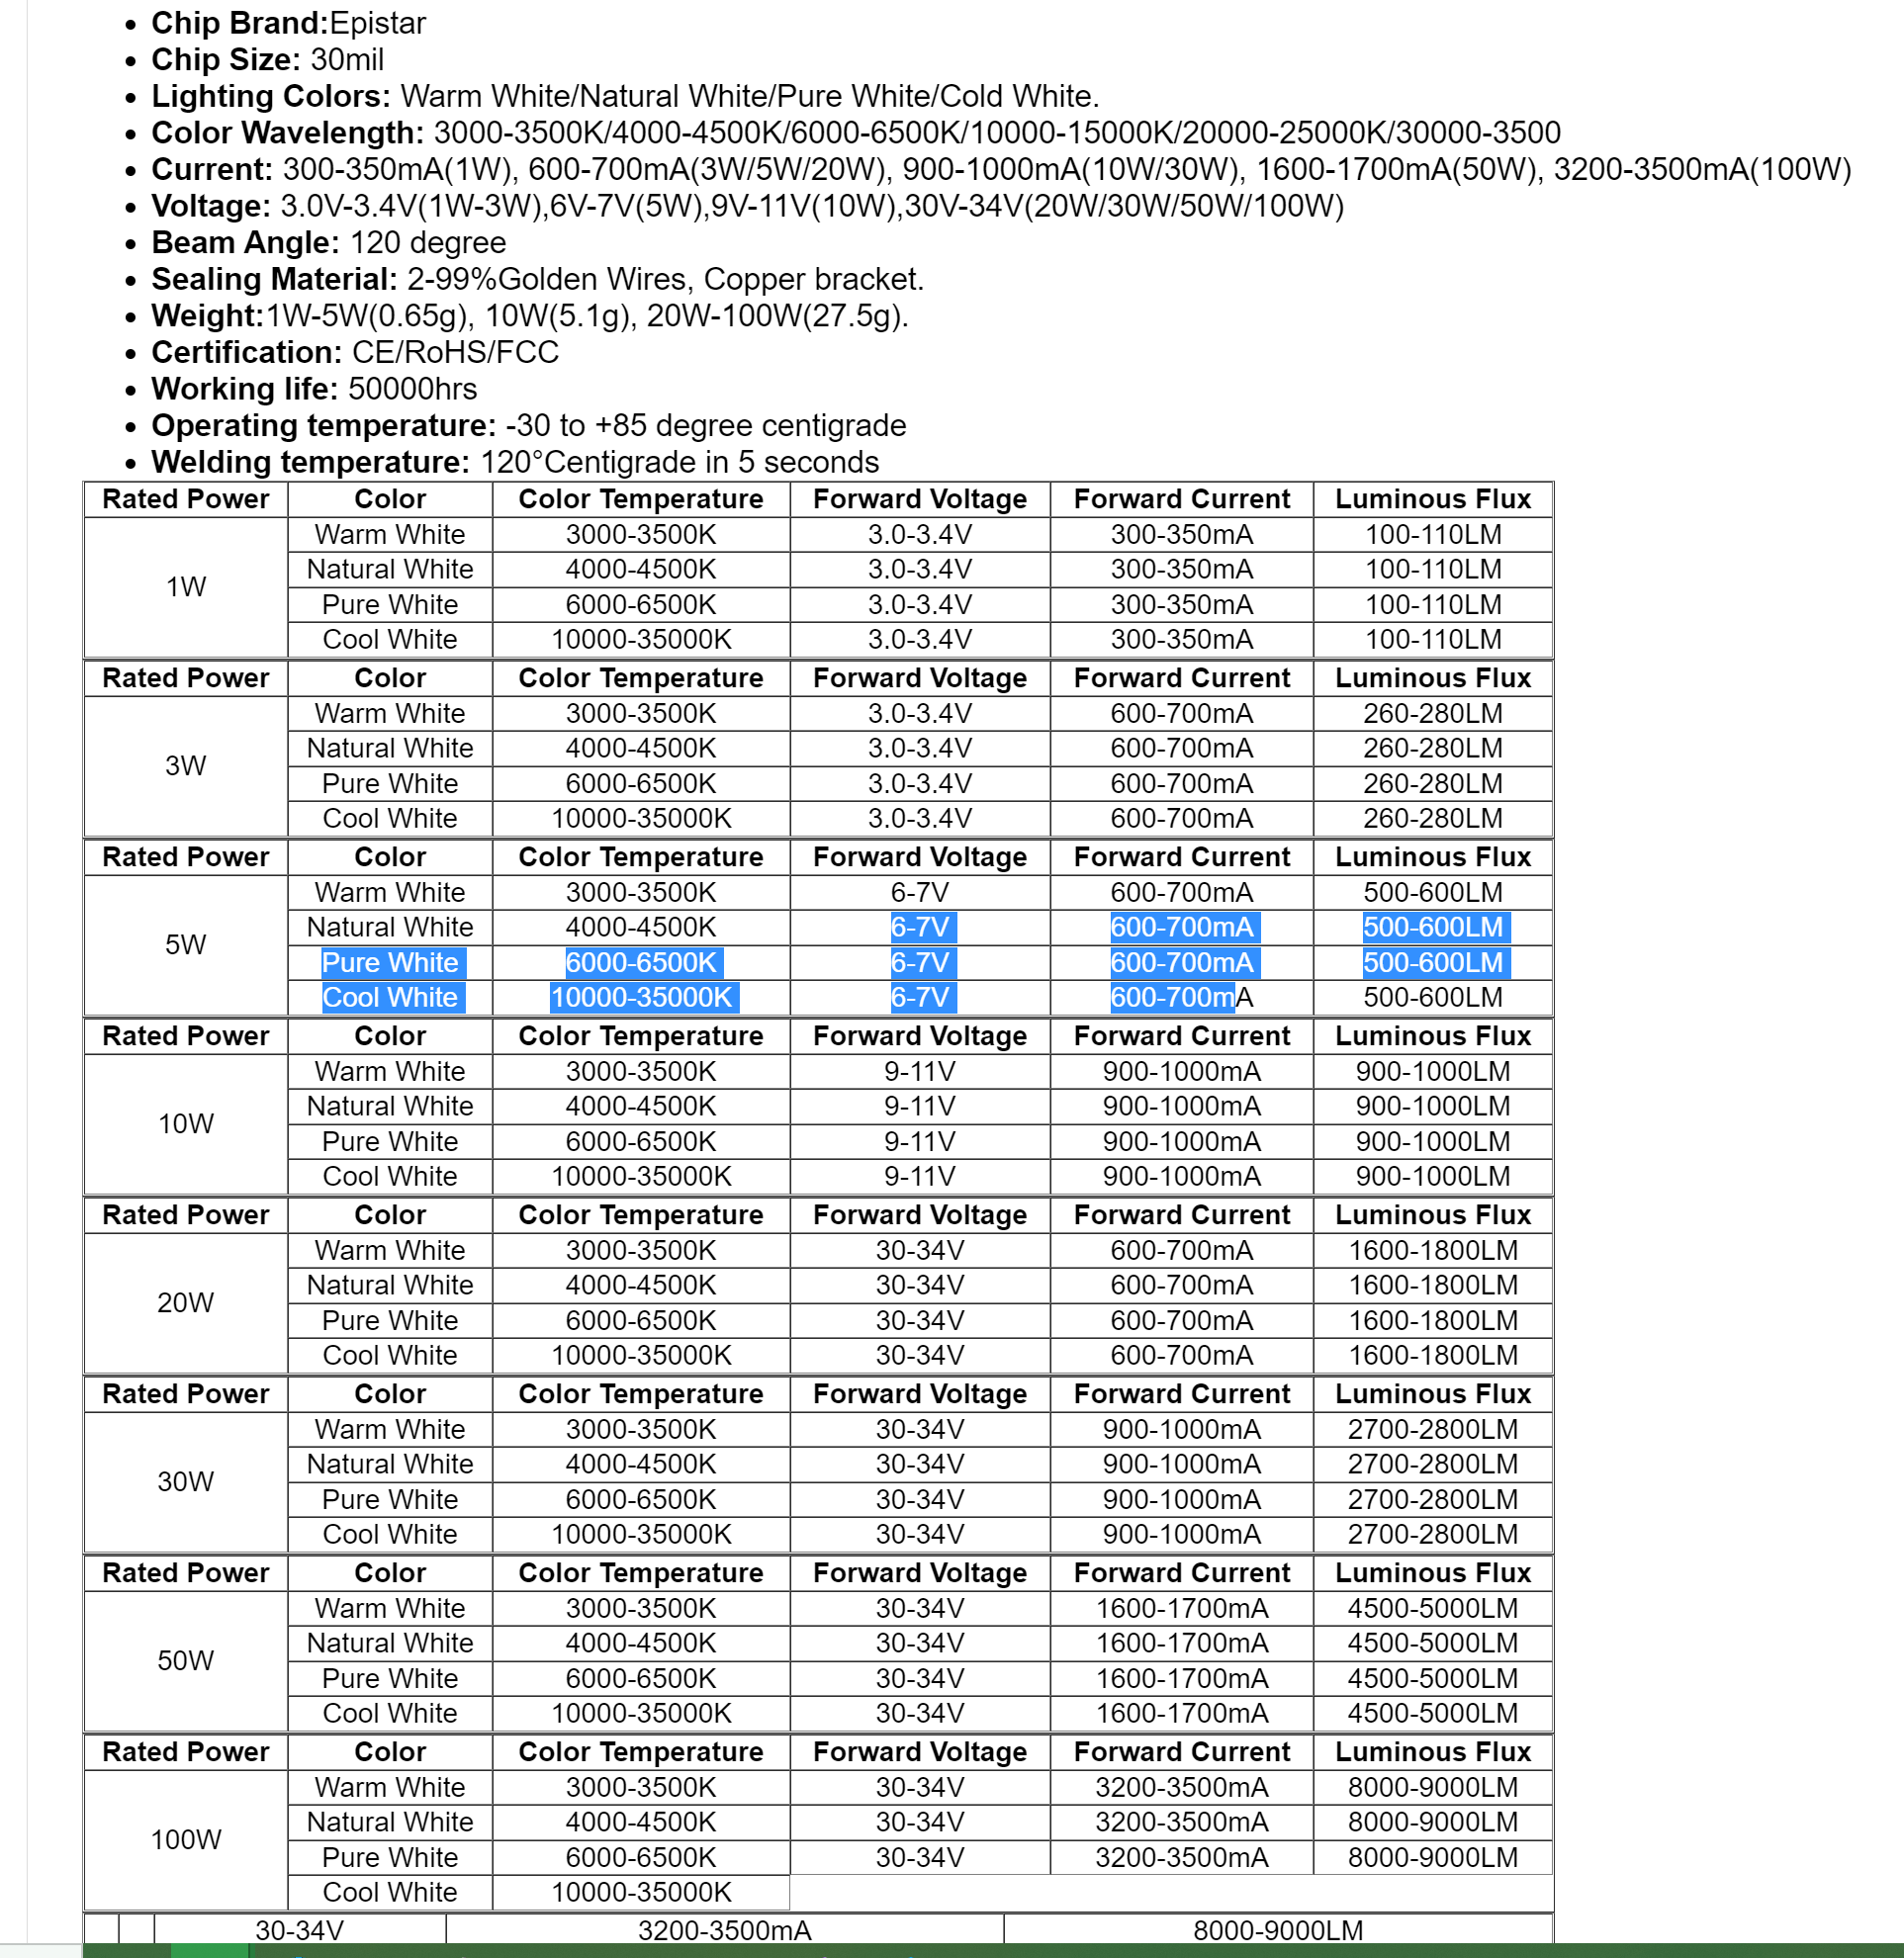
I performed a test at full power and the temperature settled at around 62°C which according to the specification of the LED chip falls well within the operating temperature range(-30°C to 85°C).
Technical specification of the LED chip(100W).
Finally, this is what it looks like at night. For comparison, the first image(on the left) is a spotlight I got from eBay. It reaches very far but has a very narrow beam. In the second image(on the right) you can see the torch I built It doesn’t have as much range as the spotlight due to having a wider angle lens but it does cover a much larger area so it works great as a floodlight.
About
This post is a cheat sheet for Docker. I wrote this for myself so if I ever have trouble remembering some of the more common commands I can just look them up on my own site. And maybe someone out there on the internet will find this useful for themselves as well.
Note: After learning docker you might also want to learn about container orchestration tools like Kubernetes that will manage deployment and load balancing for you.
For Linux you can also do a very simple install via command line by using this script which you can get with curl like so:
curl -fsSL https://get.docker.com -o get-docker.sh and then run like so: sudo sh get-docker.sh
Dockerfile
In this example, I will make a simple web server to demonstrate how to use docker.
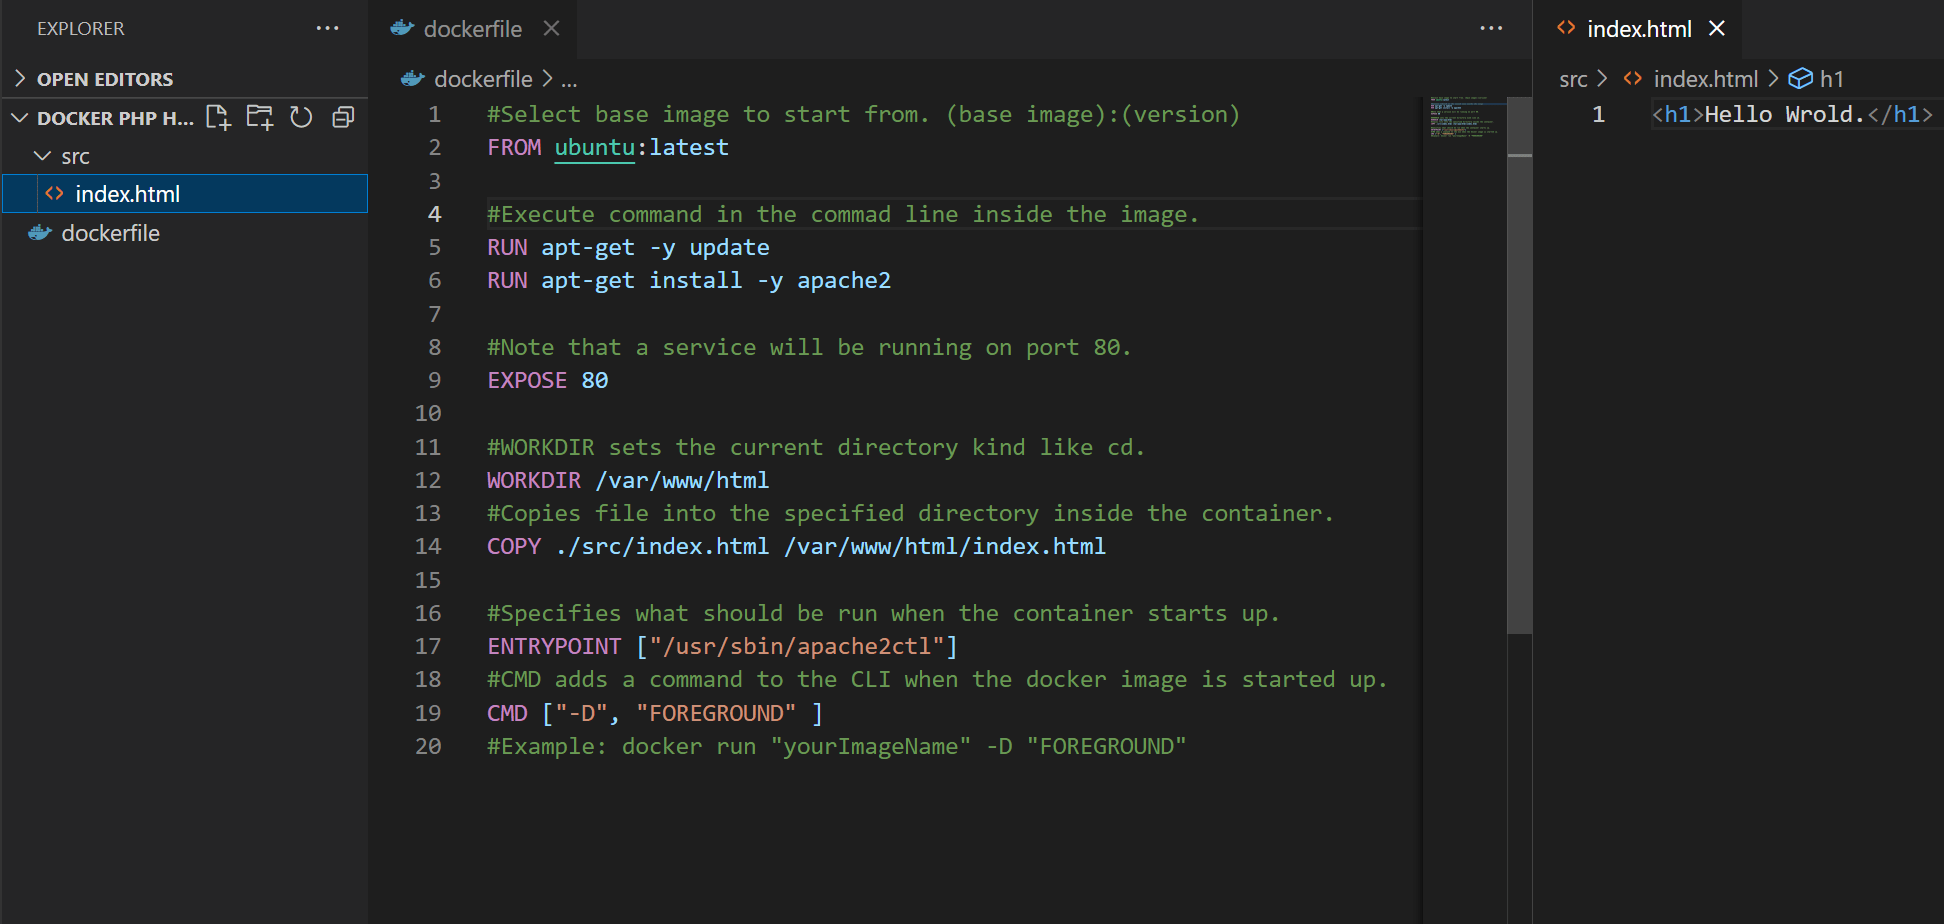
Make a new folder and add a new file named just dockerfile (no extensions). I’ll also create a folder called src (you can name it differently) to put the webpage files in.
Now let’s make a simple dockerfile “script” that will get an image with Ubuntu, install an apache web server and copy our webpage files to the server directory.
dockerfile
#Select base image to start from. (base image):(version)
FROM ubuntu:latest

#Execute command in the commad line inside the image.
RUN apt-get -y update
RUN apt-get install -y apache2

#Note that a service will be running on port 80.
EXPOSE 80

#WORKDIR sets the current directory kind of like cd.
WORKDIR /var/www/html
#Copies file into the specified directory inside the container.
COPY ./src/index.html /var/www/html/index.html

#Specifies what should be run when the container starts up.
ENTRYPOINT ["/usr/sbin/apache2ctl"]
#CMD adds a command to the CLI when the docker image is started up.
CMD ["-D", "FOREGROUND" ]
#Example: docker run "yourImageName" -D "FOREGROUND"
This is how it should all look like at the end:
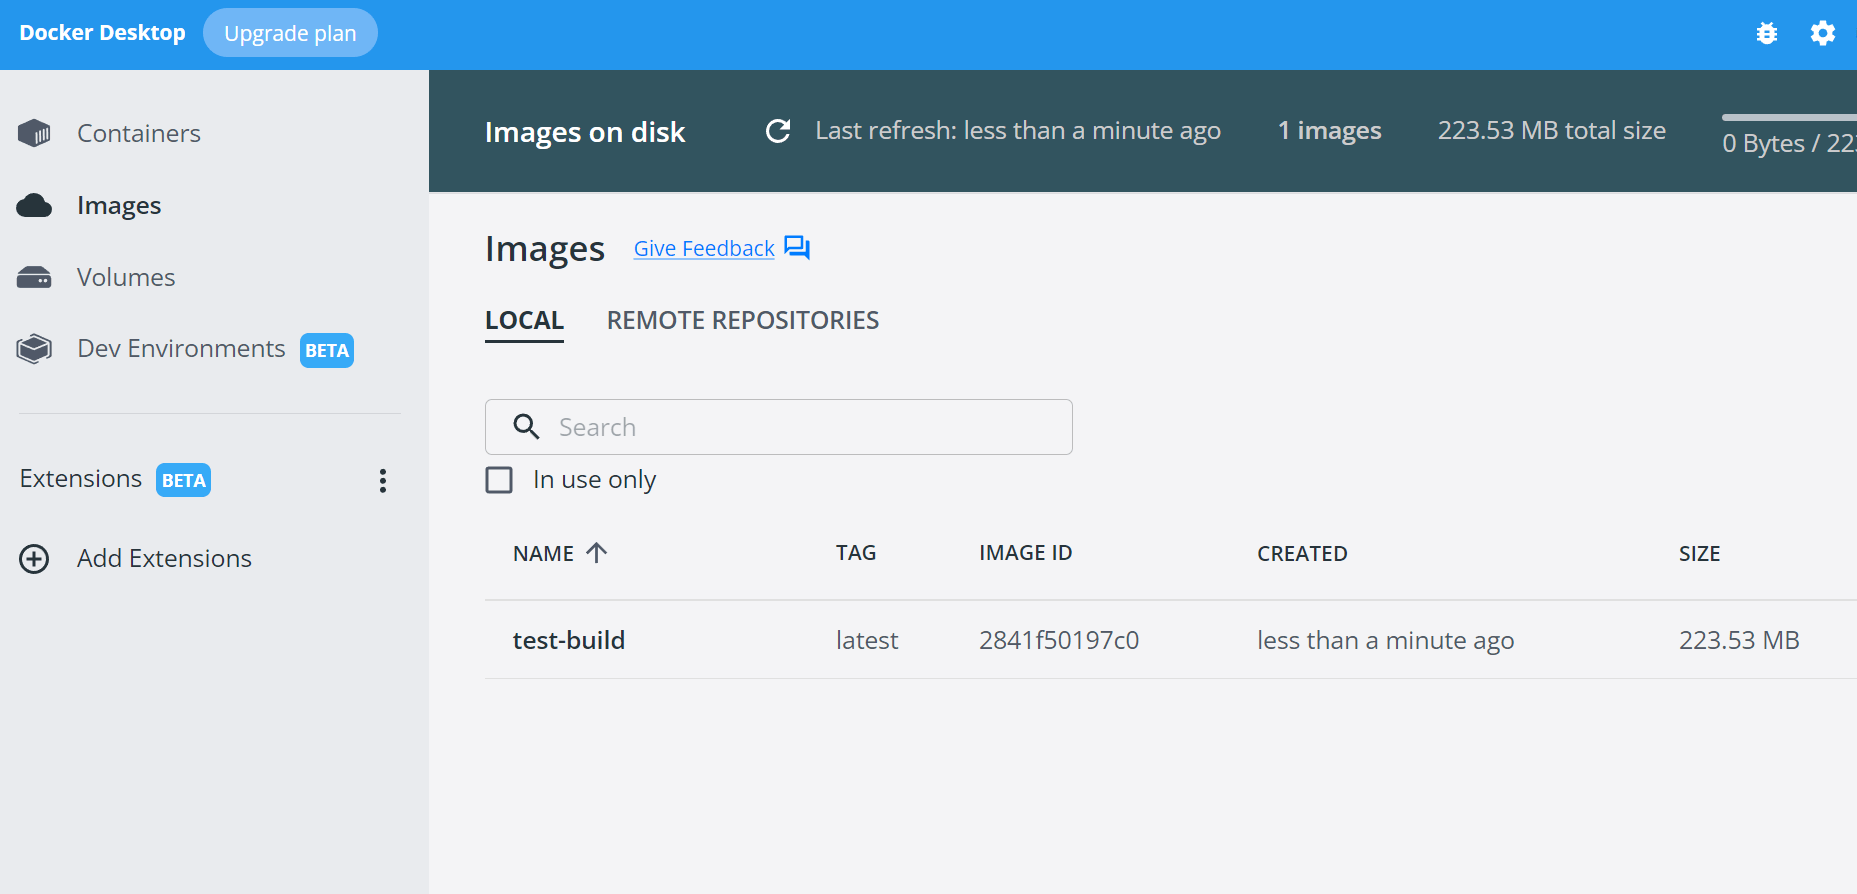
Now go to the command line(make sure you are in the folder where the docker file is) and run this command: docker build -t test-build . to make an image.
You can run this command: docker images to see the newly created images or you can just open the Docker Desktop application and select the Images tab.
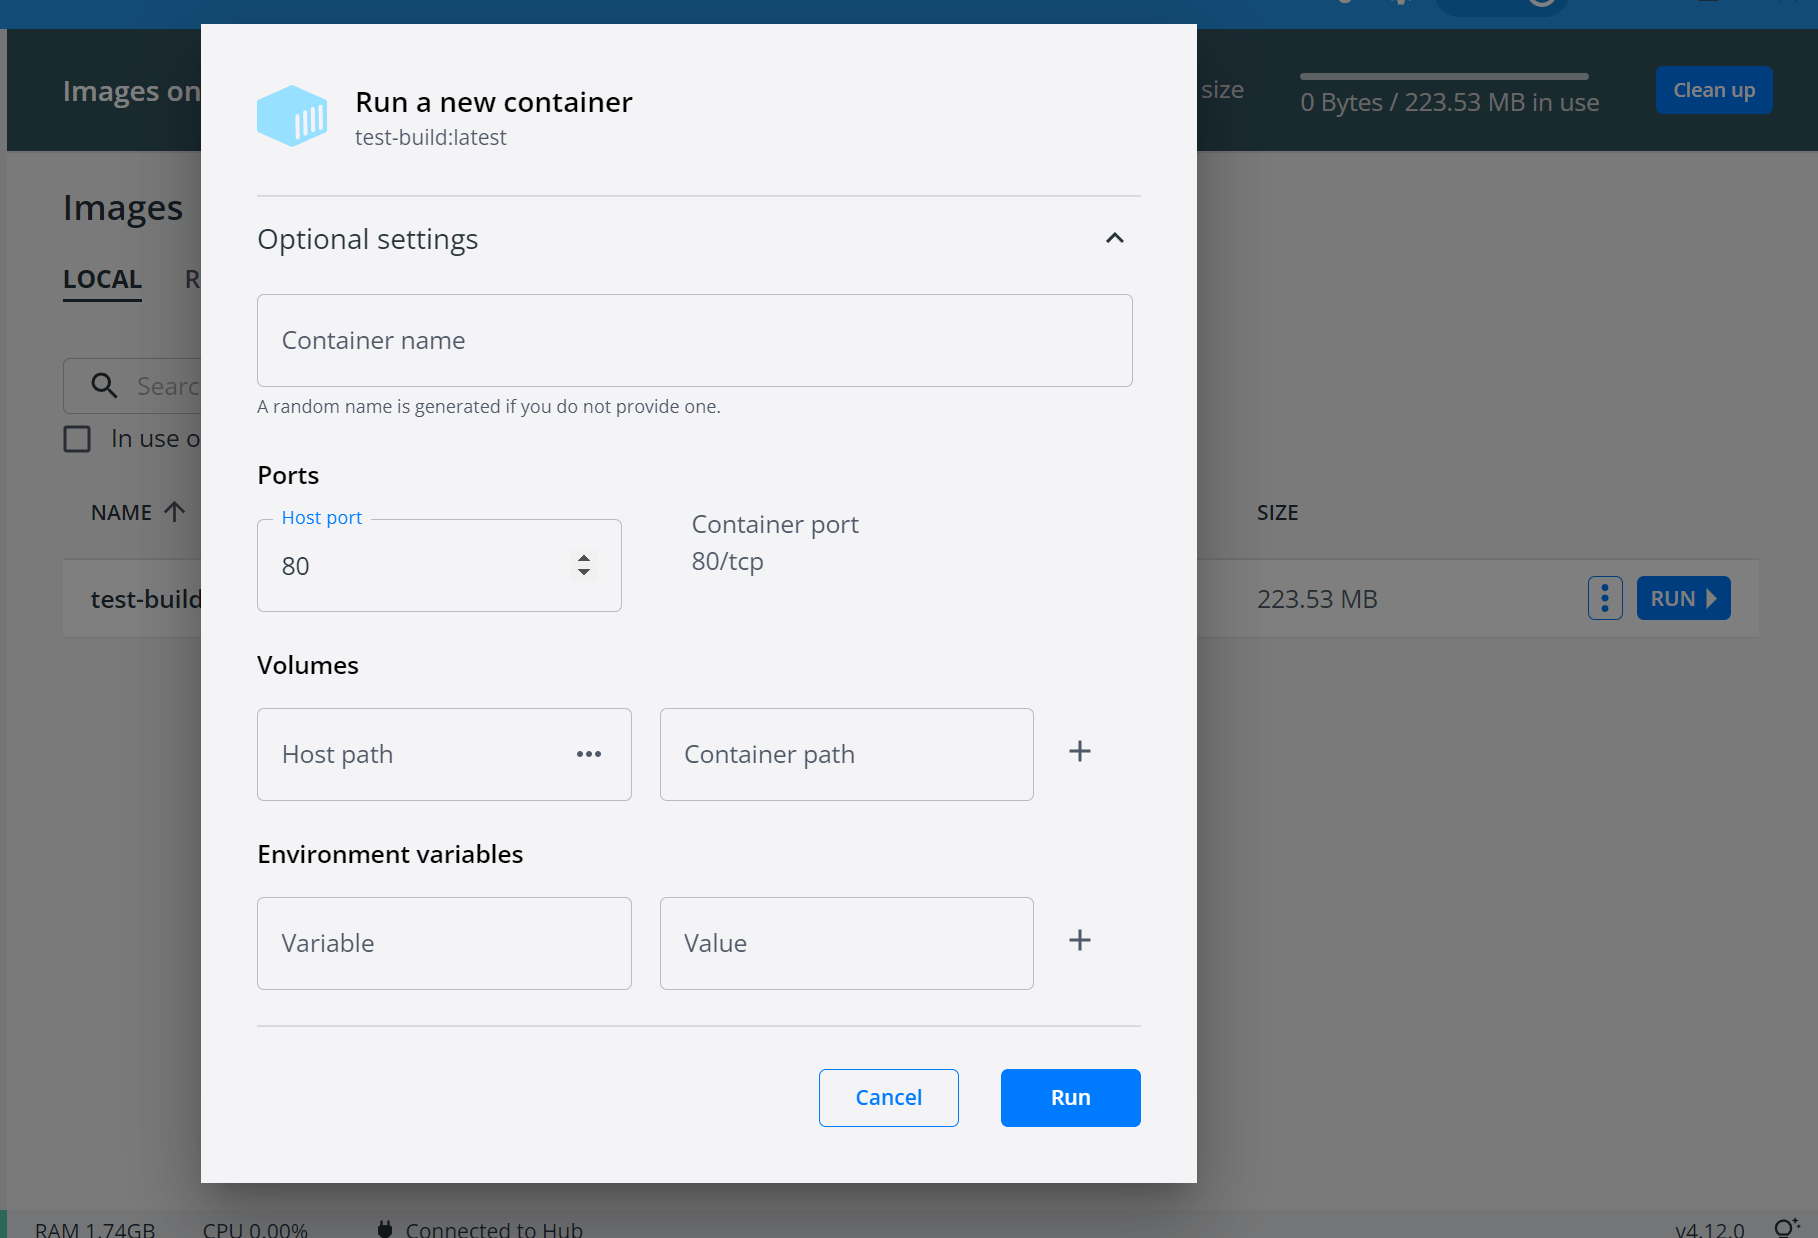
Next, you can run this command: docker run -d -p 80:8080 test-build to start up a new docker container from the image or you can just click the run button in Docker Desktop.
And the final result …
Docker CLI Commands
Here is a list of some common docker commands with short explanations.
//Build docker container.
//docker, command,  tag,  local docker dir
docker build -t test-build \.

//Run the container.
//docker, command,  -it(interactive terminal), port external map to internal, image name
docker run -it -p 80:8080 test-build

//Run the container in the background.
//docker, command,  -d(detached), port external map to internal, image name
docker run -d -p 80:8080 test-build

//Show running docker containers.
docker ps

//Stop container.
//docker, command, container name
docker stop TestContainer

//Show image builds.
//docker, command
docker images

//Get bash access to container.
//docker, command, it(interactive terminal), container ID, path to bash
docker run -it 5sd4f564s6df /bin/bash
//Or if the above doesn’t work:
docker run -it 5sd4f564s6df /bin/sh

//Removing images and containers.
docker rm  //remove container
docker rmi //remove image

//Prompts you for your credentials.
docker login

//Pulls an image from docker hub or a private repository.
docker pull nameOfTheImage

//Pushes an image to docker hub or a private repository.
docker push nameOfTheImage
Note: You can make your own private container registry(I once used Azure Container Registry for example) or use a public one like Docker Hub to push/pull your images to/from.
Docker Compose
Docker compose can be used to run multiple containers at once. For example, if you want to set up something like a WordPress site you will need a web server and a MySQL database. We can use the docker-compose.yaml file to define all these services and their behavior.
Note: Ideally you would just get a WordPress container image that has all of this already installed. This example is used just to demonstrate how to use docker compose.
docker-compose.yaml
#Specify the docker version we are using.
version: "3"

#Define services/containers.
services:
  #1. - Web server.
  web:
    #Specify base image. Could be your image or one from docker hub.
    image: "php:7.4-apache"
    #Connects ./src from project folder to /var/www/html folder within the container.
    volumes:
      - "./src/wordpress:/var/www/html/wordpress"
    #Restart on crash.
    restart: 'always'
    #Specifies that the DB should be running before the web server.
    depends_on:
      - db
    #Maps internal docker ports to outer port.
    ports:
      - '8080:80'
    #Specifies connection with the DB service.
    links:
      - db
    networks: #Connects this container to myNewNetwork network.
      - myNewNetwork

  #2. - Database.
  db:
    #Specify base image.
    image: mysql:latest
    #Restart on crash.
    restart: 'always'
    #When a container is shut down it will lose all it's data.
    #We can define volumes a wher we can store data Persistance
    volumes:
      - ./src/dbData:/var/lib/mysql
    #Define environmental variables that will be passed to the container when it runs.
    environment: #${ someVariableName } can be used to define a variable you will need to pass with the docker-compose command.
                 #This way whoever uses this can easily set their own user./pass. without changing the docker-compose file.
      MYSQL_DATABASE: "wordpress"
      MYSQL_USER: "user" #${USERNAME} <== example of how it can be used.
      MYSQL_PASSWORD: "somepassword" #"${MYSQL_PASSWORD}" <== example how it can be used.
      MYSQL_ROOT_PASSWORD: "somepassword" #"${MYSQL_PASSWORD}" <== example how it can be used.
    networks: #Connects this container to myNewNetwork network.
      - myNewNetwork

#Here we can define our networks.
networks:
  myNewNetwork: #Define a new network.
    driver: bridge #Sets bridge mode(similar to when you setup VMs).
Docker Compose Commands
#Builds and runs all the containers/images specified in the docker-compose.yaml file.
docker-compose up

#Stops all the containers/images specified in the docker-compose.yaml file.
docker-compose down
Result
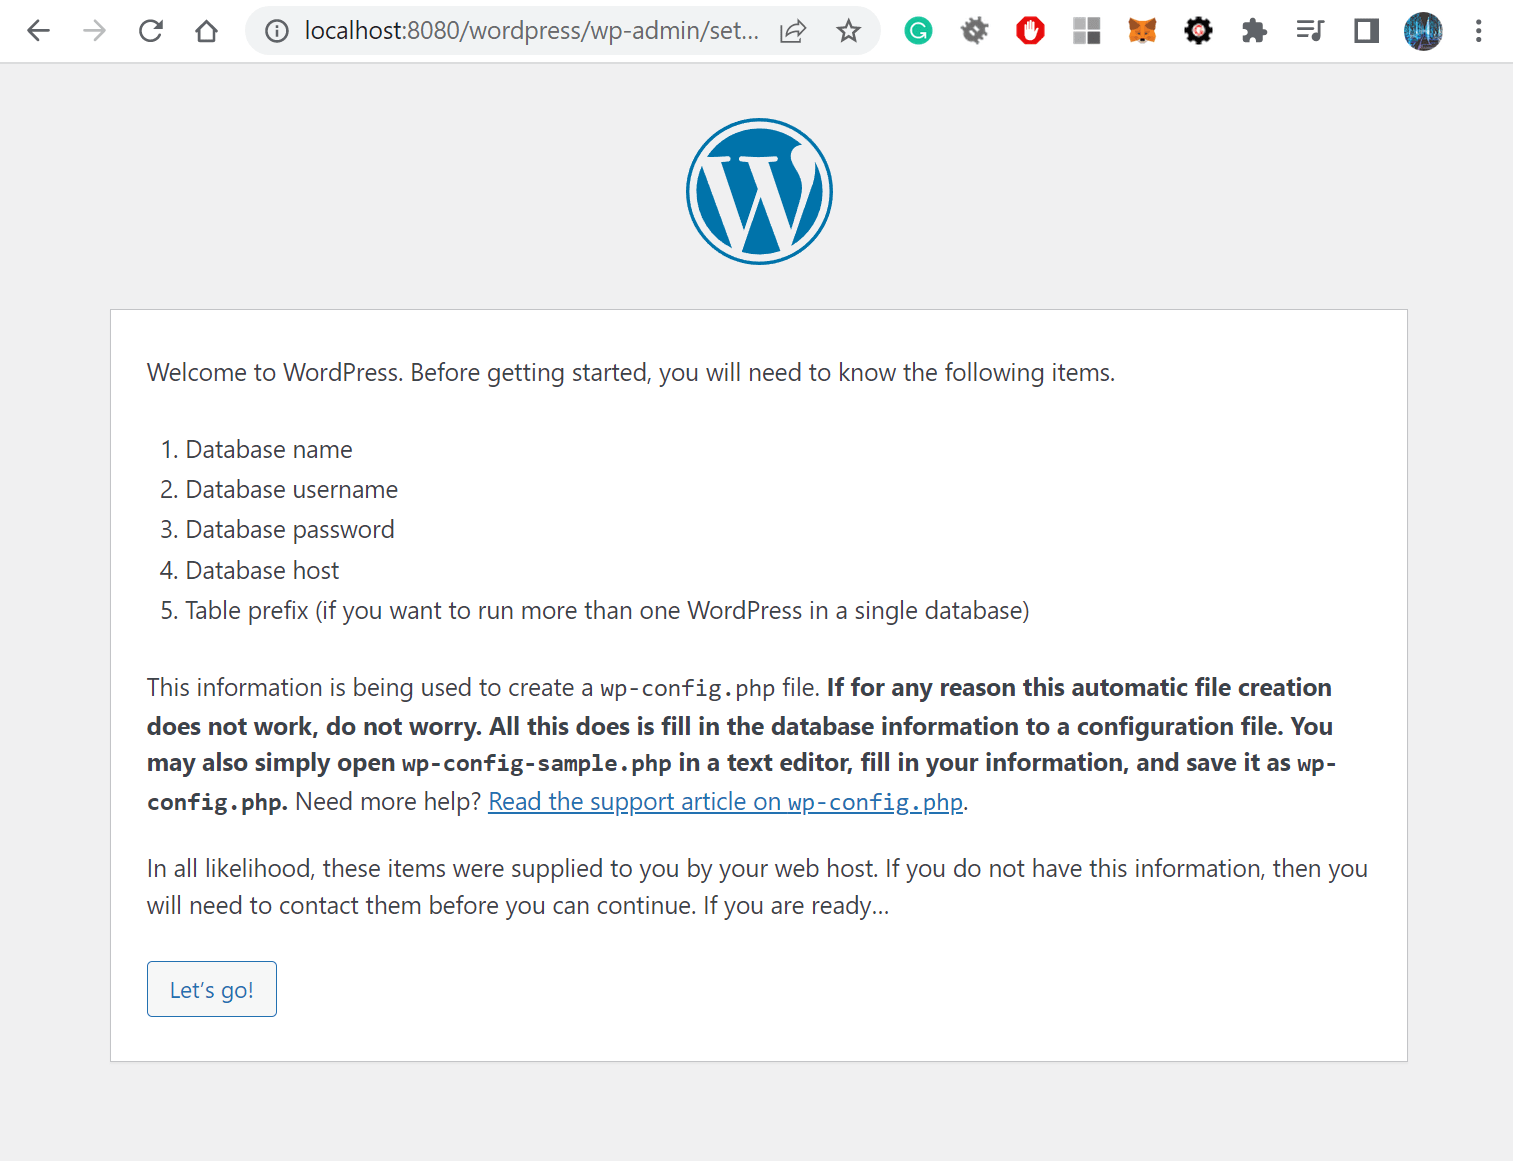
If we go to localhost:8080 after running docker-compose up we should get the WordPress installation wizard.
About
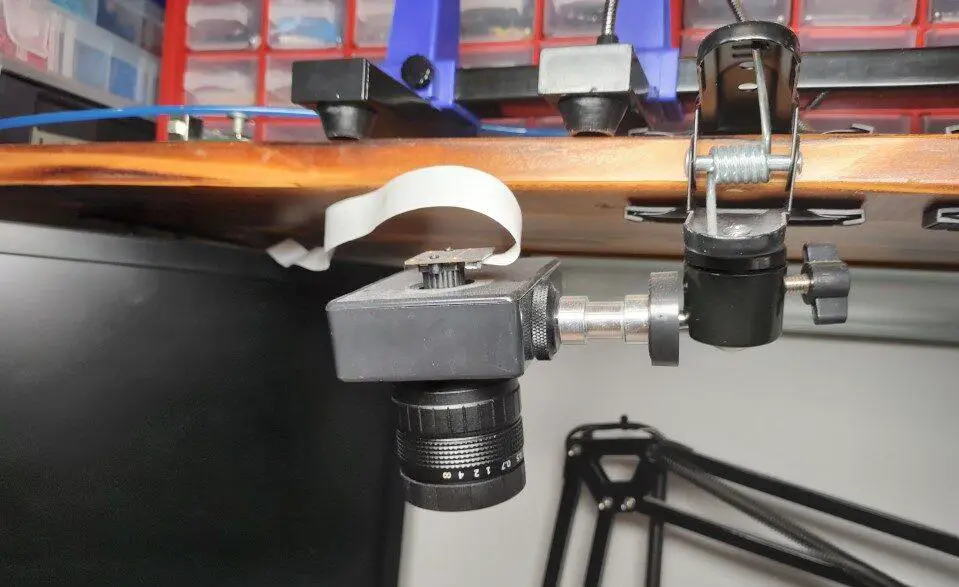
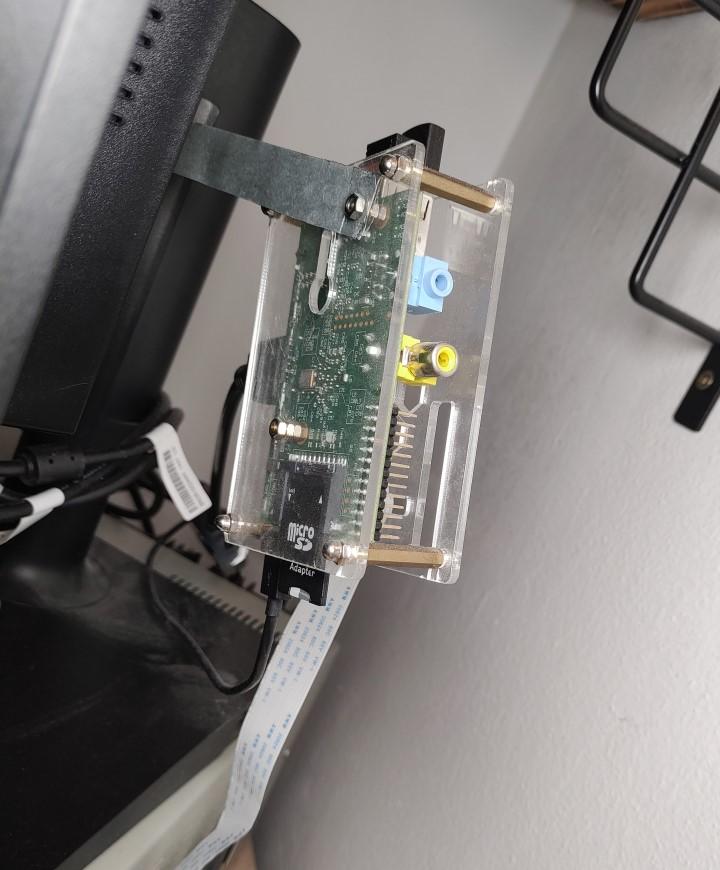
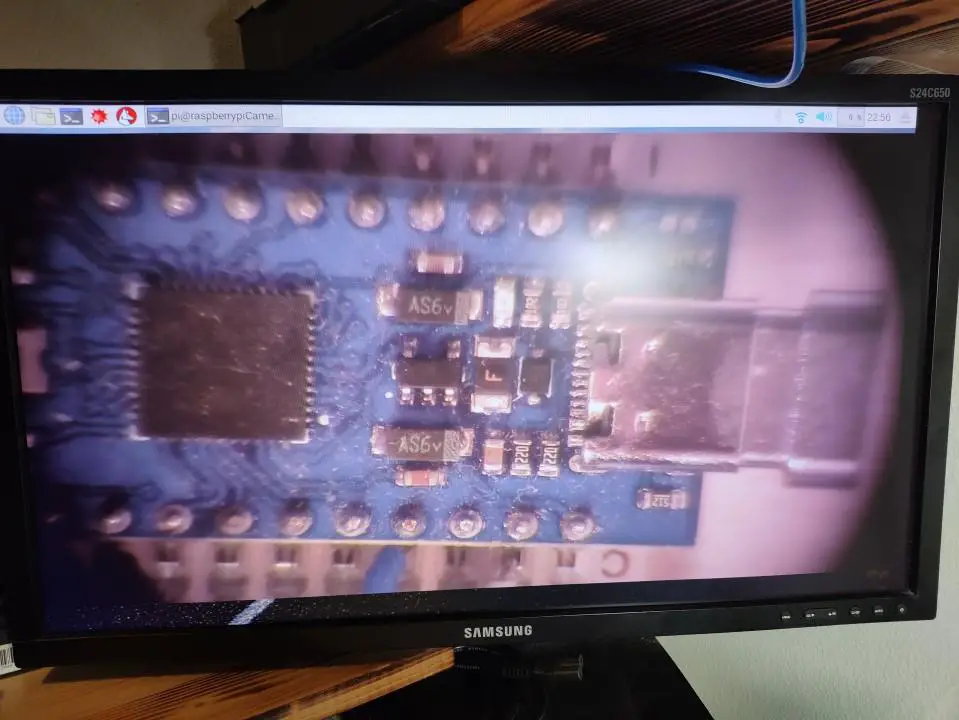
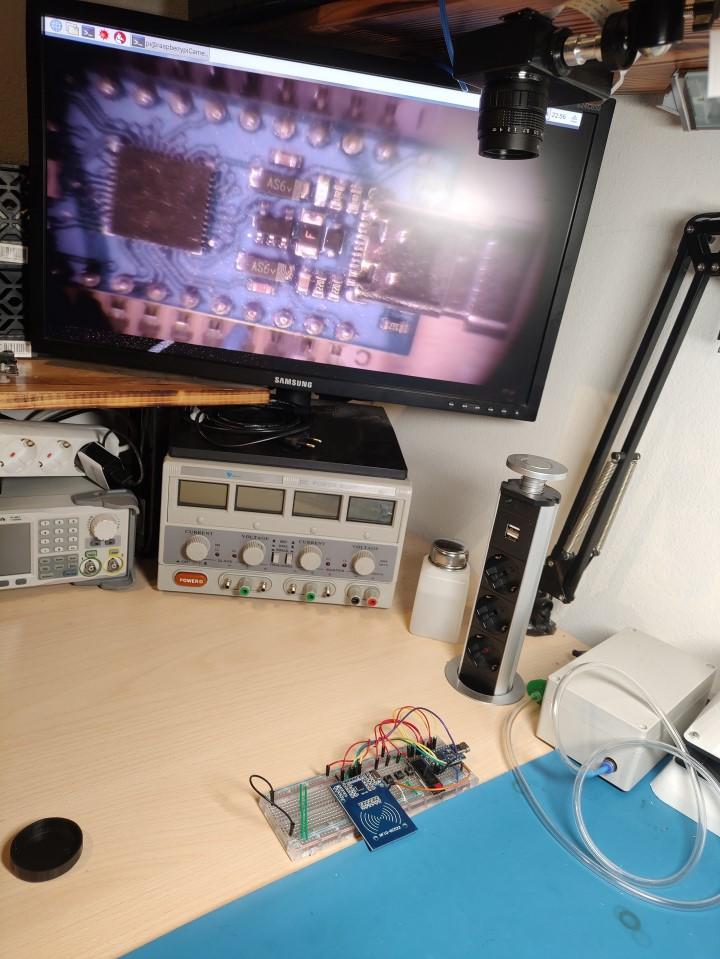
In this post, I’ll show you a Raspberry Pi microscope I made for soldering and inspecting PCBs. The great thing about it is that it has a long working distance. This enables the microscope to be mounted on the shelf above my workbench so it doesn’t get in the way. An additional benefit is that the image doesn’t shake if you bump the table when working.
I mounted the Raspberry Pi behind the monitor which will be used to display the image. The camera is connected to the Pi via an extended ribbon cable.
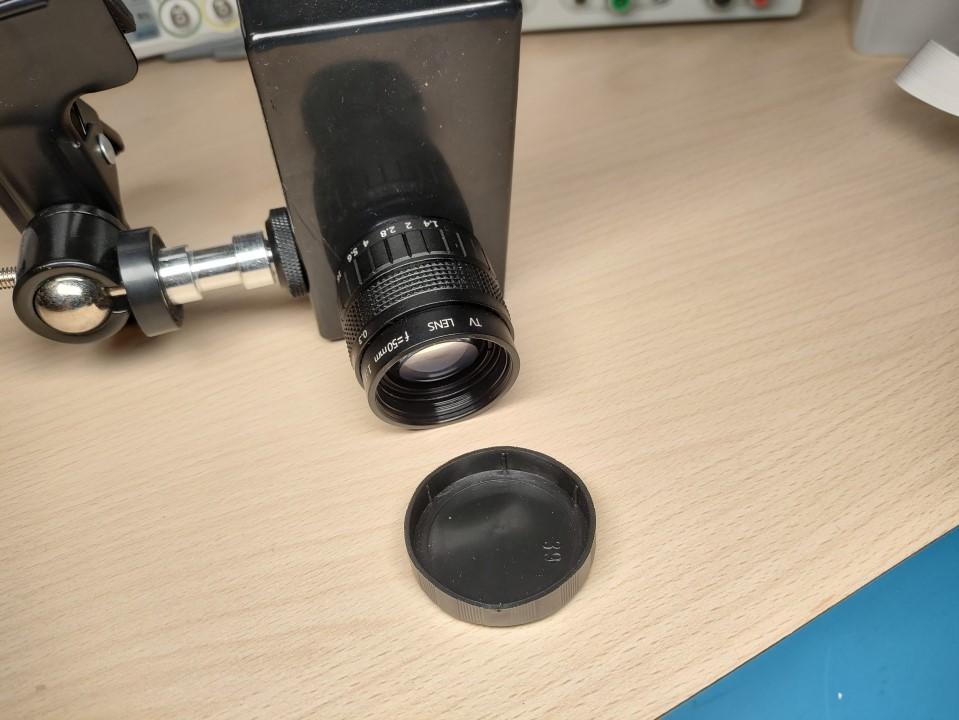
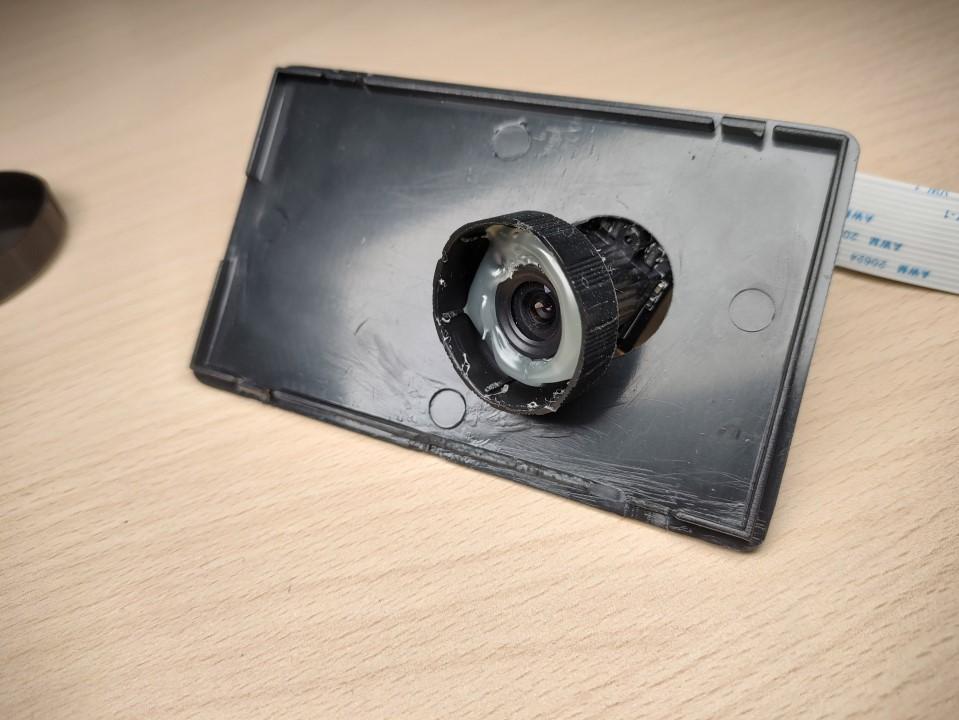
The lens is mounted to the plastic box which is mounted onto the clamp. To attach the camera to the lens I drilled a hole into the plastic lens cap and hot glued it in.
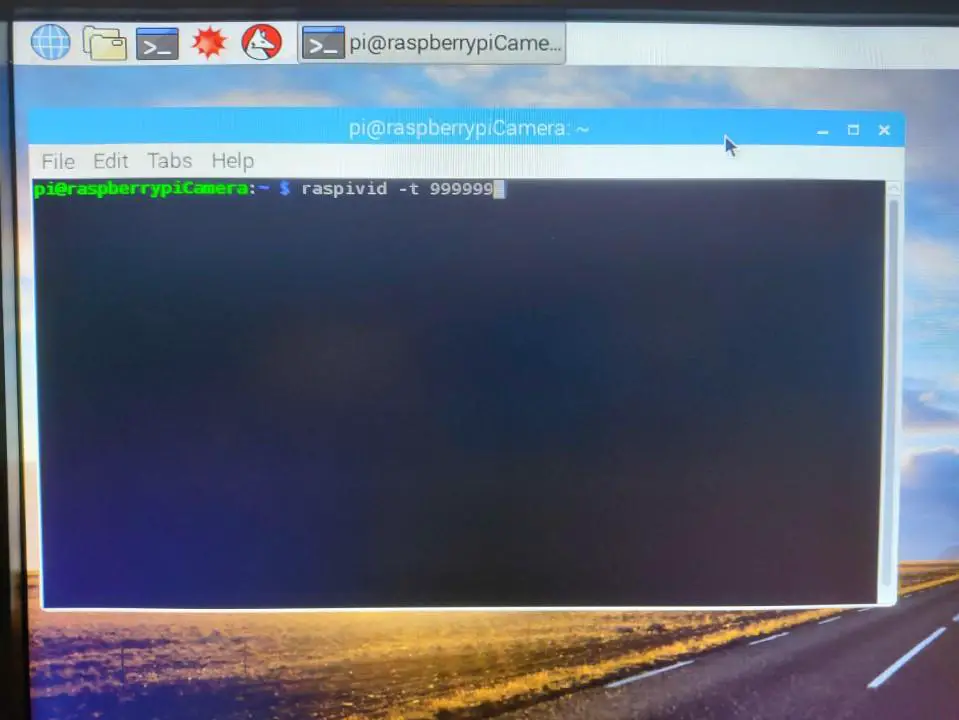
To see a continuous video feed from the camera on the Raspberry Pi type this into the command line: raspivid -t 999999
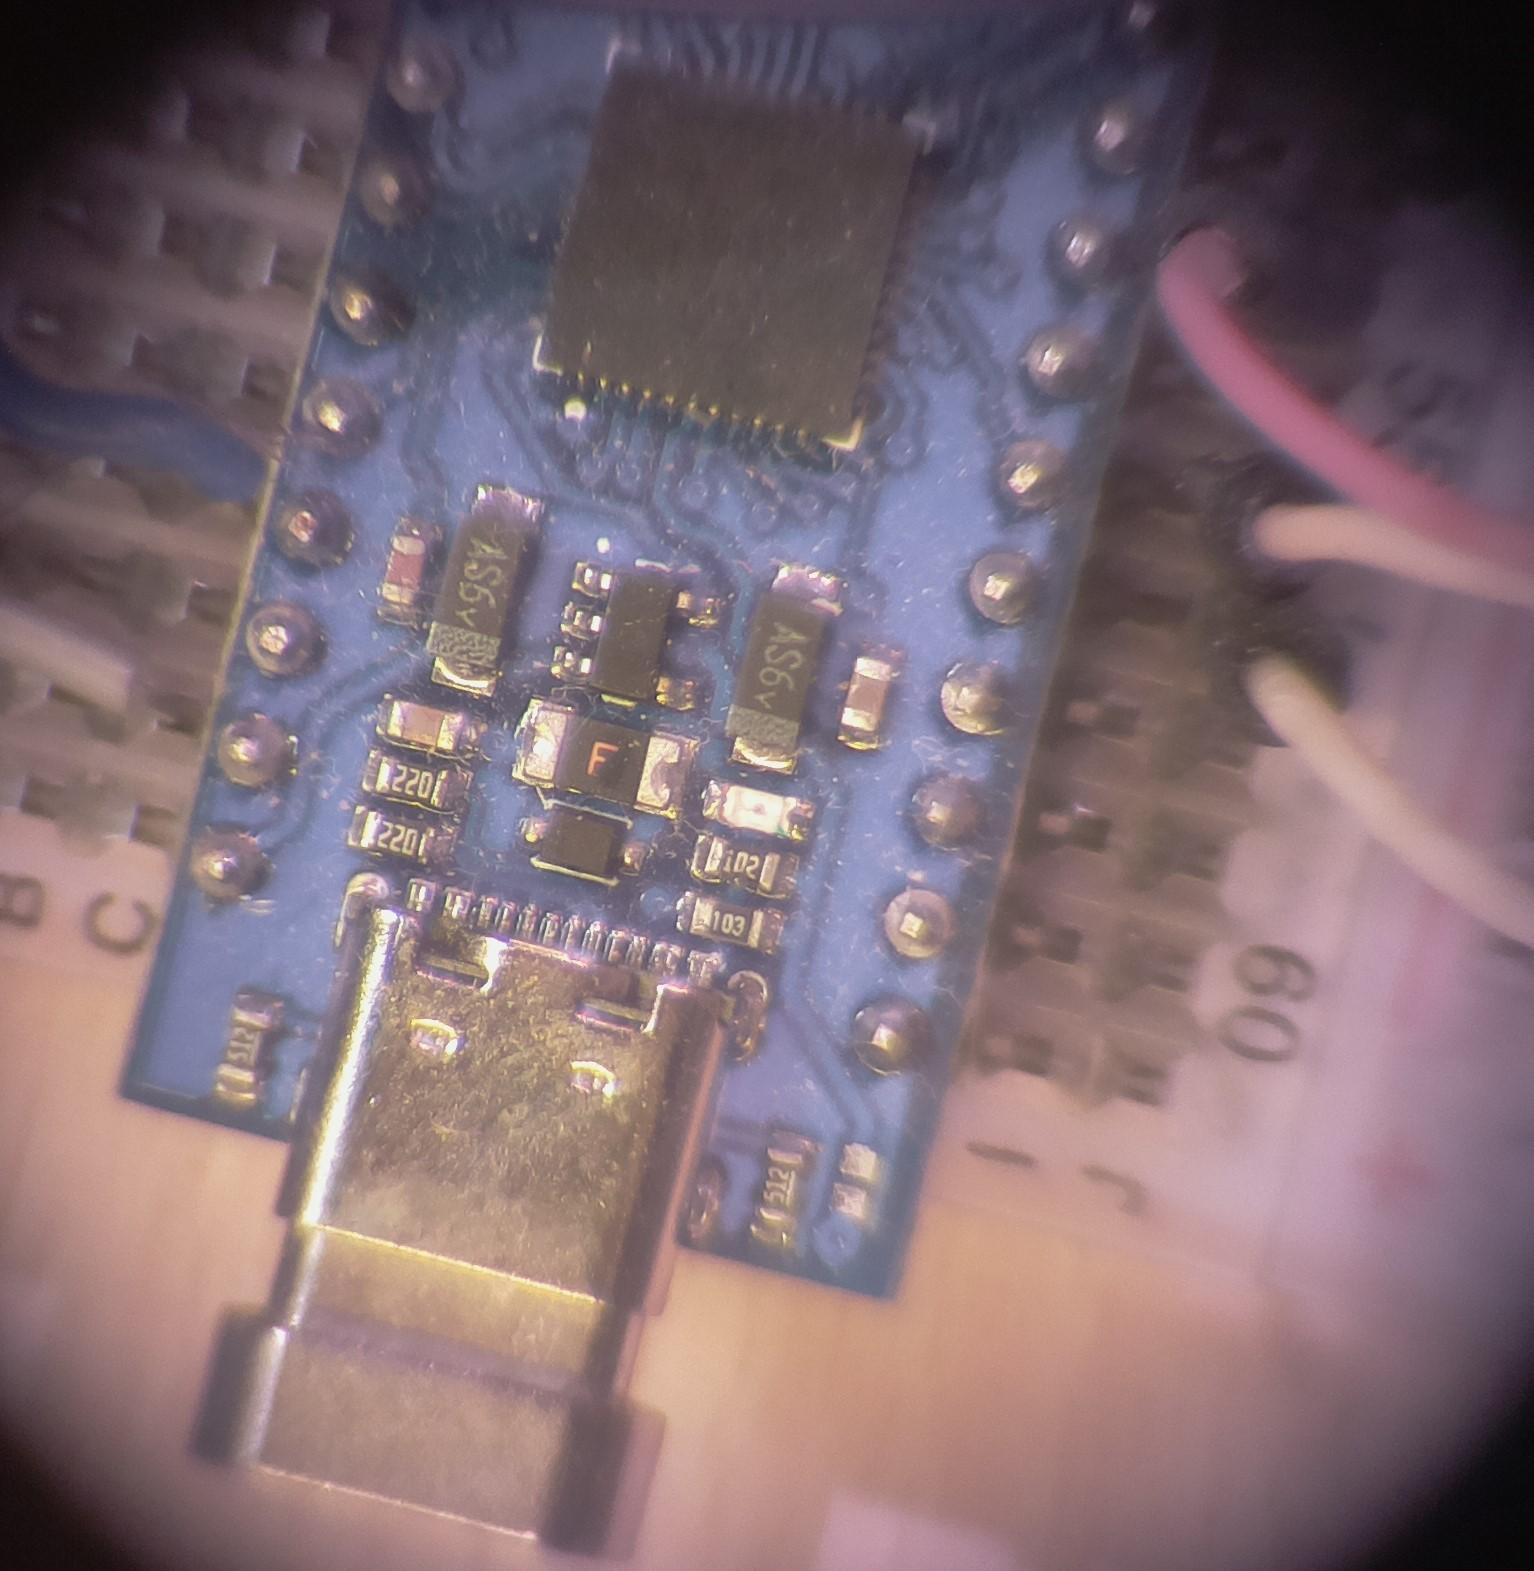
This is the final result:
About
This post is a cheat sheet for transact SQL or T-SQL for Microsoft Server. I wrote this for myself so if I ever have trouble remembering some of the more common queries(as I don’t work with databases on a daily basis) I can just look them up on my own site. And maybe someone out there on the internet will find this useful for themselves as well.
Here I made a post demonstration of how to execute queries in C#.
Note: I covered some of the more common stuff here. If you want a cheatsheet/reference that covers everything in more detail I recommend you check out this great resource here.
SQL Statements To Create, Delete, Modify, Fill and Empty a Table
/********************** Create a table ***********************/

CREATE TABLE nameOfYourTable(
   column1 datatType, /*for example: varchar, text, int, numeric, binary, ...*/
   column2 dataType,
   column3 dataType,
   PRIMARY KEY(nameOfTheKeyColumn)
);

/*************************************************************/


/********************* Modify the table **********************/

ALTER TABLE nameOfYourTable ALTER COLUMN nameOfTheColumn dataType

/*************************************************************/


/***************** Insert data into a table ******************/

INSERT INTO nameOfYourTable (column1, column2, column3)
VALUES (value1, value2, value3);

/*************************************************************/


/***************** Update data in the table ******************/

UPDATE nameOfYourTable
SET column1 = yourNewValue, column2 = yourNewValue
WHERE condition;

/*************************************************************/


/***************** Delete data from a table ******************/

DELETE FROM nameOfYourTable WHERE condition

/*************************************************************/


/**************** Delete all data in a table *****************/

TRUNCATE TABLE nameOfYourTable

/*************************************************************/


/********************* Delete the table **********************/

DROP TABLE nameOfYourTable

/*************************************************************/
Data Querys
/***************** Query data from a table *******************/

SELECT column1 FROM nameOfYourTable

/*************************************************************/


/*************** Query data with a condition *****************/

SELECT column1 FROM nameOfYourTable WHERE condition

/*************************************************************/


/******************* Order and group data ********************/

SELECT column1, column2, column3 FROM nameOfYourTable WHERE condition
ORDER BY column1ASC ASC /*ASC or DESC*/

SELECT column1, column2 FROM nameOfYourTable WHERE conditions
GROUP BY column1
ORDER BY column1 ASC /*ASC or DESC*/

/*************************************************************/
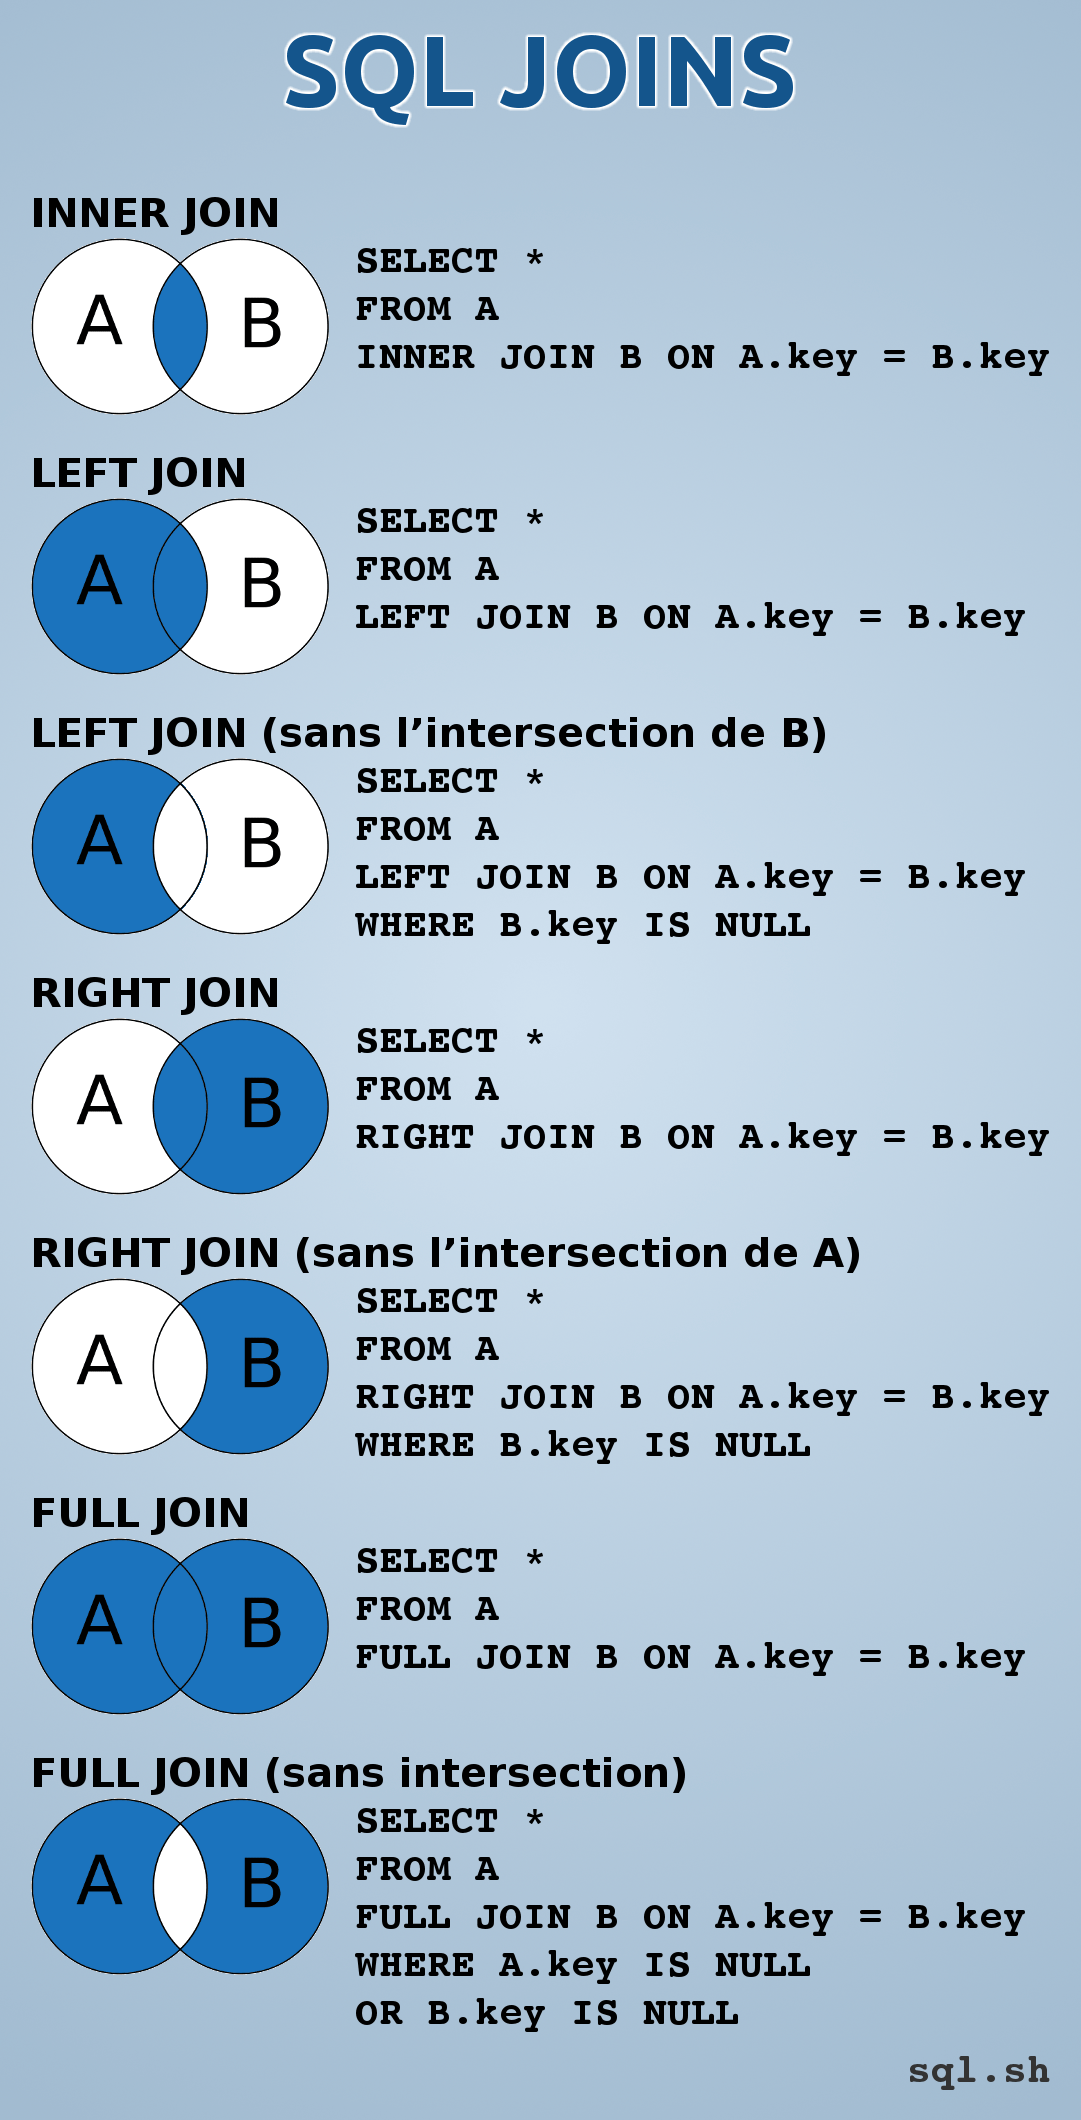
Joins
I only added an inner join example and added this lovely graphic I have found that shows you all the other types of joins.
/*************** Copy one table into another *****************/

SELECT * FROM firstTable INNER JOIN secondTable ON firstTable.key = secondTable.key

/*************************************************************/
/***************** Aggregate functions ******************/

/* Functions: COUNT(), AVG(), SUM(), MIN(), MAX()*/

SELECT AVG(column1) FROM nameOfYourTable

/*HAVING must be used for the condition instead of WHERE when aggregate functions used.*/
SELECT column1 FROM nameOfYourTable HAVING SUM(column1) > 20

SELECT column1 FROM nameOfYourTable
GROUP BY column1
HAVING MAX(column1) > 20;

/*************************************************************/
Constraints
/********************** Table constraints ***********************/

CREATE TABLE nameOfYourTable (
    PKID int NOT NULL PRIMARY KEY,  /*defines primary key*/
	column2 int NOT NULL,			/*can't be null*/
	column3 int UNIQUE,				/*each entry will have to be unique*/
    FKID int FOREIGN KEY REFERENCES nameOfYourSecondTable(primaryKeyOfSecondTable) /*defines foreign key and links it to the primary key of another table*/
);

/*************************************************************/


/********************* Create an index ***********************/

CREATE INDEX indexName ON nameOfYourTable (column1, column2, ...)

/*************************************************************/
Transactions And Error Handling
Error Handling
/********************** Error handling ***********************/

BEGIN TRY
	/*
		Your queries...
	*/
END TRY
BEGIN CATCH
	/*
		Your error handling code...
	*/
	/*For example, if an error occurs you can retrieve the information about it.*/
	SELECT
		ERROR_NUMBER() AS ErrorNumber,
		ERROR_SEVERITY() AS ErrorSeverity,
		ERROR_STATE() AS ErrorState,
		ERROR_PROCEDURE() AS ErrorProcedure,
		ERROR_LINE() AS ErrorLine,
		ERROR_MESSAGE() AS ErrorMessage;
END CATCH;

/*************************************************************/
Transactions
/*********************** Transactions ************************/

BEGIN TRY
    BEGIN TRANSACTION;

    INSERT INTO nameOfYourTable(column1, column2, column3) VALUES (val1, val2, val3);
    INSERT INTO nameOfYourTable(column1, column2, column3) VALUES (val1, val2, val3);
    ...

	/*If everything within the transaction block executes seccesfully the changes will be saved.*/
    COMMIT TRANSACTION; /*Else a transaction will be in the uncommited state.*/
END TRY
BEGIN CATCH
    IF @@TRANCOUNT > 0
        ROLLBACK TRANSACTION; /*Revert to the previous state if an error occoured.*/
END CATCH;

/*************************************************************/


/************** Reading Uncommited Transactions **************/

/* By default noncommited transactions can't be read. */
/* You can chanage this with the following statement: */
SET TRANSACTION ISOLATION LEVEL READ UNCOMMITTED

/*************************************************************/
Control Of Flow
/******************** IF ELSE Statement **********************/

IF (yourCondition)
   /* your code ... */
ELSE IF (yourCondition)
   /* your code ... */
ELSE
   /* your code ... */
END

/*************************************************************/


/******************** SWITCH Statement ***********************/

SELECT
	CASE column1
		  WHEN 1 THEN PRINT 'one' /* PRINT simply prints the value to the console. */
		  WHEN 2 THEN PRINT 'two'
		  WHEN 3 THEN PRINT 'three'
		  ELSE
	END
FROM nameOfYourTable


/*************************************************************/


/******************* WHILE LOOP ********************/

WHILE yourCondition
BEGIN
   /* your code ... */

   BREAK    /* Can be used to break out of the loop. */
   CONTINUE /* Can be used to skip any further code in the current iteration of the loop and start the next loop. */
END

/*************************************************************/

/******************* GO TO Statement ********************/

GOTO section2 /* Code will execute from the "section2:" label. */

section1:
    /* your code ... */
section2:
    /* your code ... */

/*************************************************************/


/*************************** THROW ***************************/

IF(yourCondition)
BEGIN
	PRINT 'Error';
	THROW /* Used to raise an exception. */
END

/*************************************************************/
Other
String Functions
/********************* String Functions ***********************/

--SUBSTRING(string, start, length)
SELECT SUBSTRING('Some string', 3, 6) -- Output: me str

--          (string, length)
SELECT LEFT ('Some string', 3)		  -- Output: Som
SELECT RIGHT('Some string', 3)		  -- Output: ing

--Gives length of the string.
LEN('Some string')

/*************************************************************/
Data Type Conversion
/******************* DATA TYPE CONVERSION ********************/

CAST('5' AS int)
CAST(5 AS varchar)
CAST('9/13/2022' AS DATETIME)
/* ... */

/* If cast fails TRY_CAST returns NULL instead of throwing an error. */
IF(TRY_CASTCAST('5' AS int) IS NULL)
  /* Do something to handle failed cast. */
ELSE
  /* Continue as normal. */

/* NOTE: CONVERT and TRY_CONVERT can also be used for data type conversion. */

/*************************************************************/
/*********************** Functions ***************************/

CREATE FUNCTION Addition (@a int, @b int) /*function name and parameters*/
  RETURNS int /* return type */
  AS
  BEGIN /* Code to be executed ... */
      DECLARE @result int;

      SET @result = @a + @b;

      RETURN(@result)
  END
GO

/*Call function.*/
PRINT dbo.Addition(5, 5);

/*************************************************************/
Dynamic SQL
/********************** Dynamic SQL **************************/

/*Declare variables.*/
DECLARE @id int;
DECLARE @query nvarchar;

/*Set the variable. If this was put in a function the parameter could be used here instead.*/
SET @id= '10';
/*Build query string.*/
SET @query = 'SELECT * FROM yourTableName WHERE ID = ' + @id;

/*Execute dynamic SQL.*/
EXEC sp_executesql @query;

/*************************************************************/
Copy a Table
/*************** Copy one table into another *****************/

SELECT * INTO nameOfYourTable FROM nameOfYourCopiedTable

/*************************************************************/
Stored Procedures
/******************* Making a stored procedure ********************/

/** Make sure the stored procedure doesn't already exist. **/
IF OBJECT_ID ( 'myStoredProcedure', 'P' ) IS NOT NULL
    DROP PROCEDURE myStoredProcedure

GO /* Execute the previous section of code */

/** Create new stored procedure. **/
CREATE PROCEDURE myStoredProcedure AS
	SELECT * FROM nameOfYourTable

GO

/* Call stored procedure */
EXEC myStoredProcedure @column = 'nameOfYourColumn';

/*************************************************************/
Triggers
/************************** Triggers **************************/

/** Make a new tigger. **/
CREATE TRIGGER yourTriggerName ON nameOfTheTable
AFTER /*FOR | AFTER*/ DELETE
AS
/*Code that executes on trigger.*/
BEGIN
    /*This code inserts the ID of the deleted row into the table DeletedRows so we can keep track of what was deleted(there are better ways of doing this but this is just an example).*/
    DECLARE @ID INT;
    SELECT @ID = ID FROM DELETED;
    INSERT INTO DeletedRows(id) VALUES (@ID);
END;

/* Delete trigger. */
DROP TRIGGER IF EXISTS yourTriggerName;

/*************************************************************/
Job Scheduling
/*********************** Job Scheduling ***********************/

/* For example, this job will run once a day at 22:00 and it will delete all of the entries older than 24h. */

USE msdb;
GO

/*Define a job.*/
EXEC sp_add_job
    @job_name = N'DeleteOlderThan24',
    @description = N'Deletes records older than 24h.';
GO

/*Define a job step. Multiple Steps can be added for a job.*/
EXEC sp_add_jobstep
    @job_name = N'DeleteOlderThan24',
    @step_name = N'DeleteOld_1',
    @subsystem = N'TSQL',
    @command = N'DELETE FROM nameOfYourTable WHERE dateColumn < DATEADD(hour, -24, GETDATE());',
    @retry_attempts = 1,
    @retry_interval = 1;
GO

/*Make a schedule.*/
EXEC sp_add_schedule
    @schedule_name = N'RunDailyAt22',
    @freq_recurrence_factor = 1,
    @active_start_time = 220000; /*Runs at 22:00:00*/
GO

/*Attach a job to the schedule.*/
EXEC sp_attach_schedule
   @job_name = N'DeleteOlderThan24',
   @schedule_name = N'RunDailyAt22';
GO

/*Assign the job to a server.*/
EXEC sp_add_jobserver
    @job_name = N'DeleteOlderThan24',
	@server_name = N'LOCAL';
GO


/* Delete job, job step, schedule and jobserver. */
EXEC sp_delete_job @job_name = 'DeleteOlderThan24';
EXEC sp_delete_jobstep @job_name = 'DeleteOlderThan24', @step_id = 1; --First step is removed.
EXEC sp_detach_schedule @job_name = 'DeleteOlderThan24';
EXEC sp_delete_jobserver @server_name = N'LOCAL', @job_name = 'DeleteOlderThan24';

/*************************************************************/
Creating Users And Logins
/****************** Create Login And User ********************/

CREATE LOGIN yourloginname WITH password='yourpassword';
GO

CREATE USER yourusername FOR LOGIN yourloginname
GO

EXEC sp_addrolemember N'db_ddladmin', N'yourusername'
GO

/* Note: If error "User must be in the master database." add this: */
USE master
GO

/*************************************************************/
User Permissions
You can see more about permissions in the official MS documentation here.
/*********************** Permissions **************************/

/*Give the user "someUsername" the permission to use INSERT on table "someTable".*/
GRANT INSERT ON someTable TO someUsername;

/*Deny the user "someUsername" the permission to use ALTER on table "someTable".*/
DENY ALTER ON someTable TO someUsername;

/*************************************************************/
User Roles
You can assign users to existing roles(see all the possible roles in the official MS documentation here). Or you can define your own roles with the privileges that you specify.
/************************* Roles ****************************/

/*Create your own custom role.*/
CREATE ROLE yourRoleName;

/*Grant the privilege to use SELECT on table "someTable" if a user is part of role "yourRoleName".*/
GRANT SELECT ON someTable TO yourRoleName;

/*Deny the privilege to change data of table "someTable" if a user is part of role "yourRoleName".*/
DENY ALTER. ON someTable TO yourRoleName;

/*Add role to a member*/
ALTER ROLE yourRoleName ADD MEMBER yourUserName

/*Remove role of a member*/
ALTER ROLE yourRoleName DROP MEMBER yourUserName

/*************************************************************/
Schemas
A schema is a group or collection of database items like tables, triggers, stored procedures, … This allows for a better organization of a database.
/************************ Schemas **************************/

/*Create a schema.*/
CREATE SCHEMA MySchema

/*Delete a schema.*/
DROP SCHEMA MySchema

/*Create a table on a schema*/
CREATE TABLE MySchema.MyTable(ID int, data nvarchar);

/*Read from a table from a certain schema.*/
SELECT * FROM MySchema.MyTable;

/*************************************************************/
File Groups
File groups can be used to split a database into multiple parts that can then be stored in different locations/different disks. This can improve performance. By default, everything is put on the PRIMARY filegroup. More about file groups here.
/*********************** File Groups *************************/

/*Create file group fg1 for database yourDatabase.*/
USE yourDatabase
GO

ALTER DATABASE yourDatabase
ADD FILEGROUP fg1
GO


/*Add files to file group fg1 for database yourDatabase.*/
ALTER DATABASE yourDatabase ADD FILE
    (
      NAME = N'file1',
      FILENAME = N'C:\SQLFG\file1.ndf',
      SIZE = 5 MB,
      MAXSIZE = 10MB,
      FILEGROWTH = 1 MB
    )
TO FILEGROUP fg1
GO

/*Add second file to file group.*/
ALTER DATABASE yourDatabase ADD FILE
    (
      NAME = N'file2',
      FILENAME = N'C:\SQLFG\file2.ndf',
      SIZE = 5 MB,
      MAXSIZE = 10MB,
      FILEGROWTH = 1 MB
    )
TO FILEGROUP fg1
GO


/*Create a table on the fg1 filegroup.*/
CREATE TABLE yourFirstTable(column1 nvarchar, column2 nvarchar) ON fg1;
GO

/*************************************************************/
Bulk Insert
/*********************** Bulk Insert *************************/

BULK INSERT MyTable FROM 'C:\Users\SomeUser\Desktop\fileToImport.sql';

/*************************************************************/
sqlcmd can be used to run queries on the SQL server from the command line. This can be useful for scripting or for processing very large files. For example, if you try to open a very large(around 1GB or more) .sql file in MSSQL Studio it tends to freeze up and you won’t be able to run the script. In such a case the sqlcmd can be used, see the example below(replace text and quote marks with your information).
sqlcmd -S "ip or domain of the SQL server" -U "username" -P "password" -i "your SQL script file".sql
Indexes
/************************** Indexes ***************************/

/*Clustered Index*/
/*Only one can be created as the data is part of the index structure*/
CREATE CLUSTERED INDEX yourIndexName ON yourTableName (column);

/*Non-Clustered Index*/
/*Multiple can be created as the index structure doesn't contain the data but only the references to the data itself.*/
CREATE NONCLUSTERED INDEX yourIndexName ON yourTableName (column);

/*You can build the index over multiple columns (column1, column2, ...)*/

/*************************************************************/
SSMS Query Analysis Tools
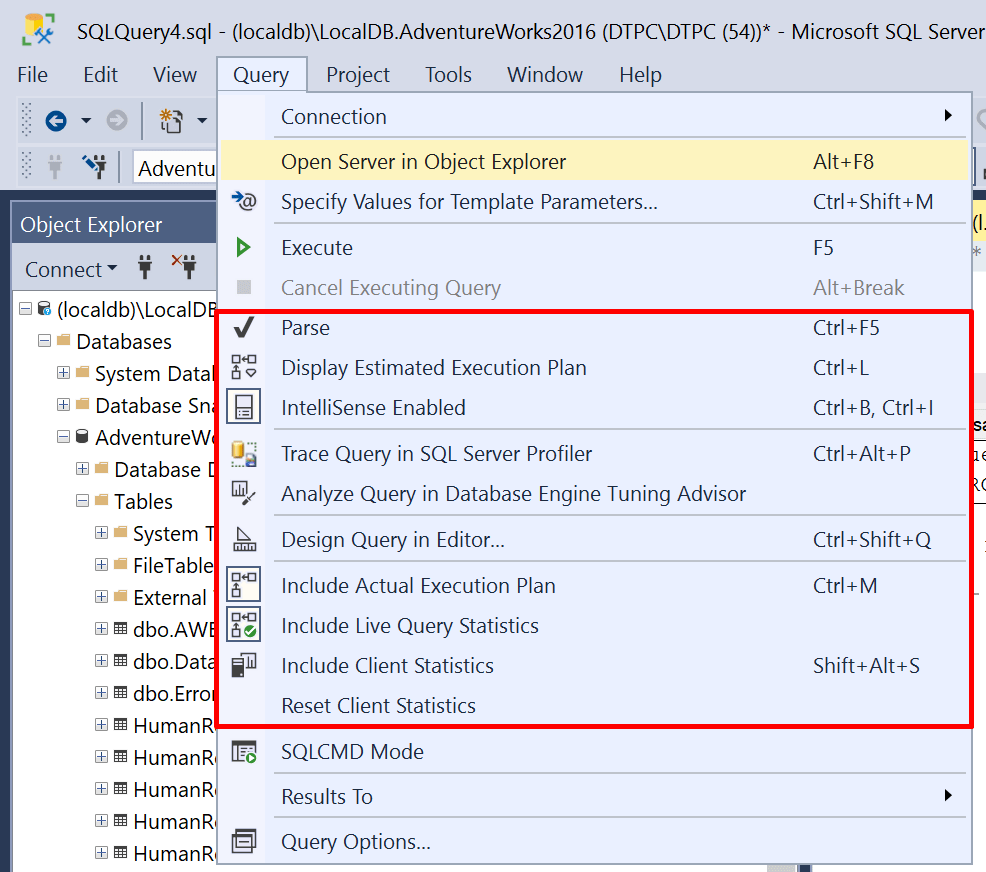
SSMS(SQL Server Management Studio) provides you with tools to analyze the query execution plan and performance so you can then optimize it. These tools are available in thge Query drop down menu.
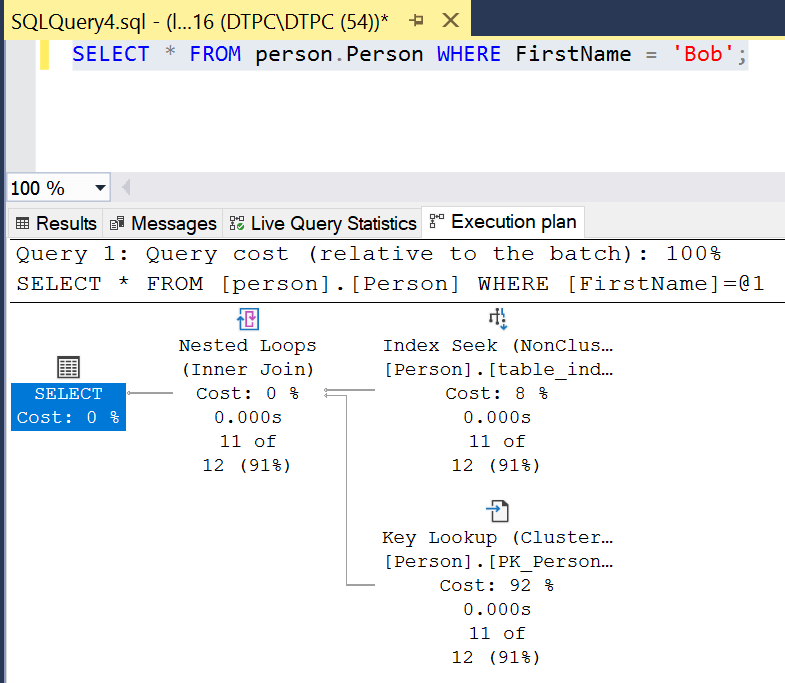
Let’s see an example for this query.
SELECT * FROM person.Person WHERE FirstName = 'Bob';
Get Open Sessions
If you are using the Azure SQL server serverless database you might run into the problem where your DB won’t automatically shut down when there is no traffic and as a result run up your cost. If your Azure database isn’t going to sleep there is a possibility that a connection was left open which is preventing it from doing so. Using the queries below you can see all the open sessions and close them if needed.
/************** Get open sessions to Azure DB ****************/

SELECT session_id, host_name, program_name, client_interface_name, login_name, status, login_time, last_request_start_time, last_request_end_time FROM sys.dm_exec_sessions AS s INNER JOIN sys.dm_resource_governor_workload_groups AS wg ON s.group_id = wg.group_id WHERE s.session_id <> @@SPID AND ( ( wg.name like 'UserPrimaryGroup.DB%' AND TRY_CAST(RIGHT(wg.name, LEN(wg.name) - LEN('UserPrimaryGroup.DB') - 2) AS int) = DB_ID() ) OR wg.name = 'DACGroup' );

--Close a session
KILL processID

/*************************************************************/
About
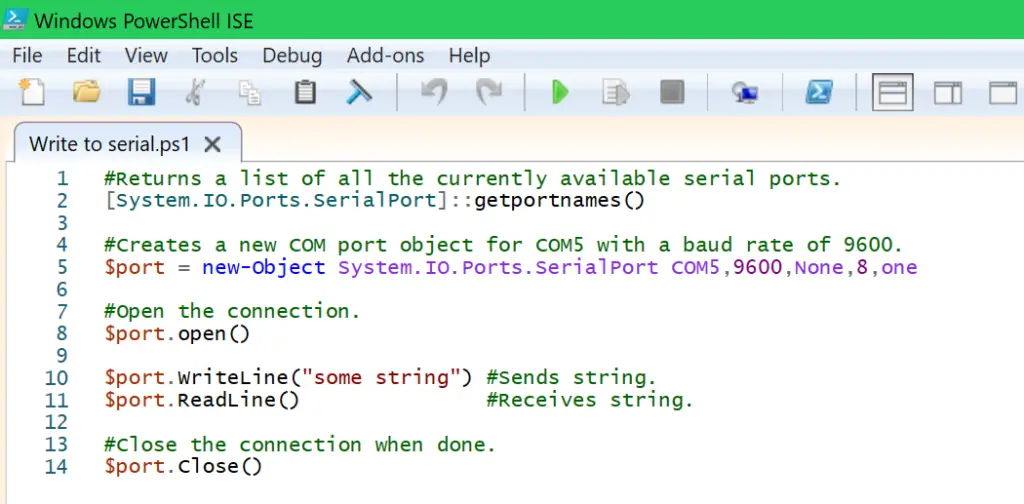
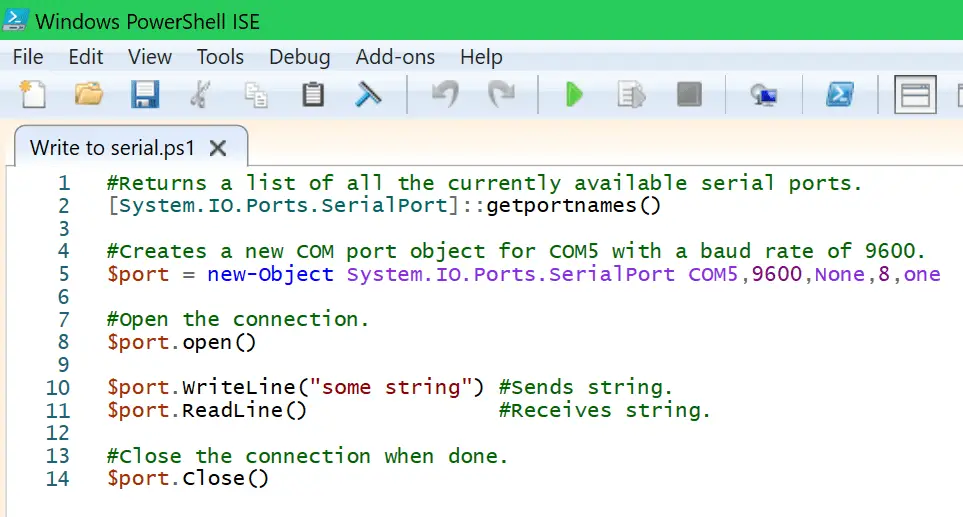
In this short post, I’ll show you how to read and write to/from the serial port using Powershell.
Let’s see how to do it in the script example below.
#Returns a list of all the currently available serial ports.
[System.IO.Ports.SerialPort]::getportnames()

#Creates a new COM port object for COM5 with a baud rate of 9600.
$port = new-Object System.IO.Ports.SerialPort COM5,9600,None,8,one

#Open the connection.
$port.open()

$port.WriteLine("some string") #Sends string.
$port.ReadLine()               #Receives string.

#Close the connection when done.
$port.Close()
About
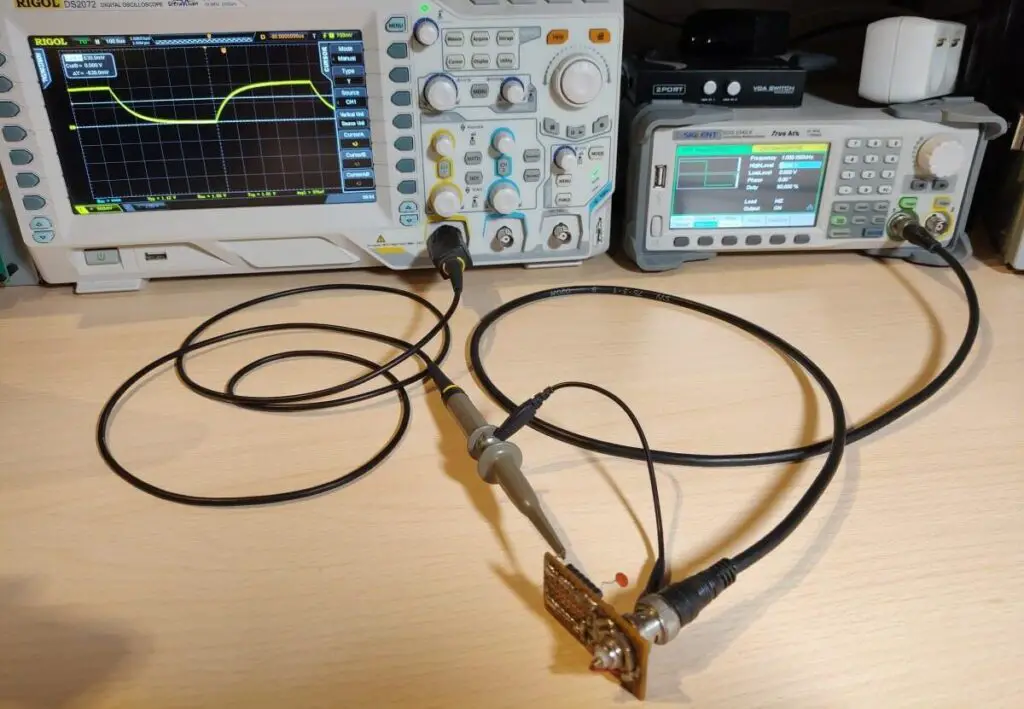
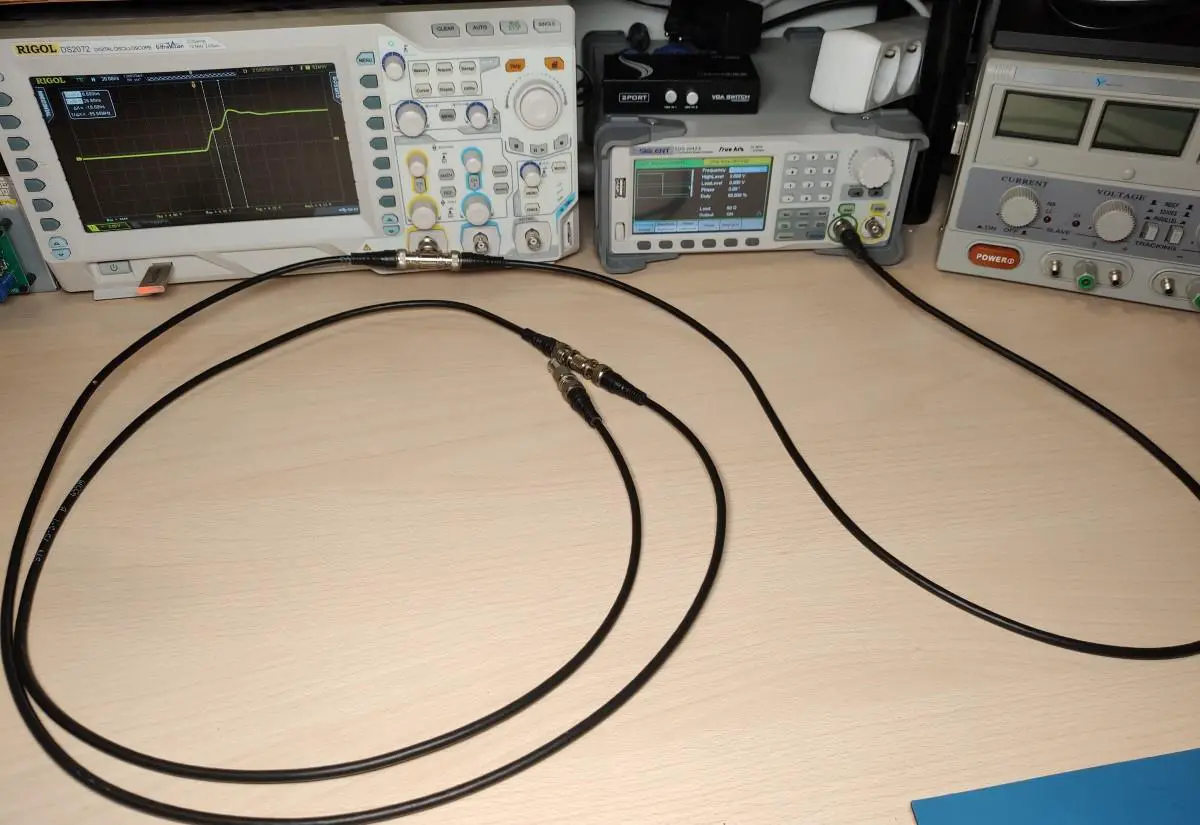
In this post, I’ll show you how to measure the length or find a break in a coaxial cable with the help of your oscilloscope and waveform generator. We can do this using signal reflection that occurs when a transmission line is not terminated correctly.
The setup is very simple just connect the output of the waveform generator, oscilloscope input and coax cable together with a T connector(see the image above). I set the waveform generator to output a 1MHz square wave at 2V and a 50% duty cycle. The set frequency and voltage aren’t that important. What matters more is that we have a fairly fast rising edge.
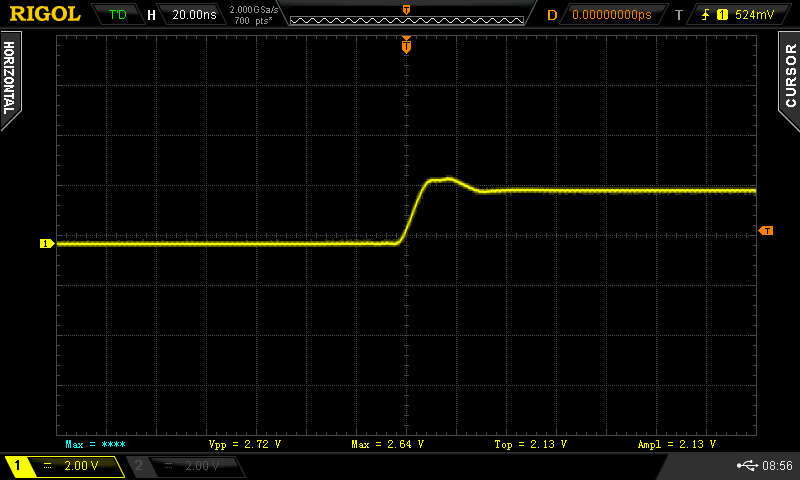
As you can see there is no reflection with a proper 50Ω termination.
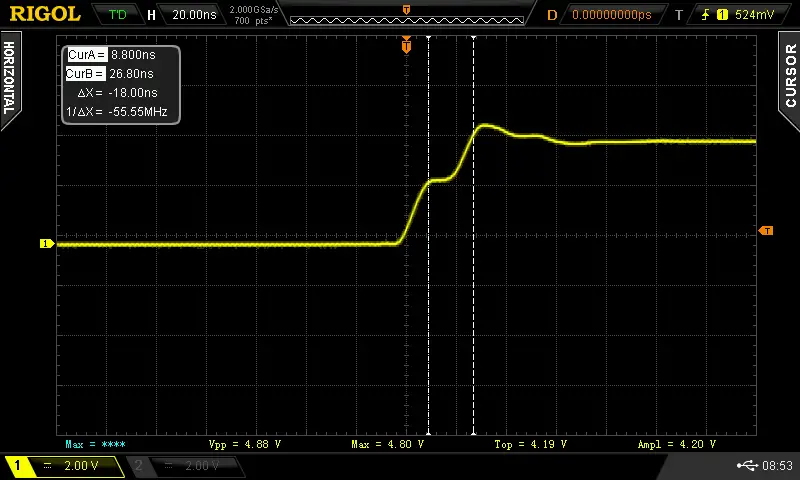
But when we remove the termination or add a break in the line a signal reflection will appear. The first “step” is the initial signal while the second “step” is the reflection of the initial signal coming back. The time from the first step to the second one is the time it took the signal to travel to the end of the cable and back.
We can use the following equation Length = c * v * dT / 2 to figure out how long the cable is. The c is the speed of light, v is the velocity factor(the signal travels a bit slower than light through the cable, this factor tells us how much slower, usually around 0.8 but it depends on your particular cable), dT time between the first and second step, finally we need to take into account that the signal traveled to the end of the cable and back so to get the actual coax length we divide it by 2.
If we put the numbers into the equation Length = 299 792 458 m/s * 0.8 * 18nS / 2 the length comes out to be 2.15m. The actual cable length is about 2m so the result is just a little off.
About
In this post, I’ll show you how to measure the value of capacitors and inductors with your oscilloscope and waveform generator.
To measure the capacitor we’ll simply which will charge(periodically with a square wave) it through a resistor and measure how much time it takes the capacitor to charge to 63% we can then calculate its value according to the RC time constant formula which is t = RC. We’ll rearrange it to C = t/R to get out the capacitance.
To measure the inductor we’ll need to make an LC tank circuit. The rising edge of the square wave signal will cause it to ring. Then we can measure the frequency of the ringing which we can input into the LC tank formula L = 1/sqrt((2*Pi*f))*C and calculate the inductance.
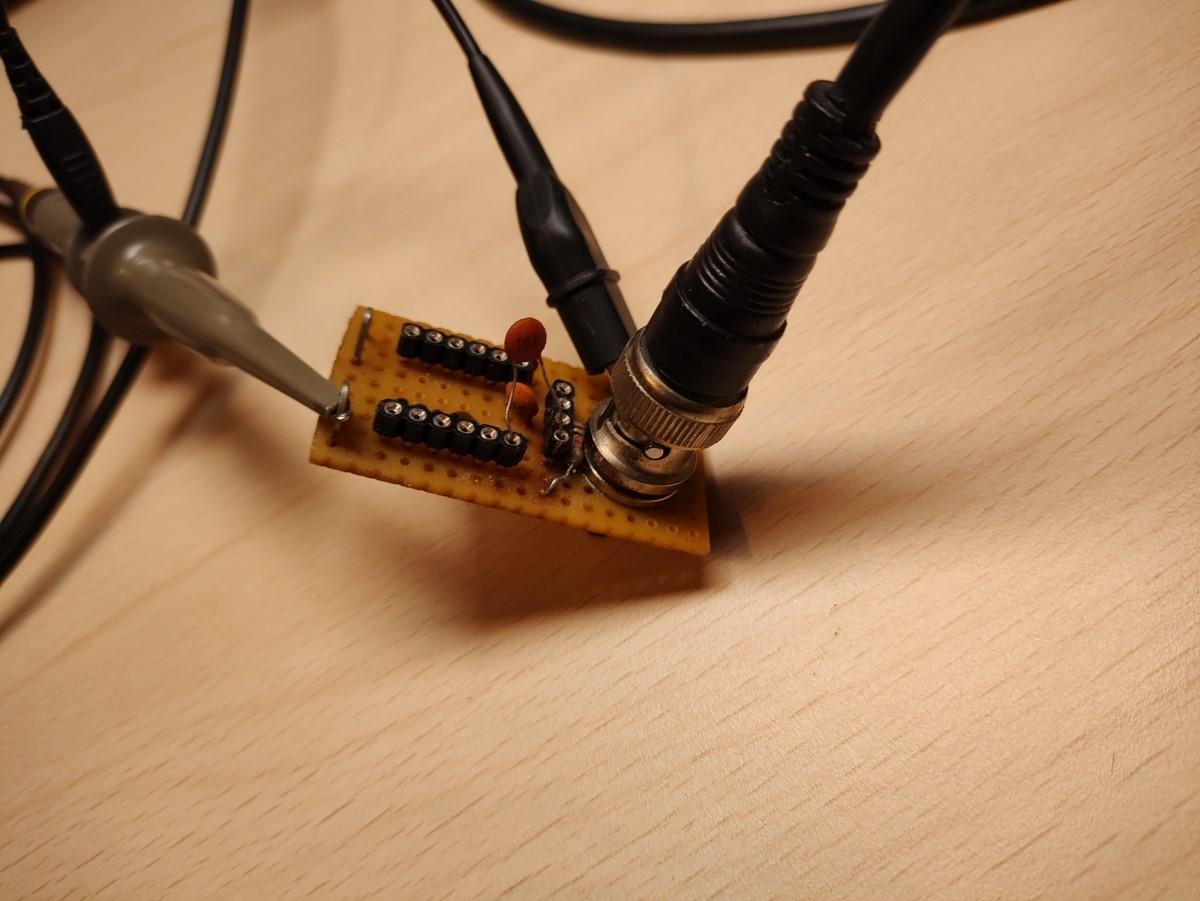
Schematic
This is what it looks like on a piece of the prototype board.
Capacitor Measurement
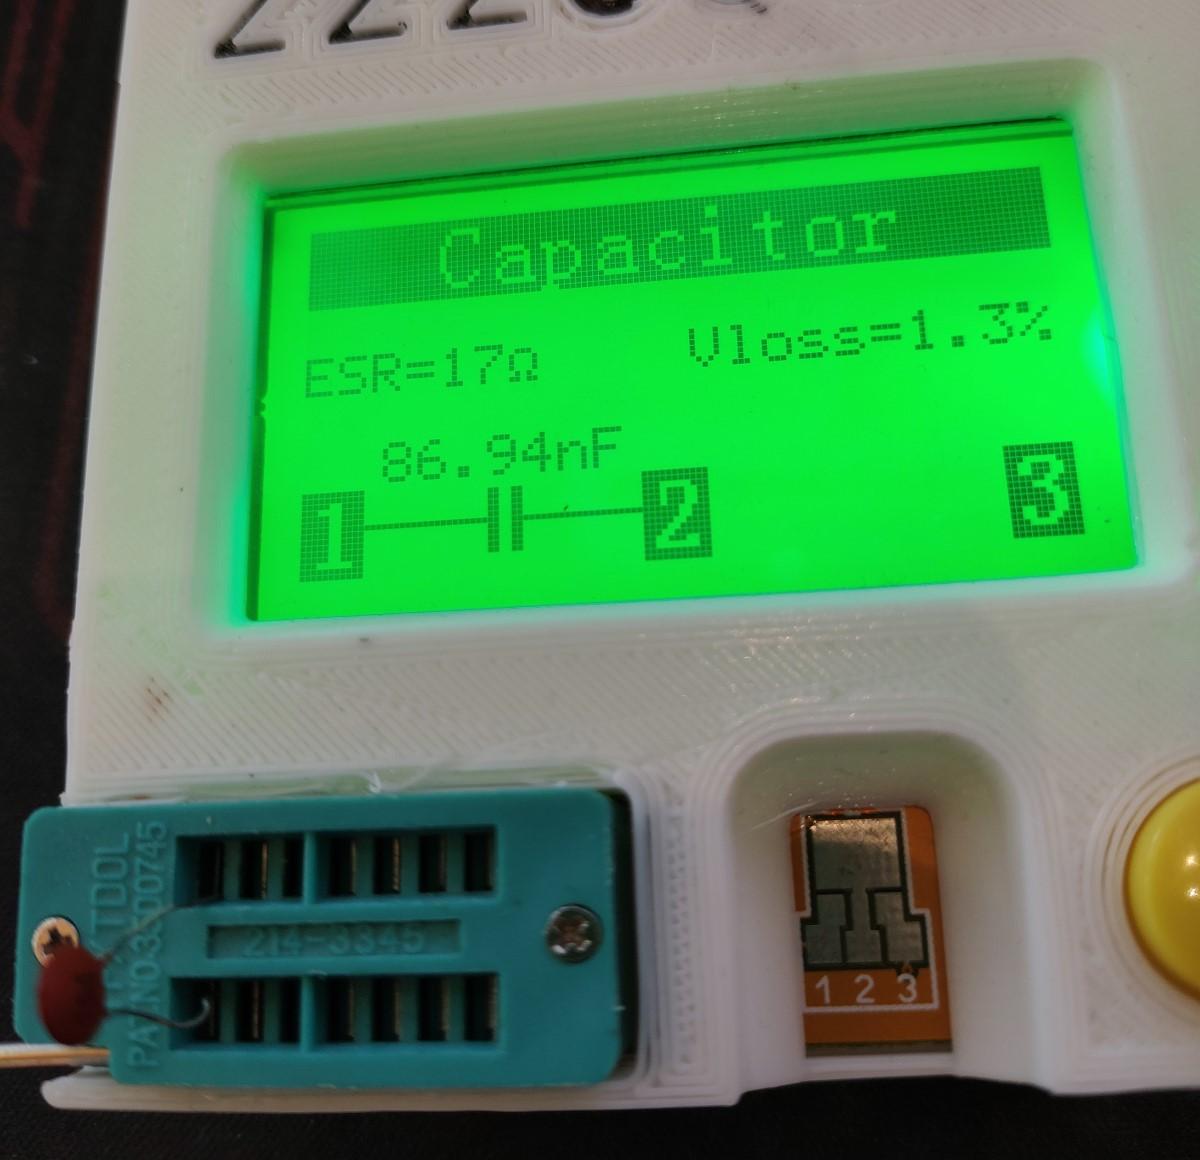
To measure the capacitor connect the oscilloscope probe to the capacitator measurement point and connect the BNC from the measurement circuit to the waveform generator. I set the generator to output a 1KHz square wave at 1V with a 50% duty cycle. Most of these parameters don’t matter that much. I set the voltage is 1Vpp because in this case the capacitor will be charged to 63% when the voltage reaches 630mV.
I turned on the cursors on the oscilloscope and set one marker at the beginning of the charge cycle and the other at around 630mV. The time ends up being 88uS so if we put this into the equation C = 0.000088/1000 we get a C of 88nF or 0.088uF.
The capacitor has a code of 104 which means it’s supposed to have a capacitance of 0.1uF. The difference between our measured value and the rated value is due to the poor tolerance of the capacitor. I confirmed that by measuring the capacitor with a component tester which showed almost the exact same value that was measured.
Inductor measurement
To measure the inductor connect the setup in the same way except the oscilloscope probe needs to be hooked up to the inductor measurement point.
I turned on the cursors on the oscilloscope and measured the peak-to-peak time to determine the frequency of the ringing, which came out to be 463KHz.
If we put this into the equation L = 1/sqrt((2*Pi*463KHz))*1nF we get an L of 118.16uH or around 0.12mH. I used the component tester to verify the result and it comes pretty close.
About
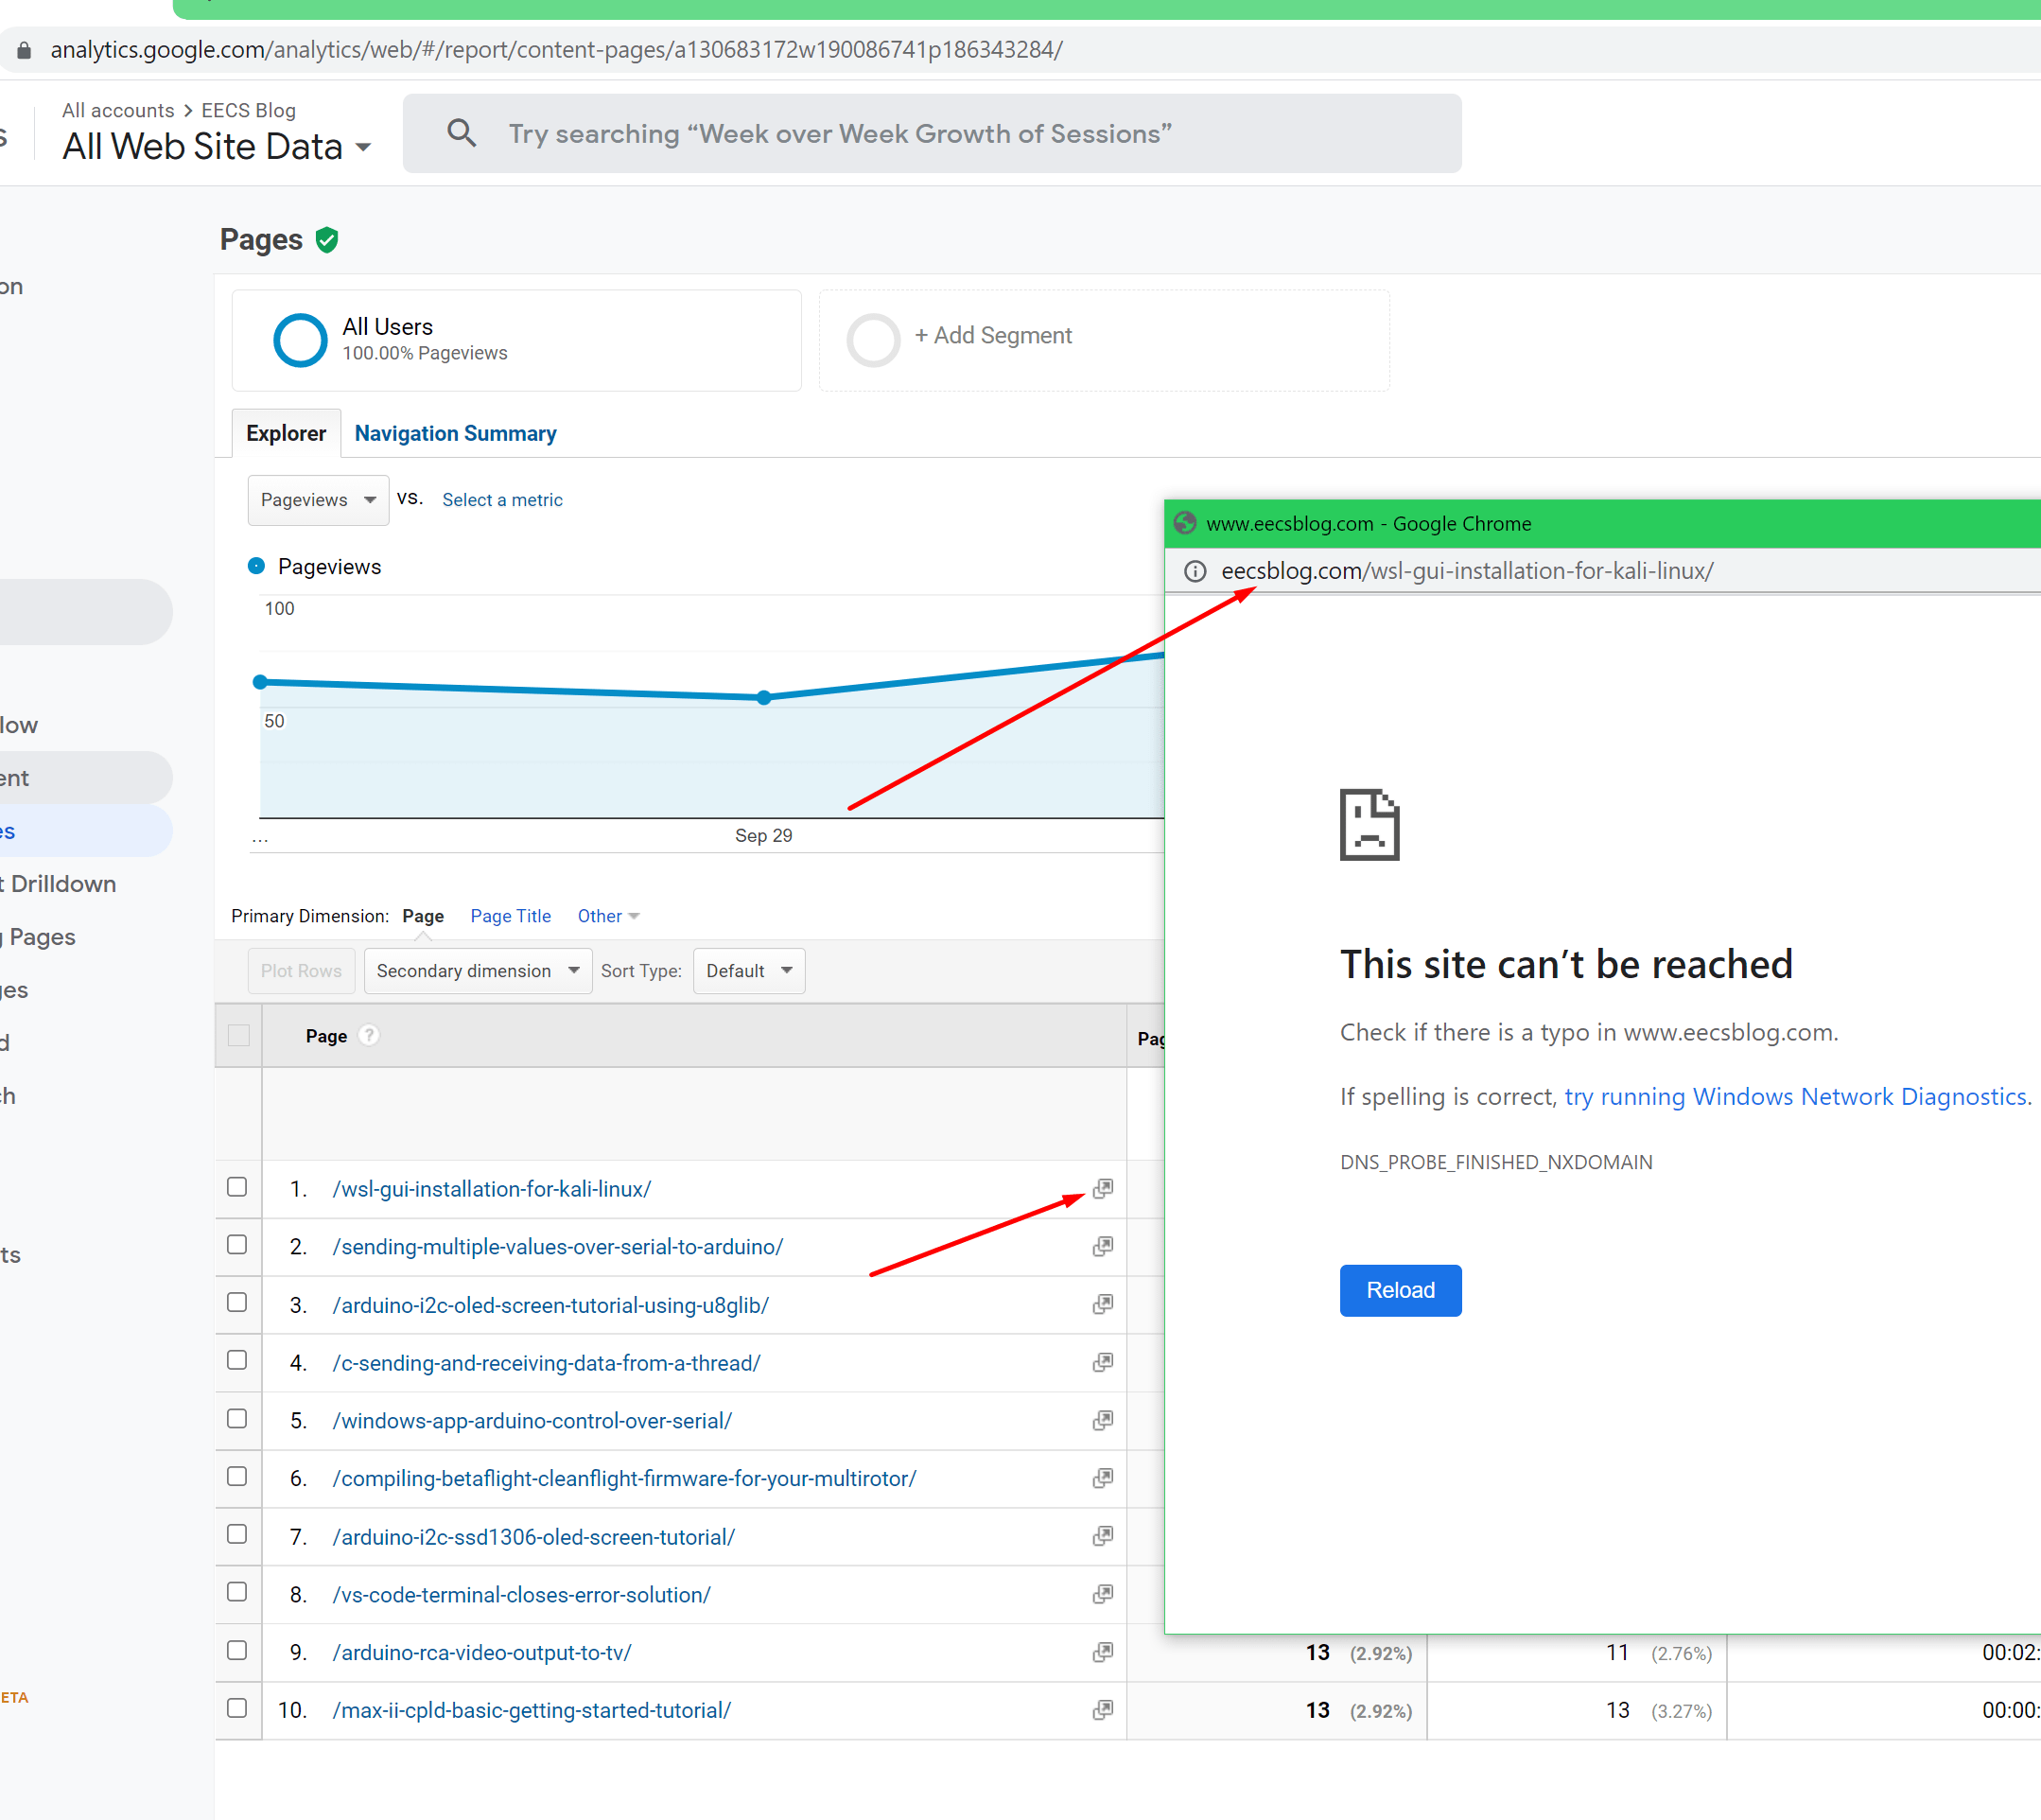
Some tome ago(few years) I was using Google Analytics to check the traffic to this very site. I was looking at the “pages report” where it shows your most visited pages. I discovered that I was getting an error(This site can’t be reached) when I click the hyperlink which was supposed to take you to that particular page on your website.
What was happening is that instead of the hyperlink pointing to the correct domain eecs.blog it was pointing to eecsblog.com. I don’t know why this happens or if it happens only to me. There might be a possibility that Google Analytics doesn’t recognize certain domains like .blog so it just adds .com at the end.
So, in theory, this opens up a possible phishing attack vector because if someone were to register eecsblog.com they could set up a phishing site and Google Analytics would be linking straight to it.
I contacted google support about this. They wanted me to buy another domain to reproduce the issue I, however, didn’t want to spend 40$ to register a domain just to potentially help narrow down a problem that is clearly on their side. I’m not spending my money to try and help a multibillion dollar company. Anyway, the case was closed down and that was that.
I decided I would still write a post about it as the issue is still present. Maybe it will help someone or someone can confirm if this also happens to them.
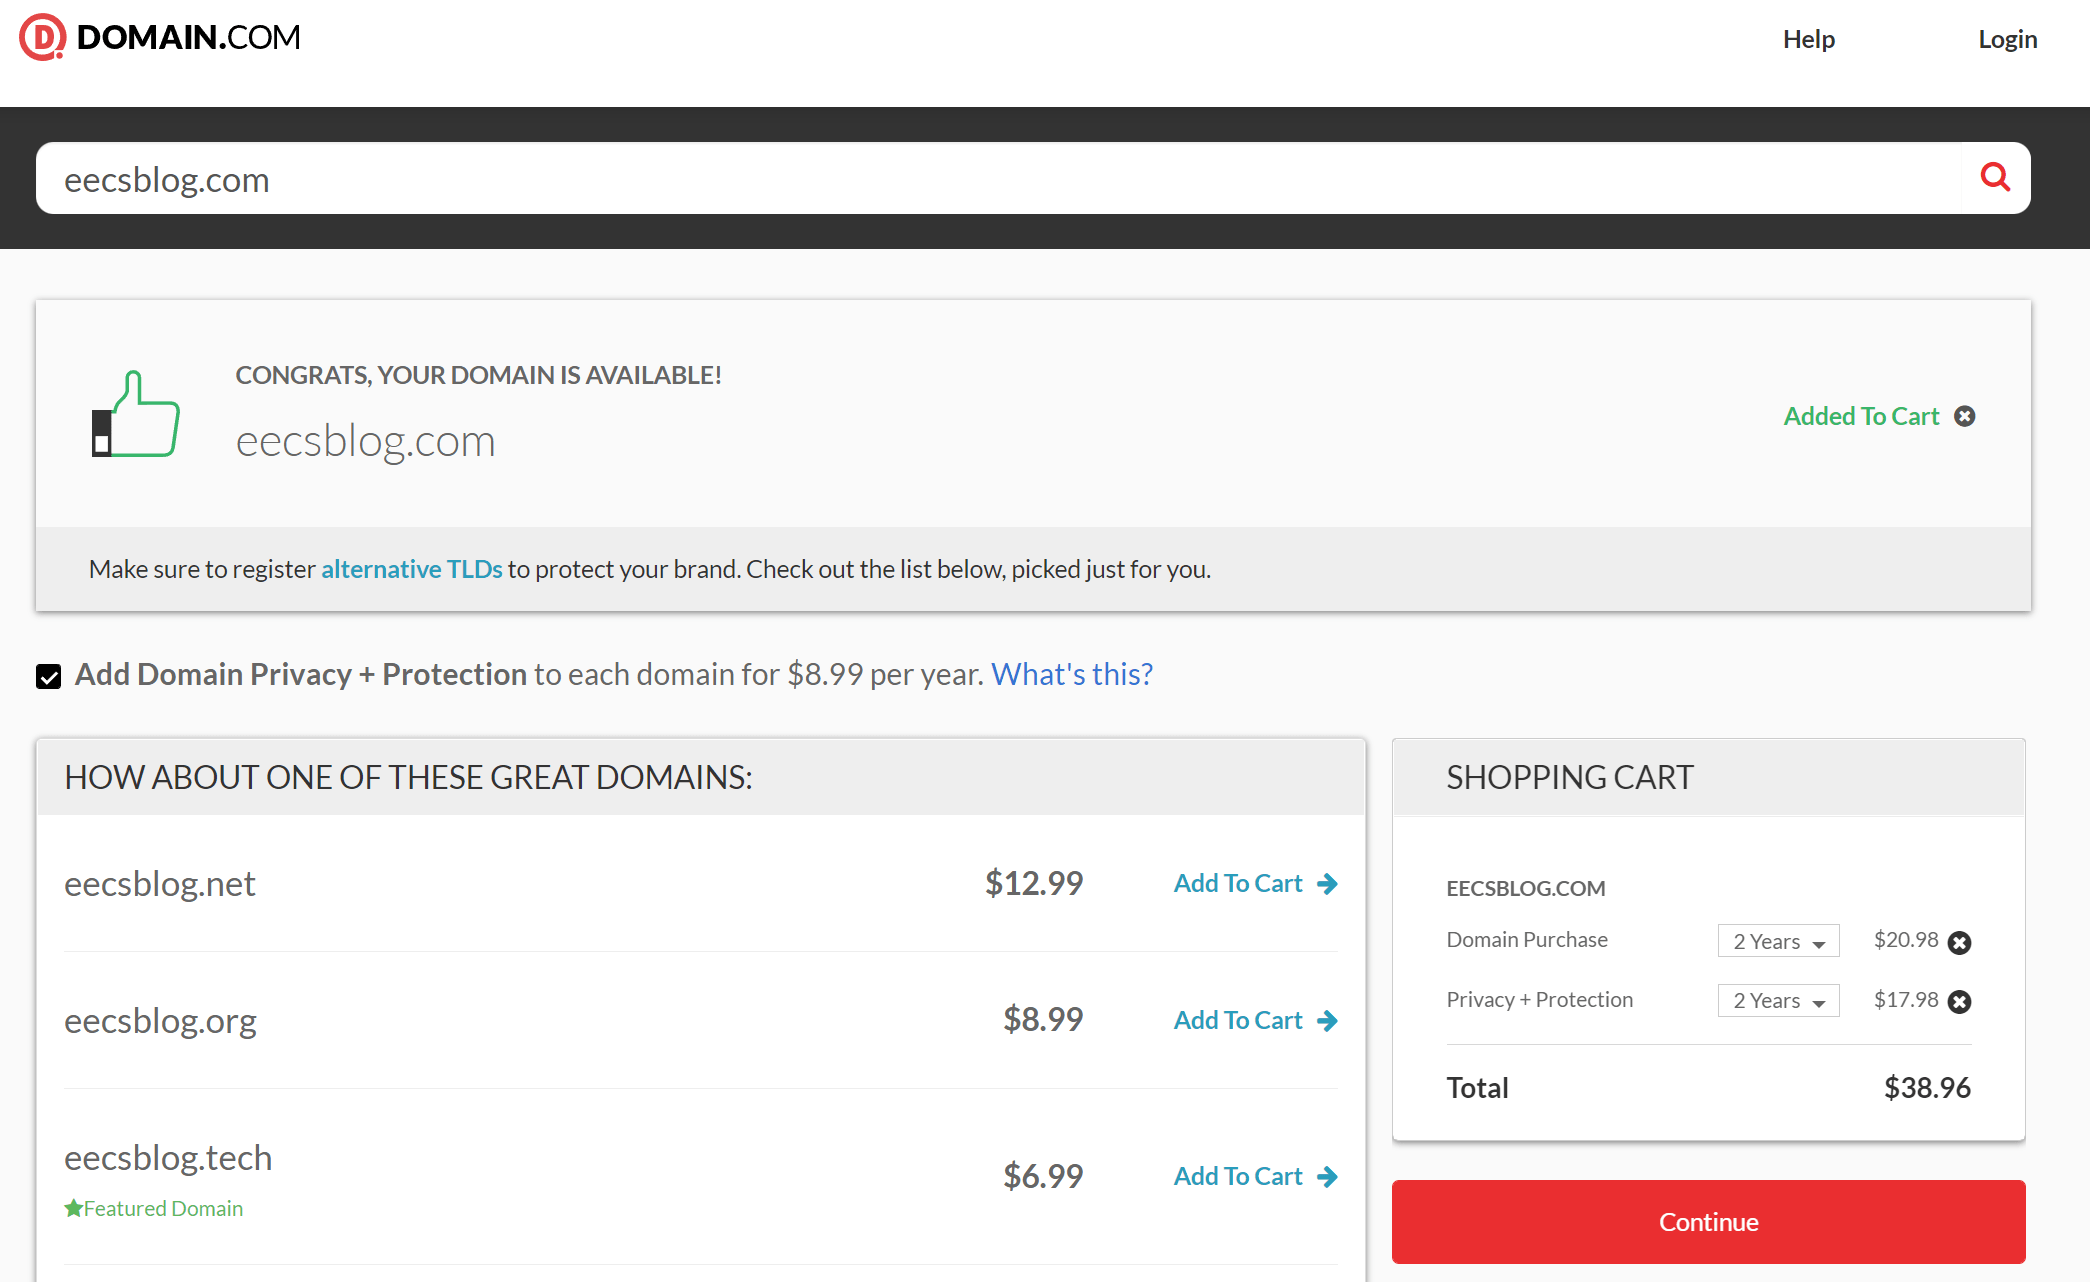
As you can see the domain eecsblog.com is available so if someone would register it they could set up a phishing WordPress site prompting for a login when you get redirected to the site from Google Analytics.
The chance for an attacker to successfully execute such an attack is pretty low but not impossible. It’s a type of attack that must be done to a specific target that has some value to the attacker.
You register the domain, set up the phishing site then you wait and hope that someone will be checking the analytics and click on one of the links. If they fall for it and type in their credentials you can gain access to a site and do further damage or try to login to other services as usually, people tend to reuse their passwords.