About
Some time ago I had to make a WordPress plugin as part of my job. Here I will document what I have learned in the process. Hopefully, this can also be useful to anyone who wants to make their own plugin or do any other WordPress development.
In this post, we will make a plugin while at the same time learning how to use some of the WordPress APIs. There are plenty more things to learn about which will not be covered here, for example, custom taxonomies, making themes, editor blocks, … If you are interested in that you can check out the official WordPress developer resources here.
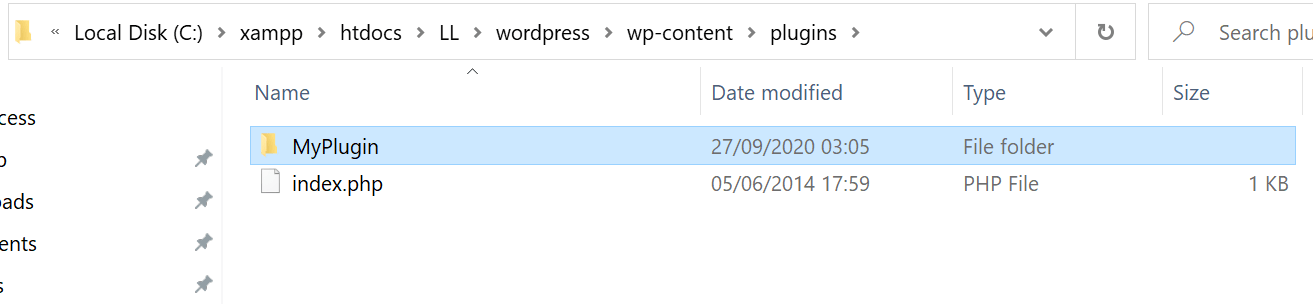
Making a Basic Plugin
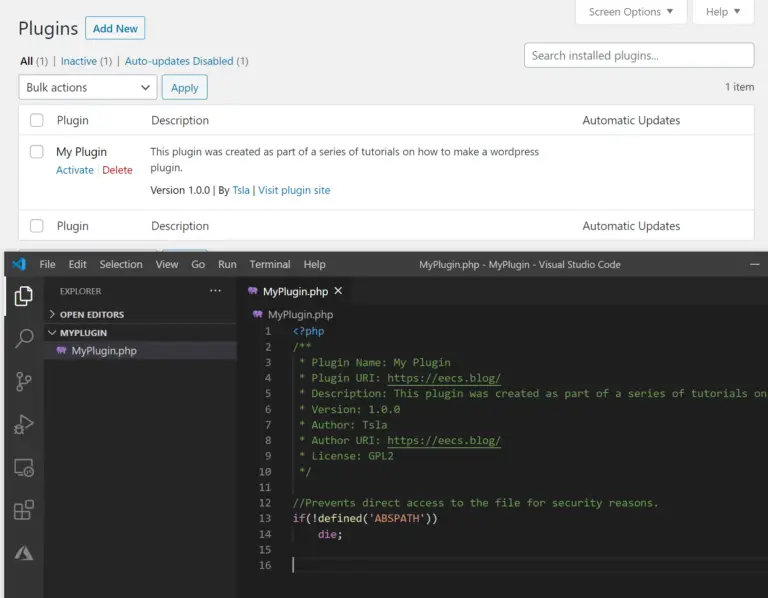
<?php
/**
 * Plugin Name: My Plugin
 * Plugin URI: https://eecs.blog/
 * Description: This plugin was created as part of a series of tutorials on how to make a WordPress plugin.
 * Version: 1.0.0
 * Author: Tsla
 * Author URI: https://eecs.blog/
 * License: GPL2
 */

//Prevents direct access to the file for security reasons.
if(!defined('ABSPATH'))
    die;
Install, Uninstall and Activation Hook
When you activate, deactivate or uninstall a plugin WordPress will “fire” a hook. We can bind functions to these hooks and run some specific code required to activate, deactivate or uninstall our plugin.
In the code below I will create a class to represent the plugin. Inside it, I will put the required functions and register them with the register_activation_hook().
The register() will be used later to include any JS, CSS or PHP files. This isn’t a hook. Just a function that we’ll call when the plugin is about to be used.
<?php
/**
 * Plugin Name: My Plugin
 * Plugin URI: https://eecs.blog/
 * Description: This plugin was created as part of a series of tutorials on how to make a WordPress plugin.
 * Version: 1.0.0
 * Author: Tsla
 * Author URI: https://eecs.blog/
 * License: GPL2
 */

//Prevents direct access to the file for security reasons.
if(!defined('ABSPATH'))
    die;

class MyPlugin{
    function __construct(){
        //The constructor runs when the class is initialized.
    }

    function register(){
        //This is where we will later register/include any js, css or php files we require.
    }

    function activate(){
        //Remove rewrite rules and then recreate rewrite rules.
        flush_rewrite_rules();

        //When the user clicks "activate" this code will run.

        //Stuff to initially set up your plugin would be added here.
        //Like for example, making a table in the database to store your plugins data.

        //We will add it later.
    }

    function deactivate(){
        //Remove rewrite rules and then recreate rewrite rules.
        flush_rewrite_rules();

        //When the user clicks "deactivate" this code will run.

        //Code to deactivate the plugin would be added here.
        //Like for example, disable.

        //We will add it later.
    }

    function uninstall(){
        //When the user clicks "uninstall" this code will run.

        //Code to delete the plugin and clean up after it would be added here.
        //Like for example, deleting a table in the database that was used to store your plugins data.

        //We will add it later.
    }
}

//Create a new instance of the plugin class.
$myPlugin = new MyPlugin();
//Call the register function.
$myPlugin->register();

//Register the activation hook.
register_activation_hook(__FILE__, array($myPlugin, 'activate'));
//Register the deactivation hook.
register_deactivation_hook(__FILE__, array($myPlugin, 'deactivate'));
//Register the uninstall hook.
register_uninstall_hook(__FILE__, array($myPlugin, 'uninstall')); Adding a Short Code
<?php
/**
 * Plugin Name: My Plugin
 * Plugin URI: https://eecs.blog/
 * Description: This plugin was created as part of a series of tutorials on how to make a WordPress plugin.
 * Version: 1.0.0
 * Author: Tsla
 * Author URI: https://eecs.blog/
 * License: GPL2
 */

//Prevents direct access to the file for security reasons.
if(!defined('ABSPATH'))
    die;

class MyPlugin{
    function __construct(){
        //The constructor runs when the class is initialized.
    }

    function register(){
        //Add/register shortcode.
        add_shortcode( 'MyPlugin', array( $this, 'shortCode' ));
    }

    function activate(){
        //Remove rewrite rules and then recreate rewrite rules.
        flush_rewrite_rules();

        //When the user clicks "activate" this code will run.

        //Stuff to initially set up your plugin would be added here.
        //Like for example, making a table in the database to store your plugins data.

        //We will add it later.
    }

    function deactivate(){
        //Remove rewrite rules and then recreate rewrite rules.
        flush_rewrite_rules();

        //When the user clicks "deactivate" this code will run.

        //Code to deactivate the plugin would be added here.
        //Like for example, disable.

        //We will add it later.
    }

    function uninstall(){
        //When the user clicks "uninstall" this code will run.

        //Code to delete the plugin and clean up after it would be added here.
        //Like for example, deleting a table in the database that was used to store your plugins data.

        //We will add it later.
    }

    function shortCode($attributes = []){
        //Get the attribute from short code.
        $attributeValue = strtolower($attributes['display']);

        $HTML = "";

        if($attributeValue == "greeting"){
            $HTML = "
                <div>
                    <h3>Hello World.</h3>
                </div>
            ";
        }else{
            $HTML = "
                <div>
                    <h3>Just some random text.</h3>
                </div>
            ";
        }

        //Return html to the spot the short code was placed.
        return $HTML;
    }
}

//Create a new instance of the plugin class.
$myPlugin = new MyPlugin();
//Call the register function.
$myPlugin->register();

//Register the activation hook.
register_activation_hook(__FILE__, array($myPlugin, 'activate'));
//Register the deactivation hook.
register_deactivation_hook(__FILE__, array($myPlugin, 'deactivate'));
//Register the uninstall hook.
register_uninstall_hook(__FILE__, array($myPlugin, 'uninstall')); 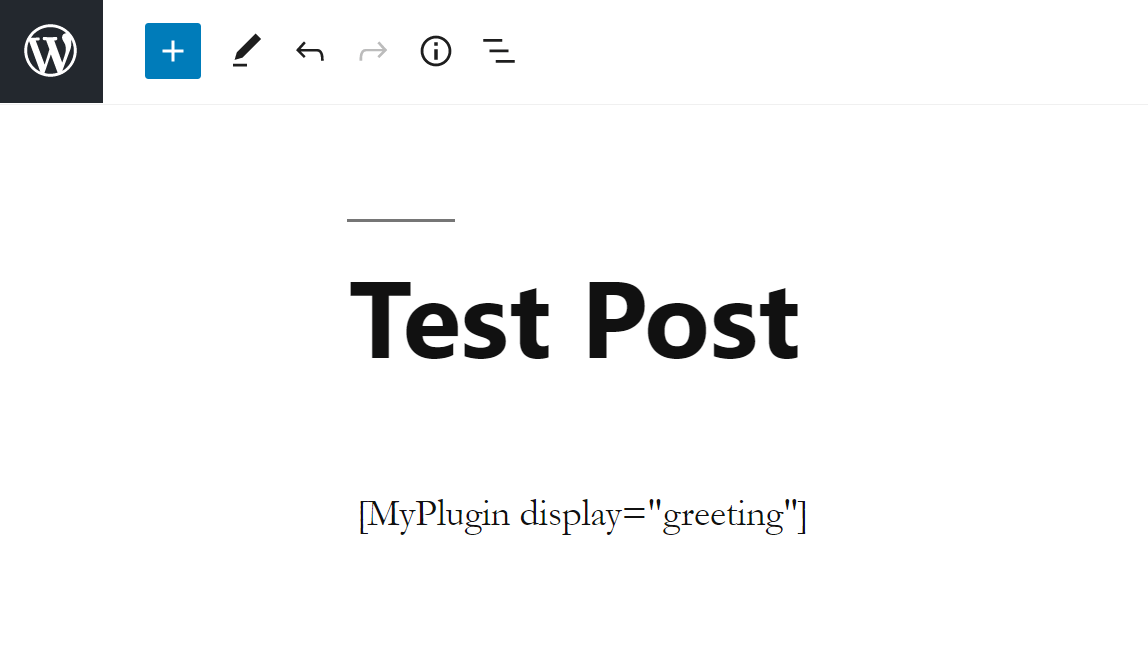

Adding CSS, PHP and JS Files
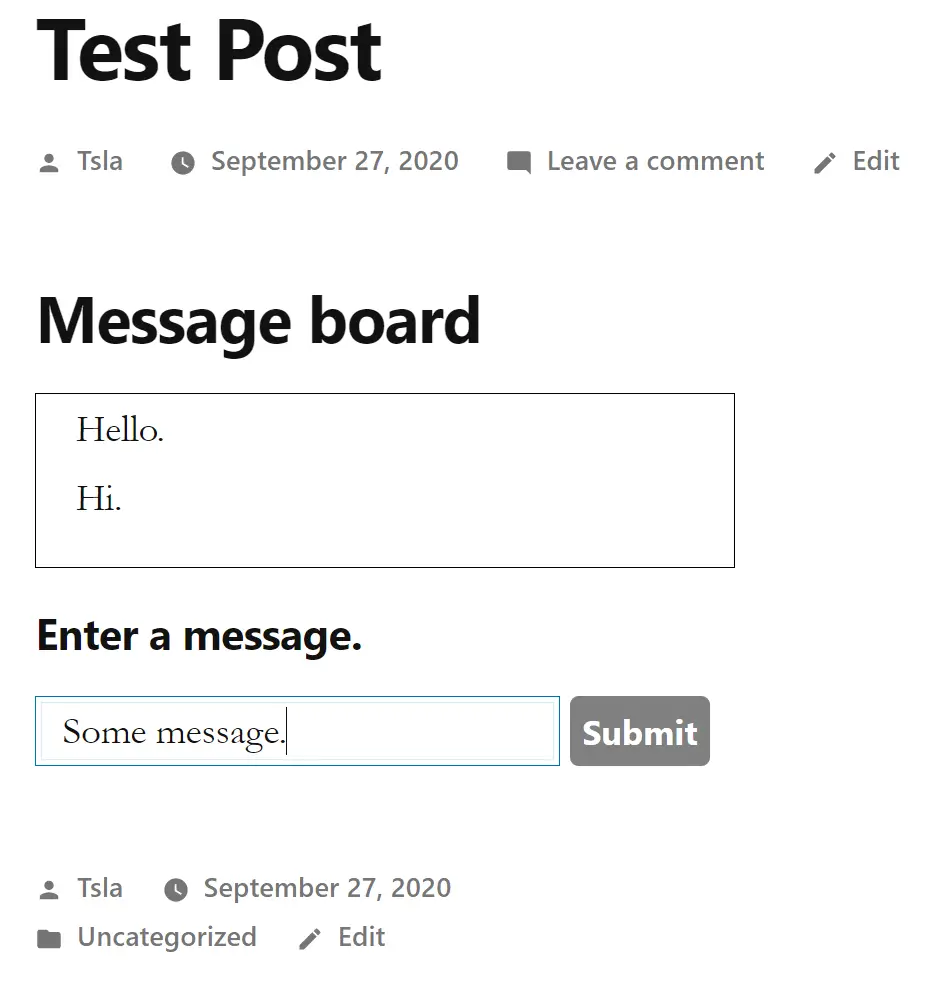
For this example and from now on, I will be making a simple message board plugin. I will be using this simple project to demonstrate how to develop further plugin functionality.
- A PHP file that is going to contain a class called MesageBoard this class will have a function called getBoard() which will return the HTML required to create the message board.
- A CSS file that will contain some basic styling for our message board.
- A Javascript file that will contain the code to make the message board work. I will be using the jQuery library in my code so it will have to be enqueued just like our Javascript file.
PHP:
MessageBoard.php
<?php
class MessageBoard{
    function getBoard(){
        return "
            <div id='wrapperDiv'>
                <div id='boardWrapper'>
                    <h3>Message board</h3>
                    <ul id='messageList'>
                    </ul>
                </div>
                <div id='messageWrapper'>
                    <h4>Enter a message.</h4>
                    <input type='text' id='messageBox'/>
                    <input type='button' id='button' value='Submit'>
                </div>
            </div>
        ";
    }
}
CSS:
MessageBoard.css
#button{
    background-color: grey;
}

#messageBox{
    width: 300px;
    height: 40px;
}

#button{
    width: 80px;
    padding: 0px;
    height: 40px;
}

#messageList{
    border: 1px black solid;
    min-height: 100px;
    width: 400px;
    list-style-type: none;
}
JS:
window.onload=function(){
    //Register event.
    buttonClickEvent()
}

function buttonClickEvent(){
    jQuery("[id='button']").click(function(event){
        const message = jQuery("[id='messageBox']").val();
        jQuery("[id='messageList']").append("<li>"+ message +"</li>");
    });
} MyPlugin.php
<?php
/**
 * Plugin Name: My Plugin
 * Plugin URI: https://eecs.blog/
 * Description: This plugin was created as part of a series of tutorials on how to make a WordPress plugin.
 * Version: 1.0.0
 * Author: Tsla
 * Author URI: https://eecs.blog/
 * License: GPL2
 */

//Prevents direct access to the file for security reasons.
if(!defined('ABSPATH'))
    die;

class MyPlugin{
    function __construct(){
        //The constructor runs when the class is initialized.
    }

    function register(){
        //Add/register shortcode.
        add_shortcode( 'MyPlugin', array( $this, 'shortCode' ));

        //Reference .php files.
        require_once(dirname(__FILE__) .'\MessageBoard.php'); //__FILE__ gets the current file, dirname() gets the parent directory

        $file = __FILE__;
        $fileDir = dirname(__FILE__);
        $fileDir2 = dirname(dirname(__FILE__));

        //Enqueue styles. plugins_url() gets the plugin directory
        wp_enqueue_style('MessageBoard', plugins_url('/MyPlugin/MessageBoard.css'));

        //Enqueue
        wp_enqueue_script('jQuery_js', plugins_url('/MyPlugin/jquery-3.5.1.min.js'));
        wp_enqueue_script('MessageBoard_js', plugins_url('/MyPlugin/MessageBoard.js'));
    }

    function activate(){
        //Remove rewrite rules and then recreate rewrite rules.
        flush_rewrite_rules();

        //When the user clicks "activate" this code will run.

        //Stuff to initially set up your plugin would be added here.
        //Like for example, making a table in the database to store your plugins data.

        //We will add it later.
    }

    function deactivate(){
        //Remove rewrite rules and then recreate rewrite rules.
        flush_rewrite_rules();

        //When the user clicks "deactivate" this code will run.

        //Code to deactivate the plugin would be added here.
        //Like for example, disable.

        //We will add it later.
    }

    function uninstall(){
        //When the user clicks "uninstall" this code will run.

        //Code to delete the plugin and clean up after it would be added here.
        //Like for example, deleting a table in the database that was used to store your plugins data.

        //We will add it later.
    }

    function shortCode($attributes = []){
        //Get the attribute from short code.
        $attributeValue = strtolower($attributes['display']);

        $HTML = "";

        if($attributeValue == "board"){
            $messageBoard = new MessageBoard();
            $HTML = $messageBoard->getBoard();
        }else if($attributeValue == "greeting"){
            $HTML = "
                <div>
                    <h3>Hello World.</h3>
                </div>
            ";
        }else{
            $HTML = "
                <div>
                    <h3>Just some random text.</h3>
                </div>
            ";
        }

        //Return html to the spot the shortcode was placed.
        return $HTML;
    }
}

//Create a new instance of the plugin class.
$myPlugin = new MyPlugin();
//Call the register function.
$myPlugin->register();

//Register the activation hook.
register_activation_hook(__FILE__, array($myPlugin, 'activate'));
//Register the deactivation hook.
register_deactivation_hook(__FILE__, array($myPlugin, 'deactivate'));
//Register the uninstall hook.
register_uninstall_hook(__FILE__, array($myPlugin, 'uninstall')); 

Front-end Back-end Communication With AJAX
We can do this by using AJAX(asynchronous Javascript and XML). We’ll use JSON instead of XML. Regularly when you use the AJAX approach to communicate between the front/back-end you would just send the data to the PHP file(located on your server) that contains your back-end code. But with WordPress, you should instead send all of your requests to the admin-ajax.php file. Then you have to enqueue the PHP function you want to execute(upon receiving the request) with a unique name. Finally, you need to include this name in the request sent from the front-end.
Note: In this section, I will only demonstrate how to send/receive data using AJAX. I will demonstrate how to store/retrieve data from the database in a later section.
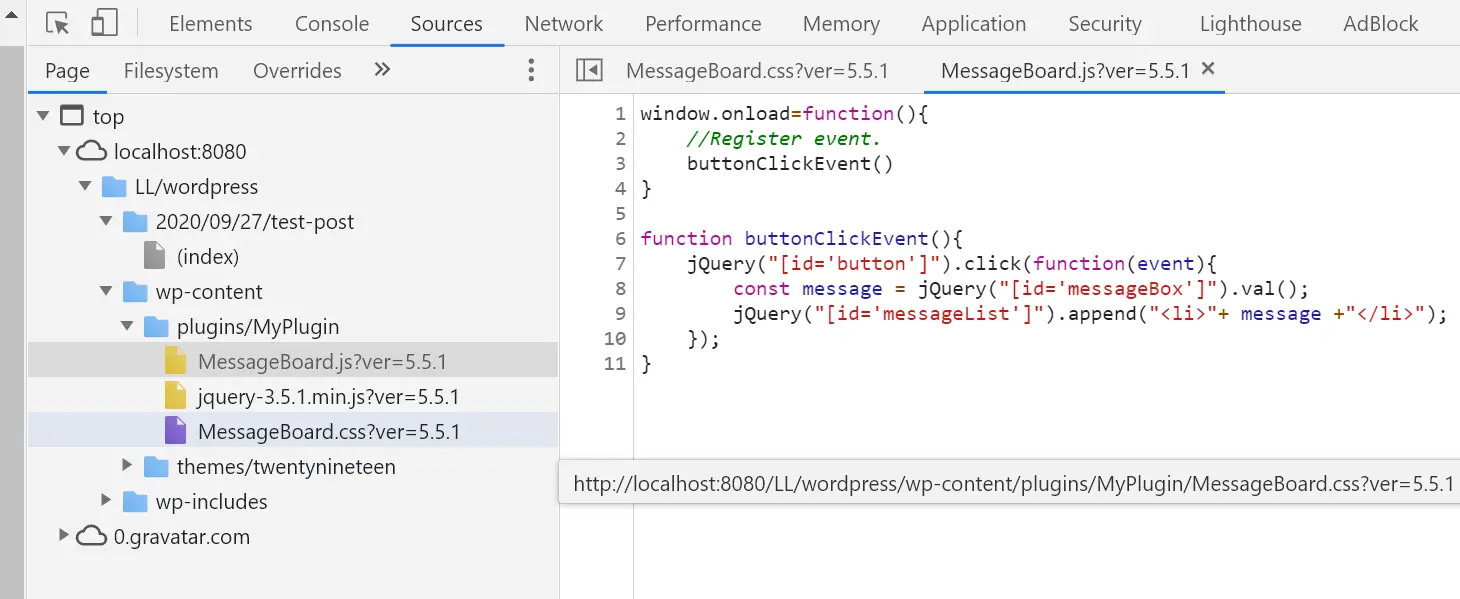
JS:
MessageBoard.js
window.onload=function(){
//Register event.
buttonClickEvent()
}
function buttonClickEvent(){
jQuery("[id='button']").click(function(event){
const message = jQuery("[id='messageBox']").val();
jQuery("[id='messageList']").append("<li>"+ message +"</li>");
const messageBoardContents = jQuery("[id='messageList']").prop("outerHTML");
saveMBContentsToDB(messageBoardContents);
});
}
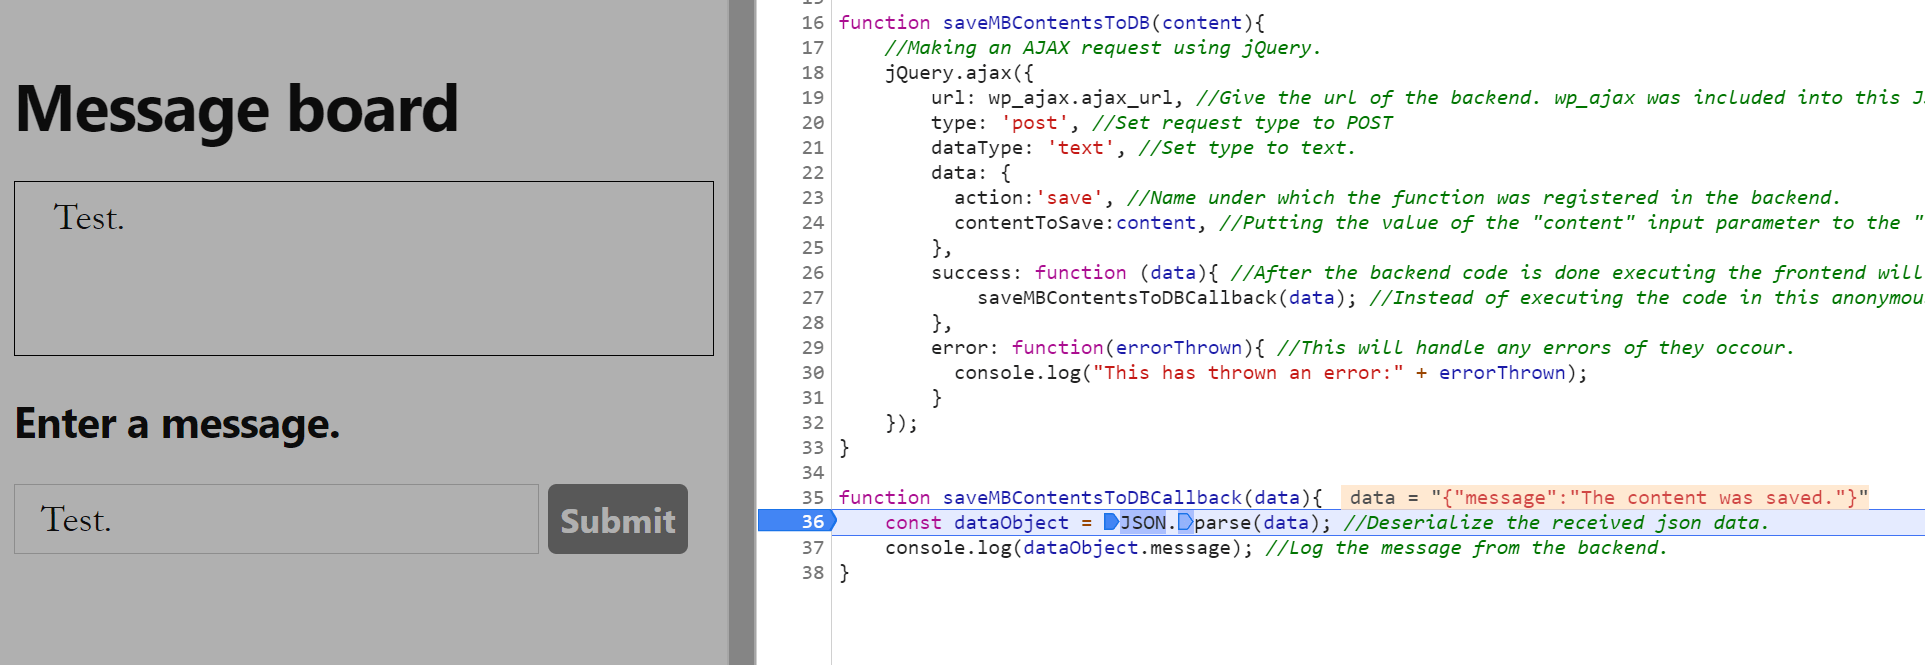
function saveMBContentsToDB(content){
//Making an AJAX request using jQuery.
jQuery.ajax({
url: wp_ajax.ajax_url, //Give the url of the backend. wp_ajax was included into this JS file from the backend using wp_localize_script() function.
type: 'post', //Set request type to POST
dataType: 'text', //Set type to text.
data: {
action:'save', //Name under which the function was registered in the backend.
contentToSave:content, //Putting the value of the "content" input parameter to the "contentToSave" property of the "data" object.
},
success: function (data){ //After the backend code is done executing the frontend will continue from here. Any data sent from the backend will be available in the data parameter.
saveMBContentsToDBCallback(data); //Instead of executing the code in this anonymous function we'll forward it to callback function.
},
error: function(errorThrown){ //This will handle any errors if they occour.
console.log("This has thrown an error:" + errorThrown);
}
});
}
function saveMBContentsToDBCallback(data){
const dataObject = JSON.parse(data); //Deserialize the received json data.
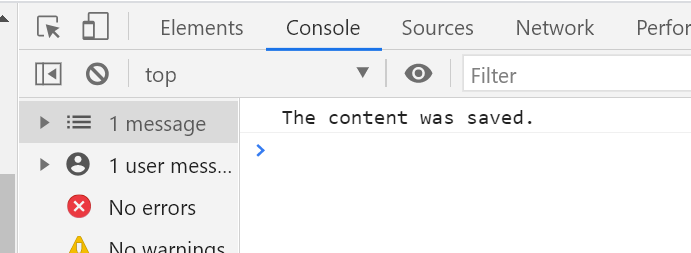
console.log(dataObject.message); //Log the message from the backend.
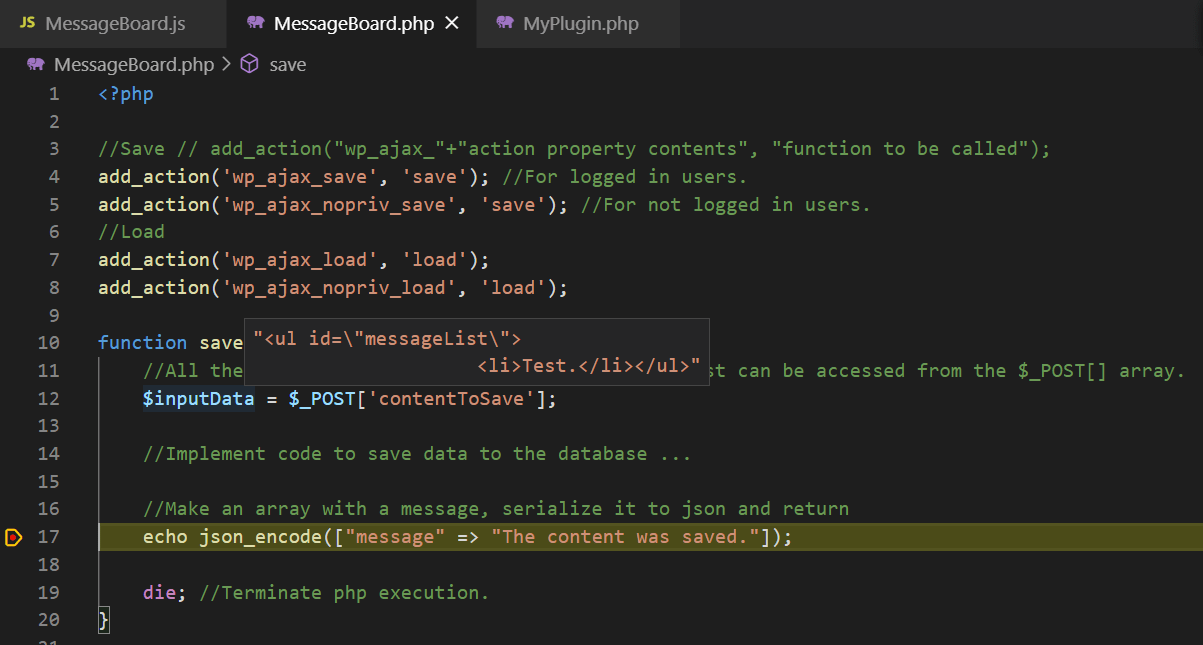
} PHP:
MessageBoard.php
//Save // add_action("wp_ajax_"+"action property contents", "function to be called");
add_action('wp_ajax_save', 'save'); //For logged in users.
add_action('wp_ajax_nopriv_save', 'save'); //For not logged in users.

function save(){
    //All the properties that were sent via POST request can be accessed from the $_POST[] array.
    $inputData = $_POST['contentToSave'];

    //Implement code to save data to the database ...

    //Make an array with a message, serialize it to json and return
    echo json_encode(["message" => "The content was saved."]);

    die; //Terminate php execution.
} 
Database Access
In this section, we’ll learn how to access the database and read/write/create tables in it. WordPress uses a MySQL database so obviously, all the queries will be written in the MySQL syntax.
In the previous section, we’ve seen how to get data from the frontend to the backend(and back to the frontend again). Now let’s see how to save this data into the database.
Note: I will create the table for storing the data manually in phpMyAdmin for this demonstration. In the later section Install, Uninstall Hooks (Continued) I will show how to make the table when the plugin is activated and delete it when the plugin is uninstalled.
WP Database Functions Demo
//This function can be used to execute any MySQL statment:
    //query("your SQL query statement");
    $users = $wpdb->query("SELECT * FROM users");


    //Prevents SQL injection.
    //prepare("your SQL query statement", "array with the values"); //% represents the parameter (%s for string; %d for integer, %f for float)
    $unsanitizedString = "bob";
    $user = $wpdb->query($wpdb->prepare("SELECT * FROM users WHERE name LIKE %s", [$unsanitizedString]));


    //Inserts new data:
    //insert("table name", "your data as an associative array");
    $wpdb->insert(
        "users",
        [ "id" => 1, "name" => "bob" ], //column => value
        [ "%d", "%s"] //format (%s for string; %d for integer, %f for float)
    );


    //Gets a single variable:
    //get_var("your SQL query statement");
    $userName = $wpdb->get_var("SELECT name FROM users WHERE id LIKE 1");


    //Gets multiple results and returns associative array.
    //get_results("your SQL query statement", output_type ); //output_type how you get the reults indexed array = ARRAY_N, associative array = ARRAY_A, object = OBJECT
    $allUsers = $wpdb->get_results("SELECT name FROM users", ARRAY_A);


    //Updates table:
    //update("table name", "your data as an associative array", "where condition as an associative array");
    $wpdb->update(
        "users",
        ["name" => "alice"],
        ["name" => "bob"]
    );


    //Deletes table row:
    //delete("table name", "where condition as an associative array");
    $wpdb->delete("users", ['id' => 1]);

    //You can get all the available functions and examples in the official WordPress documentation here:
    //https://developer.wordpress.org/reference/classes/wpdb/
Creating The Table


Saving To And Querying The Database
JS:
MessageBoard.js
window.onload=function(){
    //Register event.
    buttonClickEvent();
    //Load existing messages onto the message board.
    loadMesssageBoard();
}

function buttonClickEvent(){
    jQuery("[id='button']").click(function(event){
        const message = jQuery("[id='messageBox']").val();
jQuery("[id='messageList']").append("PHP:
MessageBoard.php
//Save // add_action("wp_ajax_"+"action property contents", "function to be called");
add_action('wp_ajax_save', 'save'); //For logged in users.
add_action('wp_ajax_nopriv_save', 'save'); //For not logged in users.
//Load
add_action('wp_ajax_load', 'load');
add_action('wp_ajax_nopriv_load', 'load');
function save(){
//Storing the actual HTML in the DB is not the best idea. Ideally, it should be serialized then stored in the DB. This is just quicker and easier for the demonstration.
//Here I will use urlencode() to mitigate SQL injection. Usually, you would use the strip_tags() function, but in this case it would ruin our HTML. Or use the prepare() function provided by WP.
//All the properties that were sent via POST request can be accessed from the $_POST[] array.
$inputData = urlencode($_POST["contentToSave"]);
//$wpdb is a global object that contains functions to work with the DB. It is instantiated and provided by wordpress automatically.
//So this is all we have to do to use it:
global $wpdb; //Get the global instance of the wpdb class(used to work with the DB).
//Run update query.
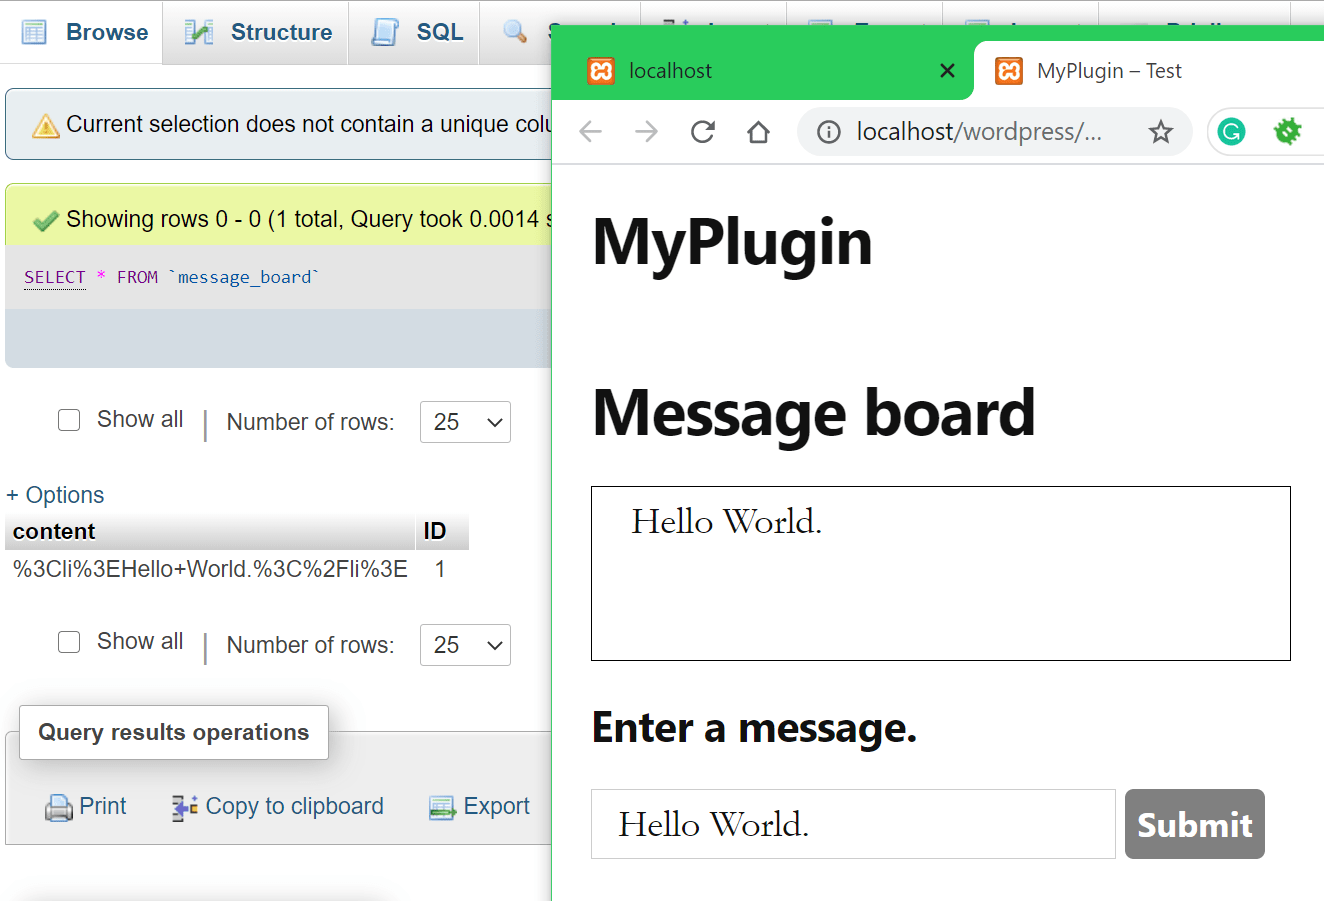
$wpdb->query("UPDATE message_board SET content = '" . $inputData . "' WHERE id LIKE 1");
//Make an array with a message, serialize it to json and return
echo json_encode(["message" => "The content was saved."]);
die; //Terminate php execution.
}
function load(){
//$wpdb is a global object that contains functions to work with the DB. It is instantiated and provided by wordpress automatically.
//So this is all we have to do to use it:
global $wpdb; //Get the global instance of the wpdb class(used to work with the DB).
//Get stored messages.
$content = $wpdb->get_var("SELECT content FROM message_board WHERE id LIKE 1");
$content = urldecode($content);
echo json_encode($content);
die; //Terminate php execution.
} Result:
Working With Files
function WP_Filesystem_Functions_Demo(){
//Here I will demonstrate a few of the more common For the full list and full functionality of the WP filesystem functions check the official documentation.
//https://developer.wordpress.org/reference/classes/wp_filesystem_direct/#methods
//Call WP_Filesystem() or the $wp_filesystem global will be null;
WP_Filesystem();
//Get the file system object.
global $wp_filesystem;
//Here we'll just get the plugin folder path.///////////
$path = dirname(__FILE__);
$dirPath = $path . "/MyNewFolder"; //Define path/name for our new directory.
$filepath = $dirPath . "MyNewFile.txt"; //Define path/name for our new file.
////////////////////////////////////////////////////////
//Make a directory.
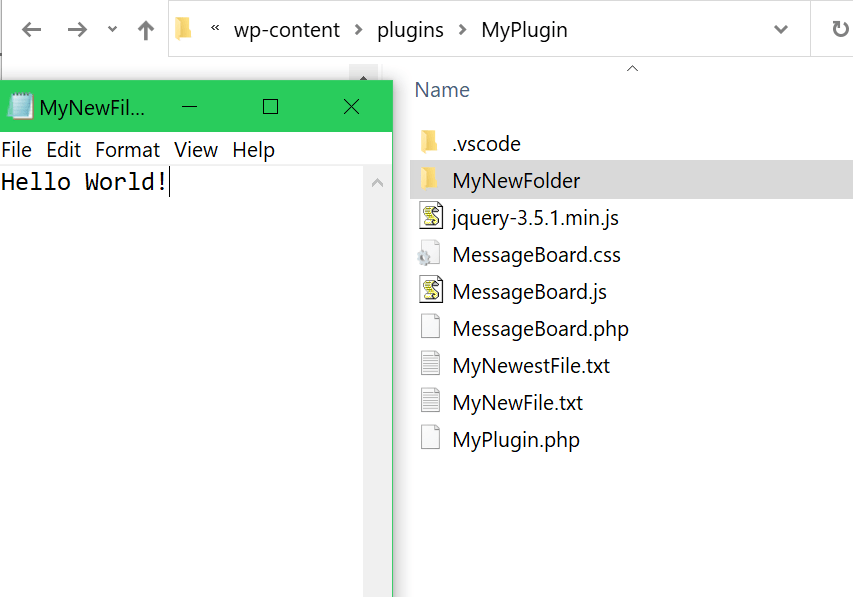
$wp_filesystem->mkdir($dirPath);
//Make a file.
$wp_filesystem->put_contents($filepath, "Hello World!");
//Get the data from the file.
$fileContents = $wp_filesystem->get_contents($filepath);
//Changes file/folder permissions.
//chmod(file/folder path, permissions(same logic as linux permissions), recursive(optional) apply to all files/subfolders)
$wp_filesystem->chmod($filepath, 777); //777 gives everyone all the permissions.
//Copy file, with new name into the same directory.
//copy(source, destination, overwrite the destination file if it exists(optional parameter))
$wp_filesystem->copy($filepath, $path. "\MyNewestFile.txt");
//Move the file file.
//move(source, destination, overwrite the destination file if it exists(optional parameter))
$wp_filesystem->move($filepath, $path . "\MyNewFile.txt"); //This will move the file from MyNewFolder to the plugin root folder.
//Check if the file exists...
if($wp_filesystem->exists($path . "\MyNewFile.txt"))
$wp_filesystem->delete($path . "\MyNewFile.txt"); //if so delete it.
//Remove directory.
$wp_filesystem->rmdir($dirPath);
//Delete all the files and subdirectories within the folder.
//rmdir(path, recursive(optional))
$wp_filesystem->rmdir($dirPath, true);
} Result:
Install, Unistall Hooks (Continued)
Now that we’ve seen how to work with the WordPress database and Files API in the previous sections let’s use that knowledge to finish up our hooks.
Activation Hook
When the plugin is activated we will check if the “message_board” table is already present in the database. If it doesn’t exist we will create it and put some initial data in.
MyPlugin.php
function activate(){
//Remove rewrite rules and then recreate rewrite rules.
flush_rewrite_rules();
//When the user clicks "activate" this code will run.
//Stuff to initially set up your plugin would be added here.
//Like for example, making a table in the database to store your plugins data.
global $wpdb;
//Check if table already exists. If not add it.
if($wpdb->query("SHOW TABLES LIKE 'message_board'") == 0){
//Create the message_board table.
$wpdb->query('CREATE TABLE message_board
(
id INTEGER NOT NULL,
content TEXT,
PRIMARY KEY (id)
)'
);
//"Initialize" it with some data.
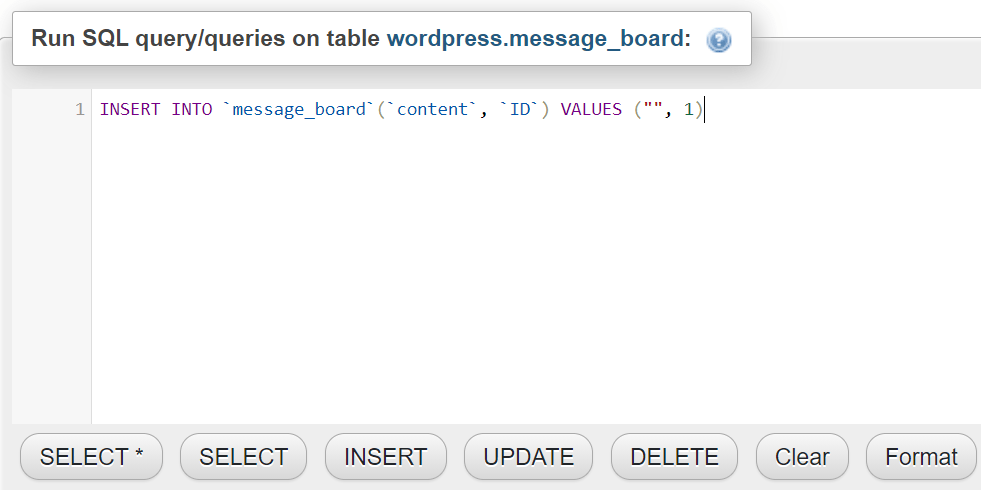
$wpdb->insert(
"message_board",
array(
'content' => "",
'id' => 1
)
);
}
} Unsinstall Hook
The code below will remove the table we created on the first activation. All the directories and files will be removed automatically, no code needed.
uninstall.php
<?php
//The code in this file will be run when the uninstall button for the plugin is clicked.
//All that we have to do is make this uninstall.php file and it will be run automatically on uninstall.
//No need to register any hook.
//Check if plugin is actually to be uninstalled...
if (!defined('WP_UNINSTALL_PLUGIN'))
die; //.. if not finish program execution here.
global $wpdb;
//Remove the "contents" table and all of its data from the WP database.
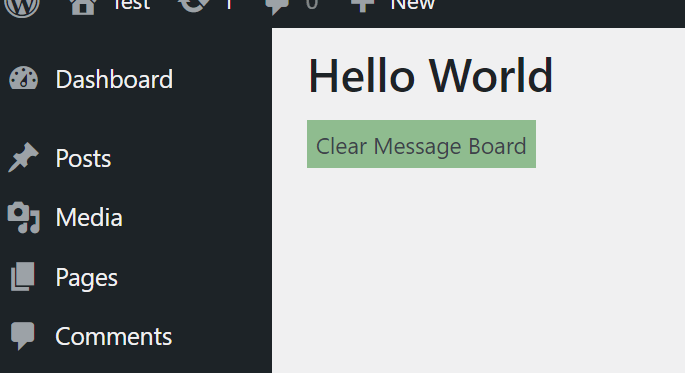
$wpdb->query("DROP TABLE message_board"); Admin Backend
AdminPage.php
<?php
    echo "
            <h1>Hello World</h1>
            <div id='clearBoardButton' style='background-color: darkseagreen; width: fit-content; padding: 5px;'>Clear Message Board</div>
            <div id='message'></div>
        ";
?> AdminArea.js
//On page load....
window.onload=function(){
    //Register event.
    jQuery("[id='clearBoardButton']").click(function(event){
        //Making an AJAX request using jQuery.
        jQuery.ajax({
            url: wp_ajax.ajax_url, //Give the url of the backend. wp_ajax was included into this JS file from the backend using wp_localize_script() function.
            type: 'post', //Set request type to POST
            dataType: 'text', //Set type to text.
            data: { action:'clear' }, //Name under which the function was registered in the backend.
            success: function (data){ //After the backend code is done executing the frontend will continue from here. Any data sent from the backend will be available in the data parameter.
                //Deserialize the json string into an object.
                deserializedData = JSON.parse(data);
                //Display message.
                jQuery("[id='message']").html(deserializedData.message);
            },
            error: function(errorThrown){ //This will handle any errors if they occour.
                console.log("This has thrown an error:" + errorThrown);
            }
        });
    });
} MessageBoard.php > clear()
//Clear
//Make this available only to logged in users.
add_action('wp_ajax_clear', 'clear');

function clear(){
    //Check if the user has admin privileges.

    //Get the current user data.
    $user = wp_get_current_user();
    //Take the $user->roles array and chekc if it contains the 'admin' role.
    if(!in_array( 'administrator', (array) $user->roles )){
        //If not, return a warning and stop the code execution.
        echo json_encode(["message" => "You need to be an Admin to clear the message board."]);
        die; //Terminate php execution.
    }

    //$wpdb is a global object that contains functions to work with the DB. It is instantiated and provided by wordpress automatically.
    //So this is all we have to do to use it:
    global $wpdb; //Get the global instance of the wpdb class(used to work with the DB).
    //Run update query.
    $wpdb->query("UPDATE message_board SET content = '' WHERE id LIKE 1");

    //Make an array with a message, serialize it to json and return
    echo json_encode(["message" => "Message Board was cleared."]);

    die; //Terminate php execution.
} MyPlugin.php > register()
        //Admin page in WP backend.

        //Add admin page. 'add_admin_page' is the name of the function that will be called to add the page.
        //The array($this, 'add_admin_page') is used to specify that we are calling the function from $this object.
        add_action('admin_menu', array($this, 'add_admin_page'));

        //Add link to admin page from plugin listing on the plugins page.
add_filter("plugin_action_links_" . $this->pluginTitle, array($this, 'AdminPageLink')); MyPlugin.php > add_admin_page()
        require_once(dirname(__FILE__) .'\MessageBoard.php'); //__FILE__ gets the current file, dirname() gets the parent directory

        //Add a page to the wordpress backend menu.

        //add_menu_page('page title', 'menu title in side bar', 'define roles', 'unique page ID slug(can be whatever)', 'function that is called to initialize page ', 'sets icon in sidebar', 'position in sidebar')
        //'define roles' will define which user can see the page https://wordpress.org/support/article/roles-and-capabilities/#manage_options
        //You can find a list of all the existing icons here: https://developer.wordpress.org/resource/dashicons/ or put a url to your custom icon
        add_menu_page('My Plugin', 'My Plugin', 'manage_options', 'MyPlugin', array($this, 'LoadMyPluginAdminPage'), 'dashicons-testimonial', 110);

        //Enqueue styles
        wp_enqueue_style('adminAreaStyleSheet', plugins_url('MyPlugin/adminAreaStyleSheet.css'));
        //Enqueue
        wp_enqueue_script('adminArea_js', plugins_url('MyPlugin/adminArea.js'), /*NULLdependencies such as jQuery*//* array('jquery'), true*/);
        //Localize
wp_localize_script( 'adminArea_js', 'wp_ajax', array( 'ajax_url' => admin_url( 'admin-ajax.php' ) ) ); MyPlugin.php > LoadMyPluginAdminPage()
    function LoadMyPluginAdminPage(){
        require_once dirname(__FILE__) .'\AdminPage.php';
} MyPlugin.php > AdminPageLink()
    public function AdminPageLink($links){
        //$links is a array of links that are present in the plugin listing on the plugins page.
        //To add a new link lets simply push a new HTML link into this array.
        array_push($links, '<a href="admin.php?page=MyPlugin">Settings</a>');

        return $links;
    }
Resulting Plugin Admin Page