About
In this post, I’ll show you how to make API requests from the ESP32 or ESP8266, how to set up a web server on the ESP and use AJAX to send/receive data and how to establish a web socket connection for bi-directional data streaming. These examples can be used as basic starting templates for projects.
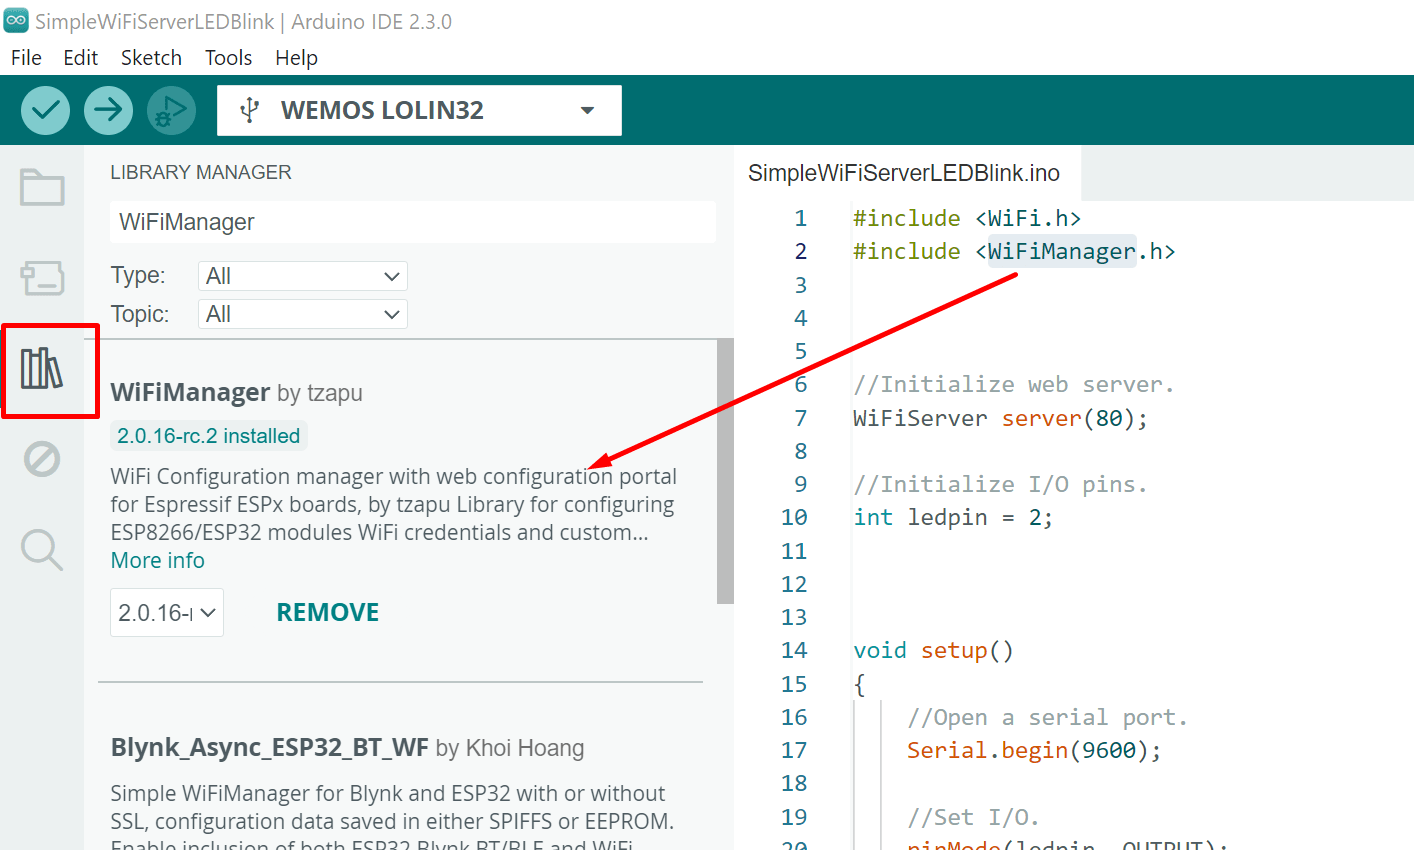
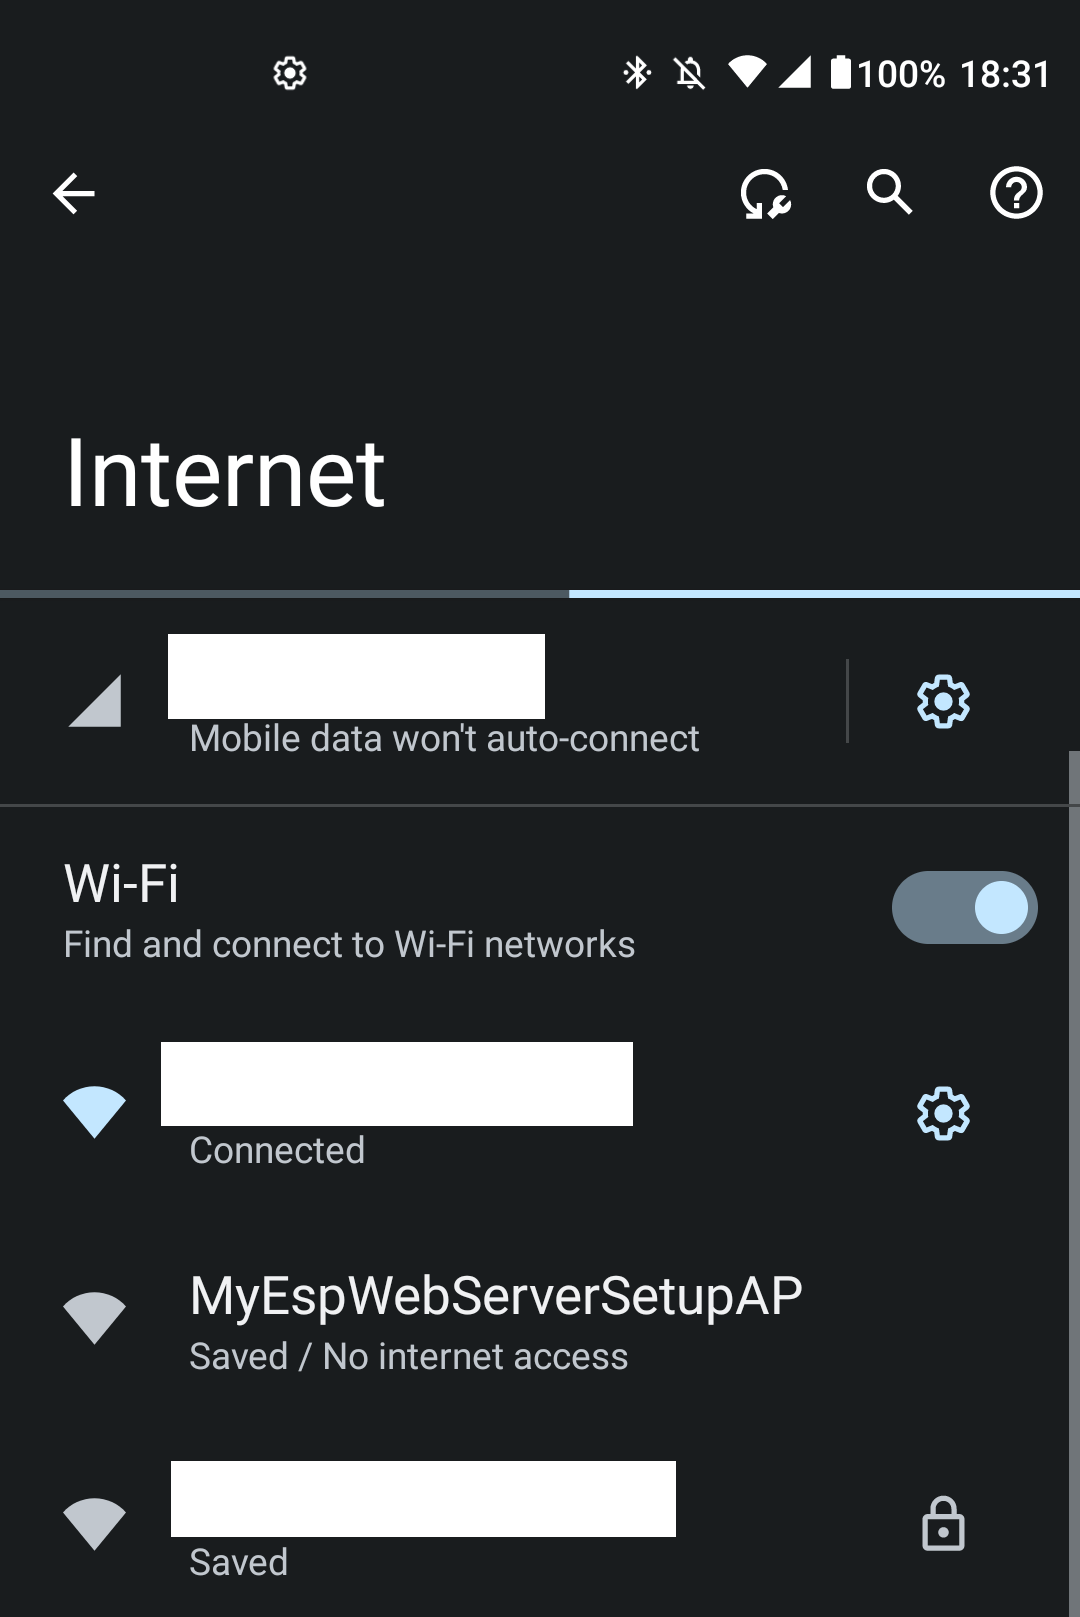
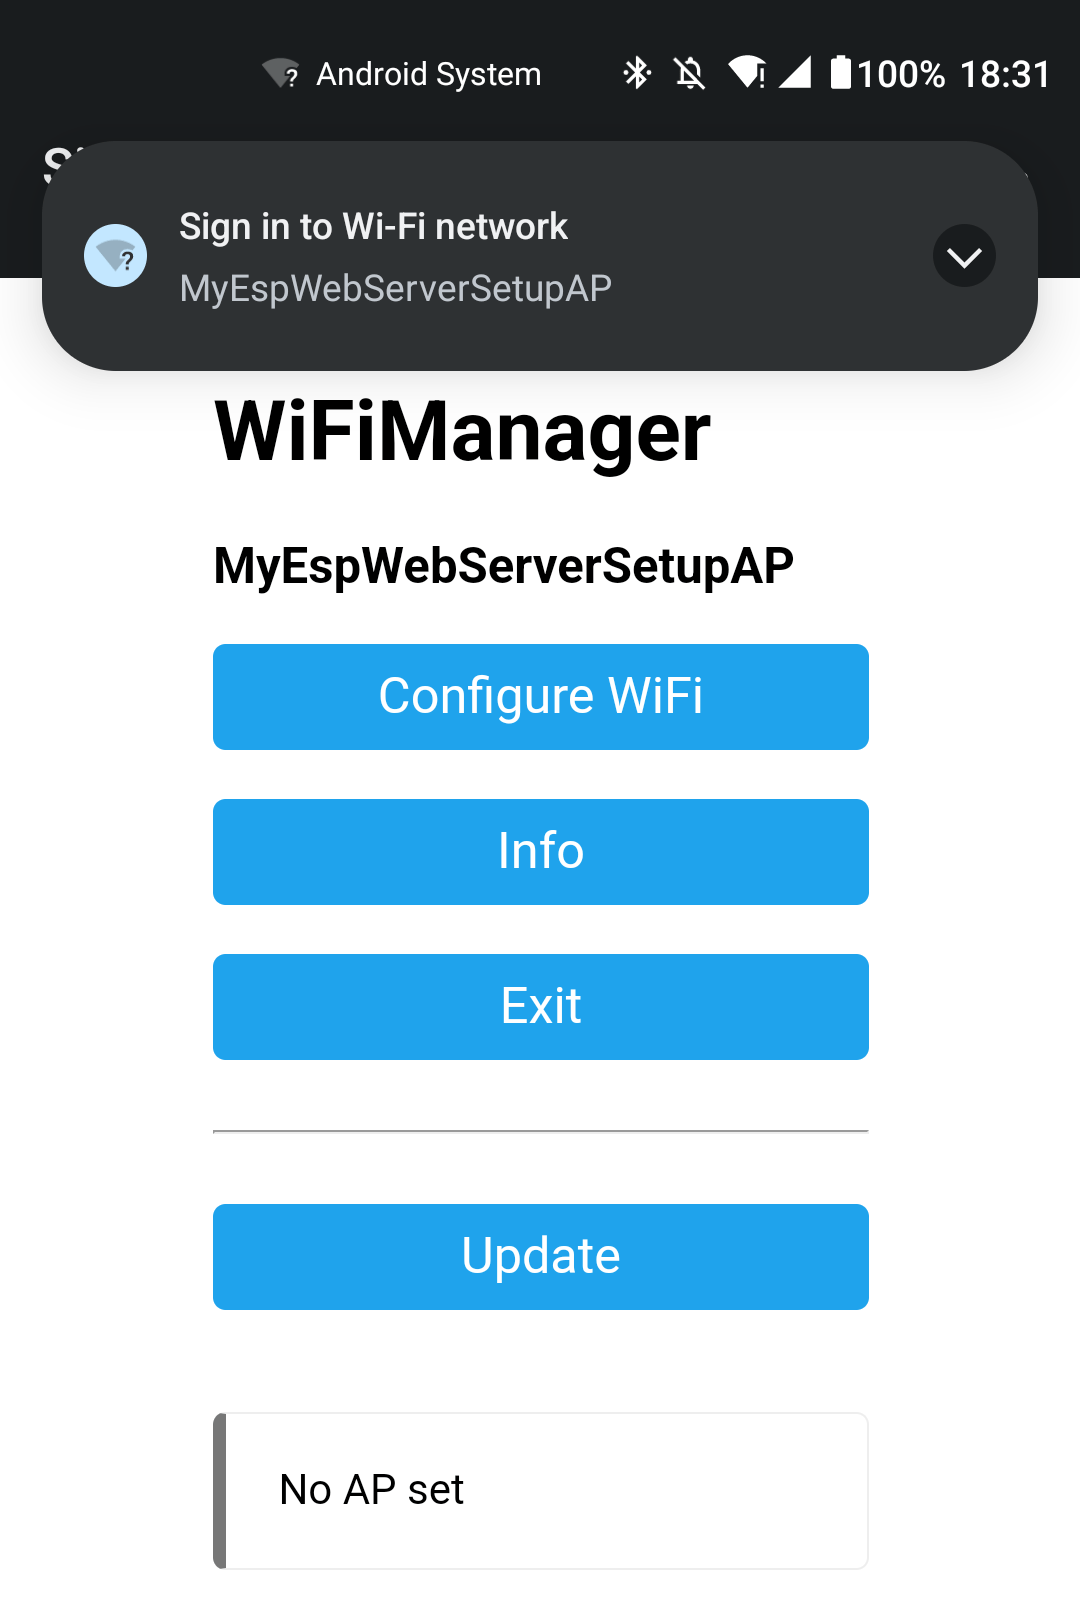
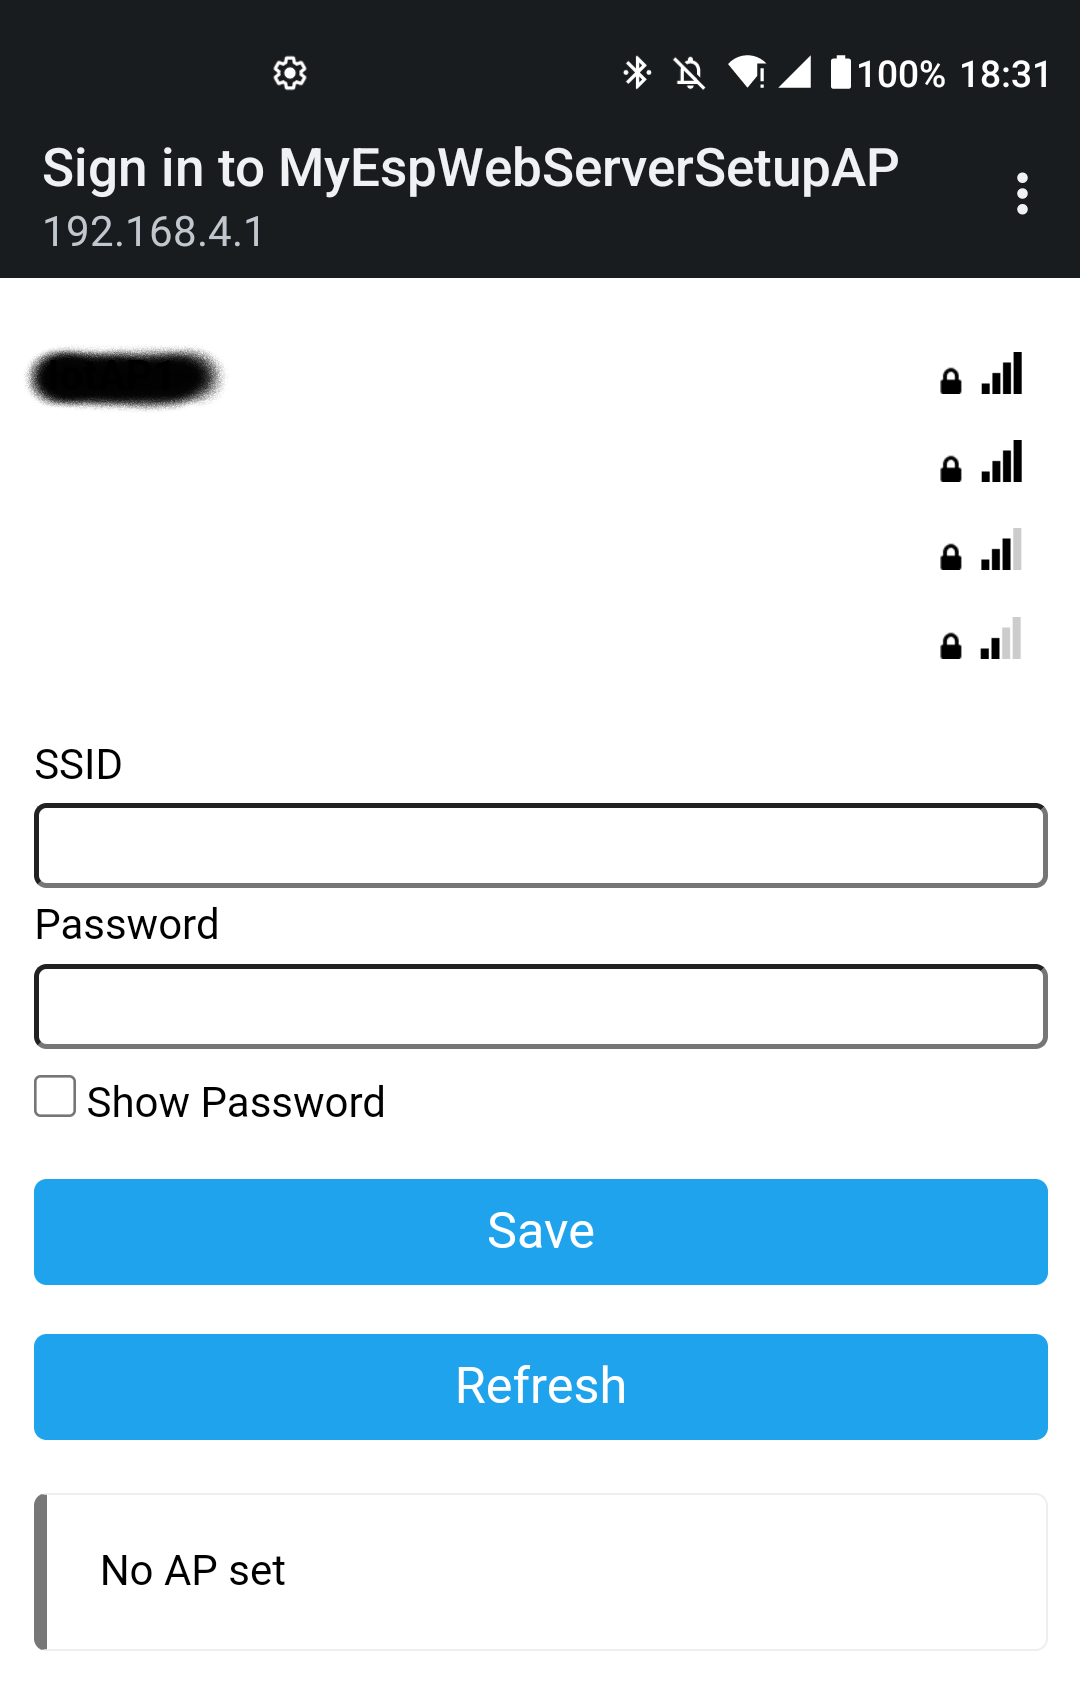
We will also see how to use the WiFi Manager library that enables you to connect to your ESP and select a network to connect it to. This way you don’t have to hardcode your password into the source code. This is more secure and flexible and required if you are making a product for customers that utilizes the ESP for web connectivity.
Note: If you are interested you can also check out this post where I made a websocket server/client in C#.
Note About Libraries:
Hardware Used
- #adAmazon LinkESP32 Board
Calling An API From The ESP
PHP API Code
<?php
use \Psr\Http\Message\ServerRequestInterface as Request;
use \Psr\Http\Message\ResponseInterface as Response;

require 'vendor/autoload.php';

//To get rid of /index.php/ in url add virtual host in htaccess file.

$app = new \Slim\App;

$app->get('/textmessage', function($request, Slim\Http\Response $response, $args) {
	$text = getTextMessage();

	$toEncode = array('textmessage' => $text);
	$json = json_encode($toEncode);

	return $response->withStatus(200)
    ->withHeader('Content-Type', 'application/json')
    ->write($json);
});

function getTextMessage(){
	//get text from database, file, some other API, ...
	$status = "Hello World!";

	return $status;
}

$app->run();
ESP Code
#include <SSD1306.h>
#include <WiFi.h>
#include <HTTPClient.h>
#include <ArduinoJson.h>
//Set wifi credentials.
const char* ssid = "your wifi network name";
const char* password = "your wifi password";
SSD1306 display(0x3c, 5, 4);
void setup() {
//Initialize display.
display.init();
//display.flipScreenVertically();
display.setFont(ArialMT_Plain_16);
//Open a serial port.
Serial.begin(9600);
//Try to connect to wifi.
WiFi.begin(ssid, password);
while (WiFi.status() != WL_CONNECTED) {
delay(1000);
Serial.println("Connecting to WiFi...");
}
Serial.println("Connected to WiFi");
}
void loop() {
//If wifi is connected call the API and display text.
if (WiFi.status() == WL_CONNECTED) {
String text = getDataFromAPI();
//Display the result on the screen.
DisplayText(text);
}
//Wait for 5 seconds before making the next request.
delay(5000);
}
inline String getDataFromAPI() {
HTTPClient http;
JsonDocument json;
//Set the url to be called.
http.begin("http://192.168.1.2/ESP/index.php/textmessage");
//Send GET request.
int httpResponseCode = http.GET();
if (httpResponseCode == 200) {
String result = http.getString();
deserializeJson(json, result);
String textmessage = json["textmessage"];
Serial.println(httpResponseCode);
Serial.println(textmessage);
//Close connection.
http.end();
return textmessage;
} else {
Serial.print("Response code: ");
Serial.println(httpResponseCode);
//Close connection.
http.end();
return "Http Code: " + httpResponseCode;
}
}
inline void DisplayText(String text) {
display.clear();
display.setTextAlignment(TEXT_ALIGN_LEFT);
display.drawString(0, 0, text);
display.display();
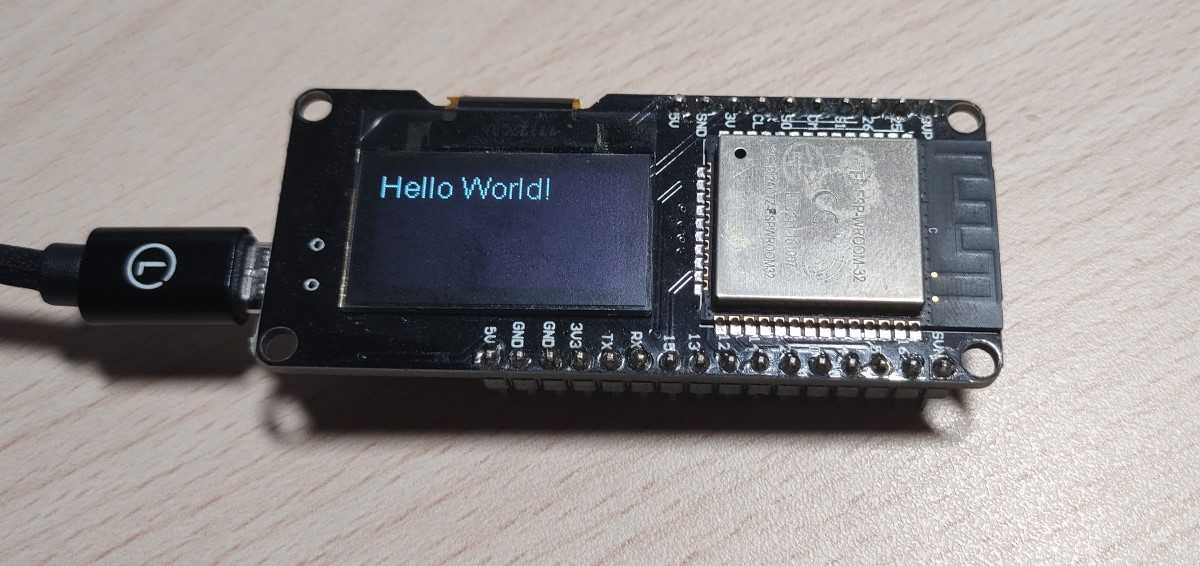
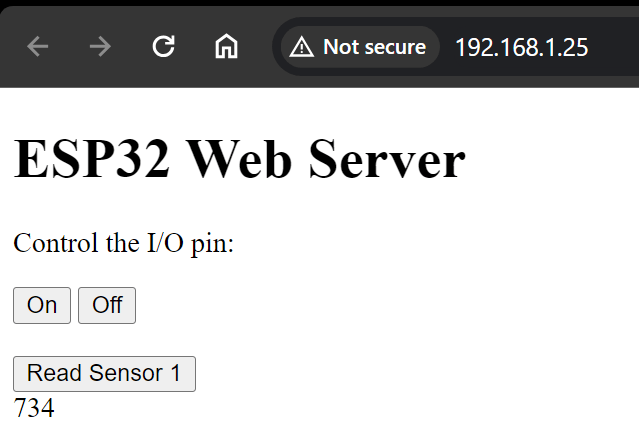
} Result:
ESP Web Server Host
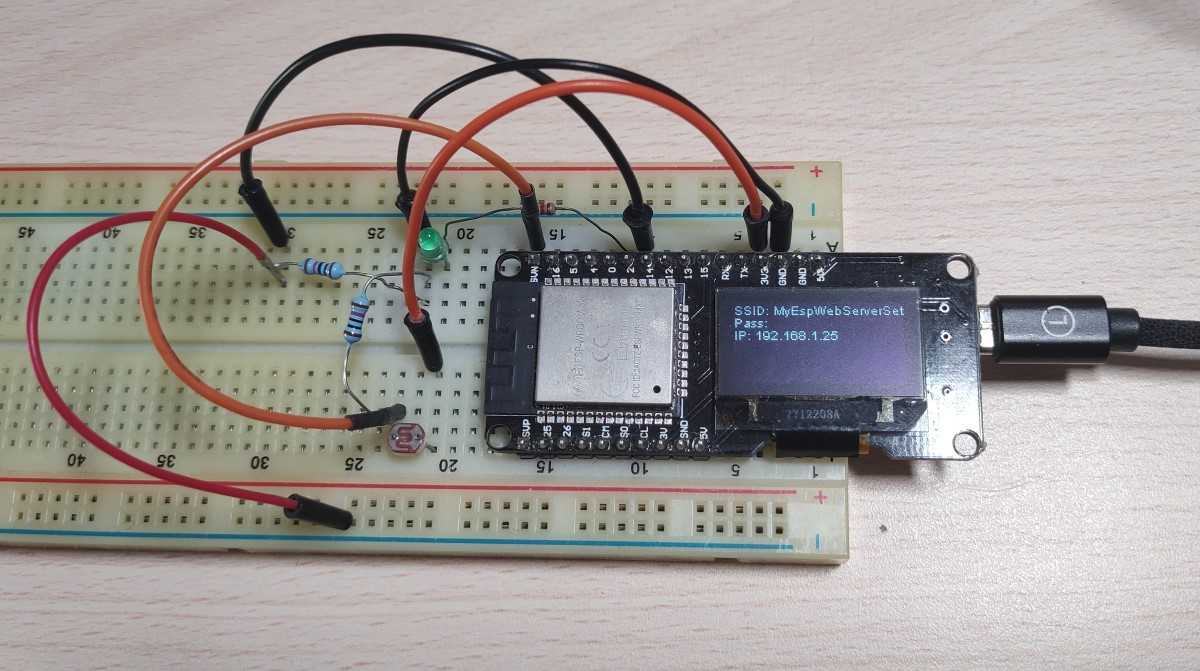
In this example, we will see how to set up a webserver on the ESP itself. This server will serve a webpage when we connect to it. The webpage will contain the fronted(UI and code) to then send/receive data from/to the ESP server. This will enable us to read the values from the ESP or control its pins. In this case, we will toggle an LED on/off and read the values from a light sensor.
Schematic

ESP Code
#include <SSD1306.h>
#include <ArduinoJson.h>
#include <WiFi.h>
#include <WebServer.h>
#include <WiFiManager.h>
#include "WebPage.h"


//Initialize /////////////////////////////////

//OLED display.
SSD1306 display(0x3c, 5, 4);

//Web server.
WebServer server(80);

//I/O pins.
int ledPin = 2;
int wifiSettingsResetPin = 14;

//Wifi AP ssid and password.
const char* ssid = "MyEspWebServerSetupAP";
const char* password = "";

///////////////////////////////////////////////


void setup()
{
  //Initialize display.
  display.init();
  display.flipScreenVertically();
  display.setFont(ArialMT_Plain_10);

  //Display initial AP connection info on the OLED screen.
  DisplayAPInfo(ssid, password, "/");

  //Open a serial port.
  Serial.begin(9600);

  //Print the AP info to the serial port.
  Serial.println("SSID: ");
  Serial.print(ssid);
  Serial.println("Password: ");
  Serial.print(password);

  //Initialize WiFiManager
  WiFiManager wm;
  if(digitalRead(wifiSettingsResetPin)) //If reset pin is HIGH.
    wm.resetSettings(); //Reset network settings.

  wm.setDebugOutput(false); //Disable debug info by default.

  //Create the initial AP used for setting the wifi configuration.
  bool response = wm.autoConnect(ssid, password);

  if (!response) {
    Serial.println("Failed to connect. Retrying connection ...");

    //Try again in 5s.
    ESP.restart();
    delay(5000);
  } else {
    Serial.println("Connected to wifi with IP: ");
    String ip = WiFi.localIP().toString();
    Serial.println(WiFi.localIP());

    DisplayAPInfo(ssid, password, ip);
  }

  //Set I/O.
  pinMode(ledPin, OUTPUT);

  //Initialize web server.
  initWebServer();
}

void loop(){
  server.handleClient();
}


inline void DisplayAPInfo(String ssid, String password, String ip) {
  display.clear();

  display.setTextAlignment(TEXT_ALIGN_LEFT);
  display.drawString(0, 0, "SSID: " + ssid);
  display.drawString(0, 10, "Pass: " + password);
  display.drawString(0, 20, "IP: " + ip);

  display.display();
}


//////////////// Web Server ///////////////////

void initWebServer() {
  //Serve the HTML page to client when they go to the root path.
  server.on("/", HTTP_GET, serveInitialPage);

  //Setup other endpoints.
  server.on("/toggleLED", HTTP_GET, toggleLED);
  server.on("/readSensor", HTTP_POST, readSensor);

  //Start web server.
  server.begin();
}


void serveInitialPage() {
  server.send(200, "text/html", WEBPAGE);
}

void toggleLED() {
  if (server.hasArg("action")) {
    String action = server.arg("action");

    if (action == "1") {
      Serial.println("LED on");
      digitalWrite(ledPin, HIGH);
    }

    if (action == "0") {
      Serial.println("LED off");
      digitalWrite(ledPin, LOW);
    }
  }

  server.send(200, "text/plain", ""); //Send web page.
}

void readSensor() {
  //Get data from the body of the request.
  String requestBody = server.arg("plain");

  //Deserialize a json string.
  StaticJsonDocument<200> deserJsonDoc; //Set size of buffer to 200 bytes. For larger payloads DynamicJsonDocument(allocated on the heap) can be used.
  deserializeJson(deserJsonDoc, requestBody); //Desrialize json.
  const char* sensorID = deserJsonDoc["sensorID"]; //Get value from json document.


  //Read a sensor based on the sensor ID provided in the json.
  int sensorValue = 0;
  if(strcmp(sensorID, "sensor1") == 0){
    sensorValue = analogRead(A3); //GPIO 39
  } /*else if(strcmp(sensorID, "sensor2") == 0){ //add other sensors ...
    ...
  }*/


  //Serialize read value to a json string.
  StaticJsonDocument<200> serJsonDoc; //Set size of buffer to 200 bytes.
  serJsonDoc["value"] = sensorValue; //Set value.
  char jsonString[200]; //Make a json string variable.
  serializeJson(serJsonDoc, jsonString); //Serialize json.

  //Return read value as json.
  server.send(200, "application/json", jsonString); //Send web page
}

///////////////////////////////////////////////
Webpage Code
const char WEBPAGE[] PROGMEM = R"=====(
<!DOCTYPE html>
<html lang="en">
  <head>
      <meta charset="UTF-8">
      <meta name="viewport" content="width=device-width, initial-scale=1.0">
      <title>ESP32 Web Server</title>
  </head>
  <body>
      <h1>ESP32 Web Server</h1>

      <p>Control the I/O pin:</p>

      <button onclick="sendCommand('1')">On</button>
      <button onclick="sendCommand('0')">Off</button>

      <br>
      <br>

      <button onclick="getReading('sensor1')">Read Sensor 1</button>
      <div id="readingDisplay"></div>

      <script>
        async function sendCommand(command) {
          try {
            const response = await fetch("/toggleLED?action=" + command);
            if (!response.ok)
              throw new Error('Error');
          } catch (error) {
            console.error('Error: ', error);
          }
        }

        async function getReading(sensorID) {
          const reading = await fetchReading(sensorID);

          document.getElementById('readingDisplay').innerText = reading.value;
        }

        async function fetchReading(sensorID) {
          const dataObject = { "sensorID": sensorID };
          const json = JSON.stringify(dataObject);

          try {
            const response = await fetch("/readSensor", {
              method: 'POST',
              headers: {
                'Content-Type': 'application/json'
              },
              body: json
            });

            if (!response.ok)
              throw new Error('Error');

            const data = await response.json();

            return data;
          } catch (error) {
            console.error('Error: ', error);
          }
        }
      </script>
  </body>
</html>
)=====";
Result:
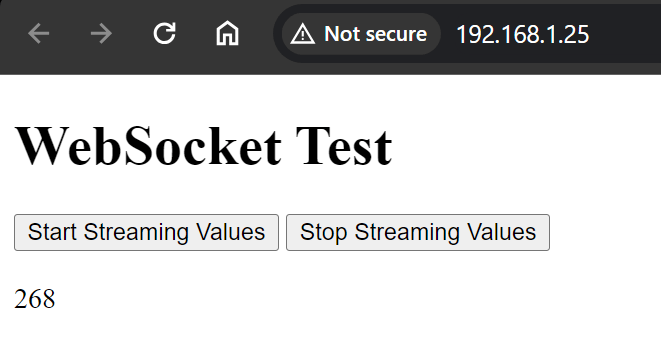
ESP Web Socket Server
ESP Code
#include <WiFi.h>
#include <WiFiManager.h> //Include before webserver libraries or it will cause an error.
#include <AsyncTCP.h>
#include <AsyncWebSocket.h>
#include <ESPAsyncWebServer.h>
#include <SSD1306.h>

#include "WebPage.h"


//Initialize /////////////////////////////////

//OLED display.
SSD1306 display(0x3c, 5, 4);

//Web and websocket server.
AsyncWebServer server(80);
AsyncWebSocket ws("/ws");
bool sendData = false;

//I/O pins.
int wifiSettingsResetPin = 14;

//Wifi AP ssid and password.
const char* ssid = "MyEspWebServerSetupAP";
const char* password = "";

///////////////////////////////////////////////


void setup() {
  //Initialize display.
  display.init();
  display.flipScreenVertically();
  display.setFont(ArialMT_Plain_10);

  //Display initial AP connection info on the OLED screen.
  DisplayAPInfo(ssid, password, "/");

  //Open a serial port.
  Serial.begin(9600);

  //Print the AP info to the serial port.
  Serial.println("SSID: ");
  Serial.print(ssid);
  Serial.println("Password: ");
  Serial.print(password);

  //Initialize WiFiManager
  WiFiManager wm;
  if(digitalRead(wifiSettingsResetPin)) //If reset pin is HIGH.
    wm.resetSettings(); //Reset network settings.

  wm.setDebugOutput(false); //Disable debug info by default.

  //Create the initial AP used for setting the wifi configuration.
  bool response = wm.autoConnect(ssid, password);

  if (!response) {
    Serial.println("Failed to connect. Retrying connection ...");

    //Try again in 5s.
    ESP.restart();
    delay(5000);
  } else {
    Serial.println("Connected to wifi with IP: ");
    String ip = WiFi.localIP().toString();
    Serial.println(WiFi.localIP());

    DisplayAPInfo(ssid, password, ip);
  }

  //Serve the HTML page to client when they go to the root path.
  serveInitialPage();

  //Start the websocket server.
  ws.onEvent(onWsEvent);
  server.addHandler(&ws);

  server.begin();
}

void loop() {
  if(sendData){
    int reading = analogRead(A3);
    ws.textAll(String(reading));

    //Wait for a second before sending the next reading.
    delay(1000);
  }
}


void serveInitialPage() {
  server.on("/", HTTP_GET, [](AsyncWebServerRequest *request) {
    request->send_P(200, "text/html", WEBPAGE);
  });
}

inline void DisplayAPInfo(String ssid, String password, String ip) {
  display.clear();

  display.setTextAlignment(TEXT_ALIGN_LEFT);
  display.drawString(0, 0, "SSID: " + ssid);
  display.drawString(0, 10, "Pass: " + password);
  display.drawString(0, 20, "IP: " + ip);

  display.display();
}

void onWsEvent(AsyncWebSocket *server, AsyncWebSocketClient *client, AwsEventType type, void *arg, uint8_t *data, size_t len) {
    switch (type) {
    case WS_EVT_CONNECT:
        Serial.println("Client connected");
        break;
    case WS_EVT_DISCONNECT:
        Serial.println("Client disconnected");

        sendData = false;

        break;
    case WS_EVT_DATA:
        Serial.println("Data received from client");

        sendData = (data[0] == '1');

        break;
    case WS_EVT_PONG:
        Serial.println("Pong received");
        break;
    case WS_EVT_ERROR:
        Serial.println("Error with WebSocket connection");
        break;
    }
}
Webpage Code
const char WEBPAGE[] PROGMEM = R"=====(
<!DOCTYPE html>
<html>
<head>
    <title>WebSocket Test</title>
</head>
<body>
    <h1>WebSocket Test</h1>

    <button onclick="getValues('1')">Start Streaming Values</button>
    <button onclick="getValues('0')">Stop Streaming Values</button>

    <br>
    <br>

    <div id="readingDisplay"></div>

    <script>
        var ws = new WebSocket('ws://' + window.location.hostname + '/ws');
        ws.onopen = function() {
            console.log('Connected');
        };
        ws.onclose = function() {
            console.log('Disconnected');
        };
        ws.onerror = function(error) {
            console.error('WebSocket Error:', error);
        };
        ws.onmessage = function(event) {
            console.log('Message from server:', event.data);
            document.getElementById('readingDisplay').innerText = event.data;
        };

        function getValues(value) {
            ws.send(value);
        }
    </script>
</body>
</html>
)=====";
Result: