


In this code snippet, we’ll check out the for of loop in Javascript.
You probably already know about the for and while loops. But there are two other very useful vriations of the for loop called the for of loop and for in loop.
The for of loop can be used to iterate throught values of iterable objects. Meanwhile the for in loop can be used to iterate through keys of an object.
Let’s see the example below.
let numbers = [ 1, 5, 7, 3, 6 ];

//Returns values of an object.
for(const number of numbers)
	console.log(number);

//Returns keys of an object(indexes of the array in this case).
for(const number in numbers)
	console.log(number);


In this code snippet, we’ll learn how to send emails with PHPMailer in PHP.
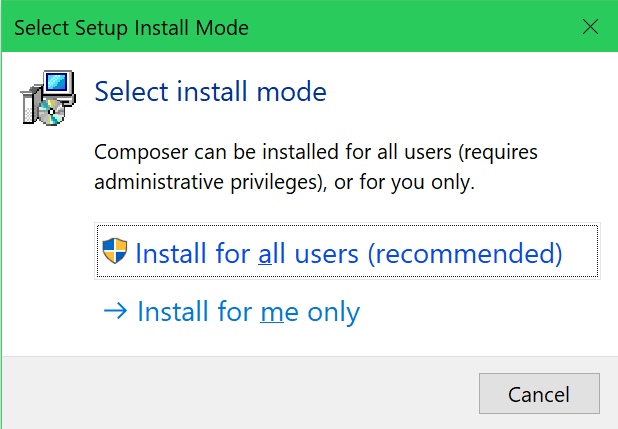
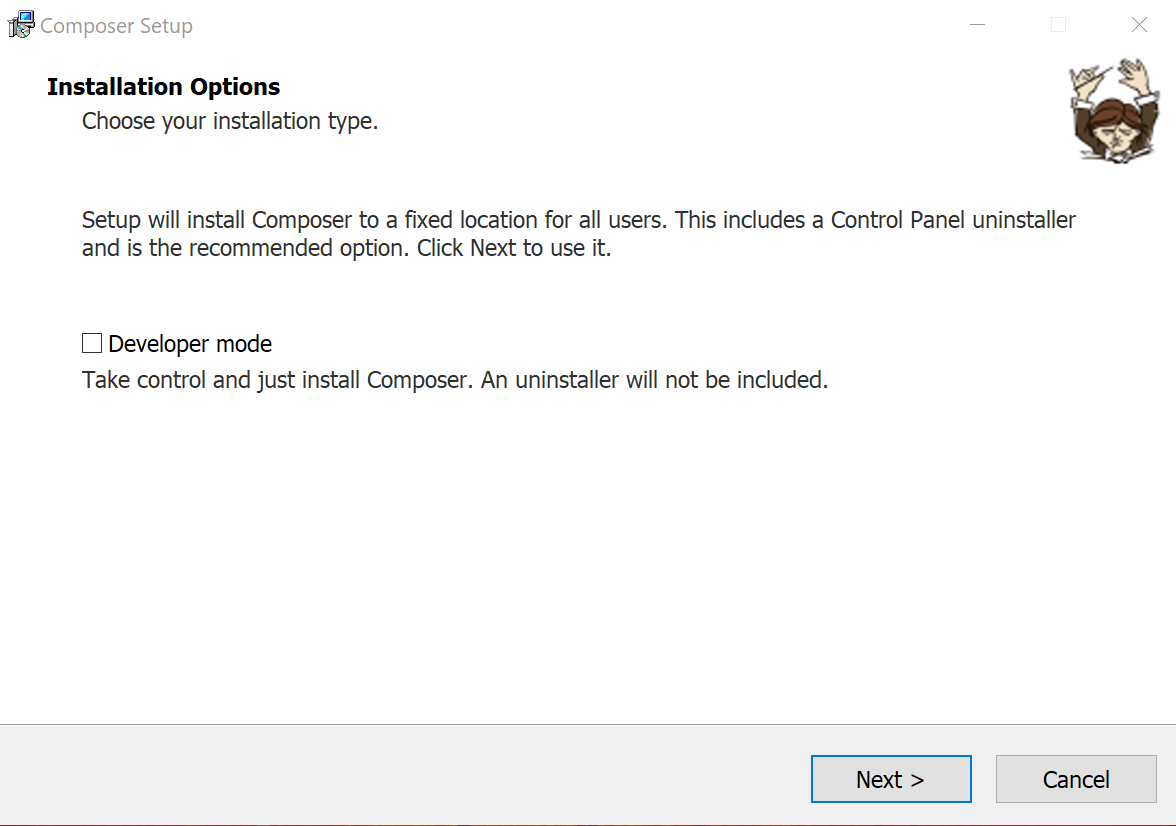
First, we’ll need to install the PHPMailer package. We’ll do that using a dependency manager for PHP called Composer. (See this tutorial if you want to know how to install Composer in the first place.)
Simply open up cmd, navigate to your project directory and run this command: composer require phpmailer/phpmailer to add the dependency. Then we’ll include it at the top of the file.
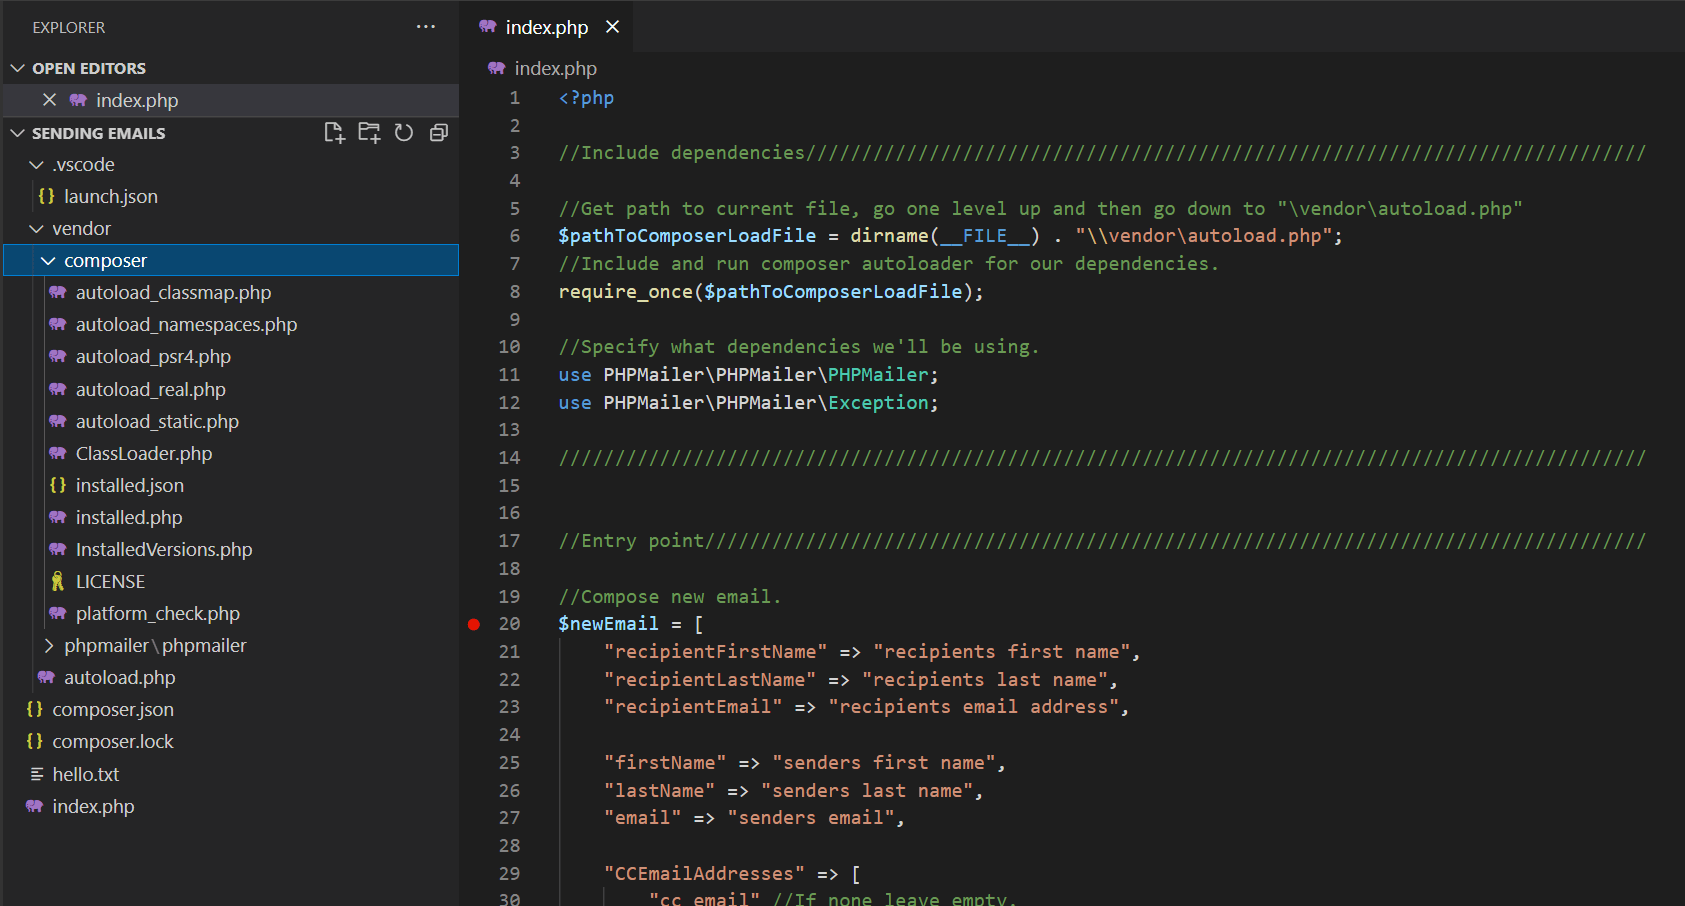
Next, I’ll make two associative arrays. One will hold the data required to compose a new email(content, recipient, seder, …) while the other will contain the client data to send the email(SMTP server, username and password of the sender, …). Then I’ll pass these two arrays to a function called setupMailer() which will make a PHPMailer email object and return it.
Finally, the send() function of the previously mentioned email object is called to send the actual email.
Let’s see the example code below.
<?php
//Include dependencies///////////////////////////////////////////////////////////////////////////
//Get path to current file, go one level up and then go down to "\vendor\autoload.php"
$pathToComposerLoadFile = dirname(__FILE__) . "\\vendor\autoload.php";
//Include and run composer autoloader for our dependencies.
require_once $pathToComposerLoadFile;
//Specify what dependencies we'll be using.
use PHPMailer\PHPMailer\PHPMailer;
use PHPMailer\PHPMailer\Exception;
/////////////////////////////////////////////////////////////////////////////////////////////////
//Entry point////////////////////////////////////////////////////////////////////////////////////
//Compose new email.
$newEmail = [
    "recipientFirstName" => "recipients first name",
    "recipientLastName" => "recipients last name",
    "recipientEmail" => "recipients email address",
    "firstName" => "senders first name",
    "lastName" => "senders last name",
    "email" => "senders email",
    "CCEmailAddresses" => [
        "cc email", //If none leave empty.
    ],
    "BCCEmailAddresses" => [
        "bcc email", //If none leave empty.
    ],
    "subject" => "Hello",
    "body" => "<h1>Hello Bob!</h1>",
    "altBody" => "Hello Bob!",
    "attachements" => [
        //Multiple attachement can be added here.
        [
            "attachementPath" => "C:\\xampp\htdocs\Code Examples\php\Zipping Files",
            "attachementName" => "hello.text",
        ],
    ],
];
//Set emailer settings.
$emailSettings = [
    "host" => "smtp.office365.com", //Depends on your email provider. For example, outlook: "smtp.office365.com", gmail: "smtp.gmail.com", ...;
    "port" => 587,
    "userName" => "YourEmailAddress",
    "password" => "YourEmailAddressPassword",
];
//Setup mailer.
$mail = setUpMailer($emailSettings, $newEmail);
//Try to send email.
if (!$email->send()) {
    echo "An error occurred while trying to send the email! Error " . $mail->ErrorInfo;
}
/////////////////////////////////////////////////////////////////////////////////////////////////
//Functions//////////////////////////////////////////////////////////////////////////////////////
function setUpMailer($emailSettings, $newEmail)
{
    try {
        $mail = new PHPMailer();
        //Set true to enable exceptions.
        $mail = new PHPMailer(false);
        //Enable SMTP debugging.
        //$mail->SMTPDebug = 3;
        $mail->SMTPDebug = false;
        //Set PHPMailer to use SMTP.
        $mail->isSMTP();
        //Set SMTP host name. Depends on the email provider you are using.
        $mail->Host = $emailSettings["host"];
        //Set this to true if SMTP host requires authentication to send email.
        $mail->SMTPAuth = true;
        //Provide username and password.
        $mail->Username = $emailSettings["userName"];
        $mail->Password = $emailSettings["password"];
        //If SMTP requires TLS encryption then set it.
        $mail->SMTPSecure = "tls";
        //Set TCP port to connect to:.
        $mail->Port = $emailSettings["port"];
        //Set character encoding.
        $mail->CharSet = 'UTF-8';
        //Sender info.
        $mail->From = $newEmail["email"];
        $mail->FromName = $newEmail["firstName"] . " " . $newEmail["lastName"];
        //Address to which recipient will reply.
        $mail->addReplyTo($newEmail["email"], "Reply");
        //Add recipient address.
        $mail->addAddress($newEmail["recipientEmail"], $newEmail["recipientFirstName"] . " " . $newEmail["recipientLastName"]);
        //CC
        foreach ($cc as $newEmail["CCEmailAddresses"]) {
            $mail->addCC($cc);
        } //Add email attachment.
        //BCC
        foreach ($bcc as $newEmail["BCCEmailAddresses"]) {
            $mail->addBCC($bcc);
        } //Add email attachment.
        //Add email attachments.
        foreach ($attachement as $newEmail["attachements"]) {
            $mail->addAttachment($attachement["attachementPath"], $attachement["attachementName"]);
        } //Add email attachment.
        //Set if the email will contain HTML or not.
        $mail->isHTML(true);
        //Set subject.
        $mail->Subject = $newEmail["subject"];
        //Email body with HTML.
        $mail->Body = $newEmail["body"];
        //Email body without HTML.
        $mail->AltBody = $newEmail["altBody"];
        return $mail;
    } catch (Exception $ex) {
        echo "An error occurred while trying to send the email! Error " . $mail->ErrorInfo;
    }
}
//////////////////////////////////////////////////////////////////////////////////////////////////

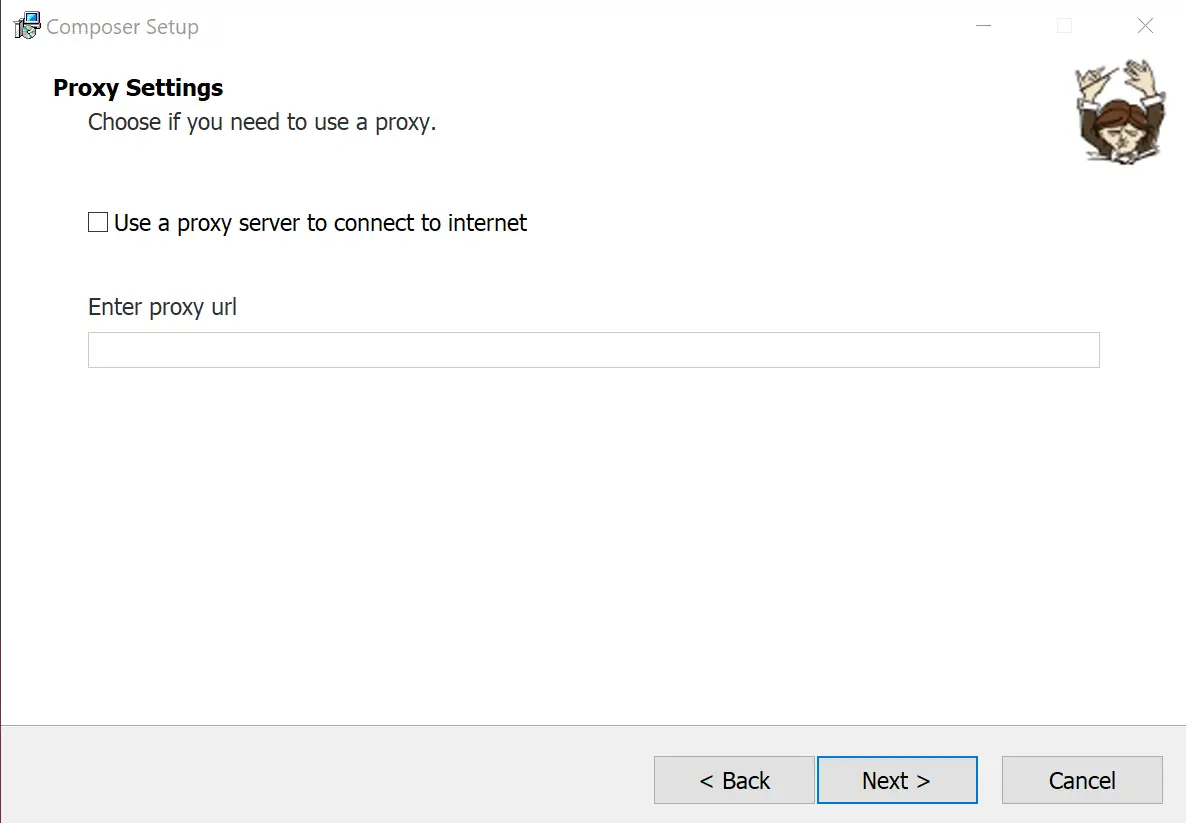
In this tutorial, we’ll learn how to install and use Composer.
Composer is a PHP dependency manager that simplifies adding and managing libraries in your PHP projects.
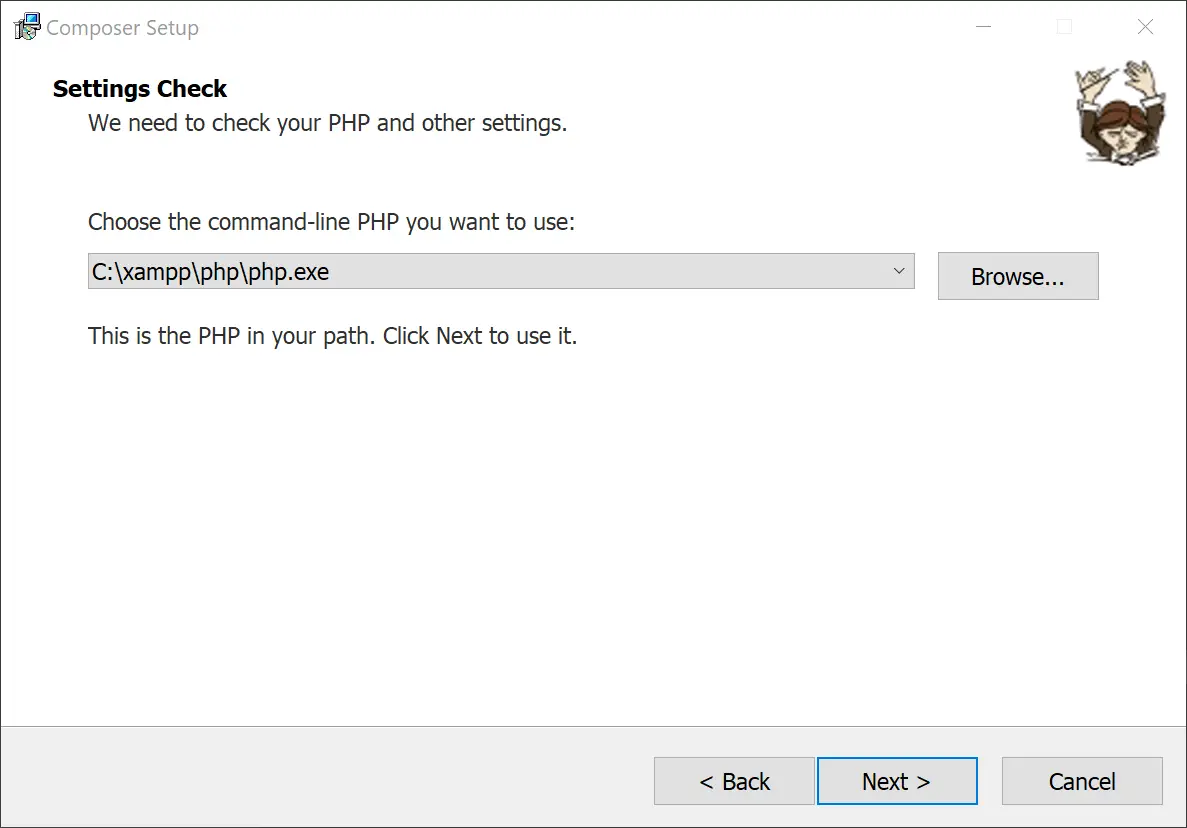
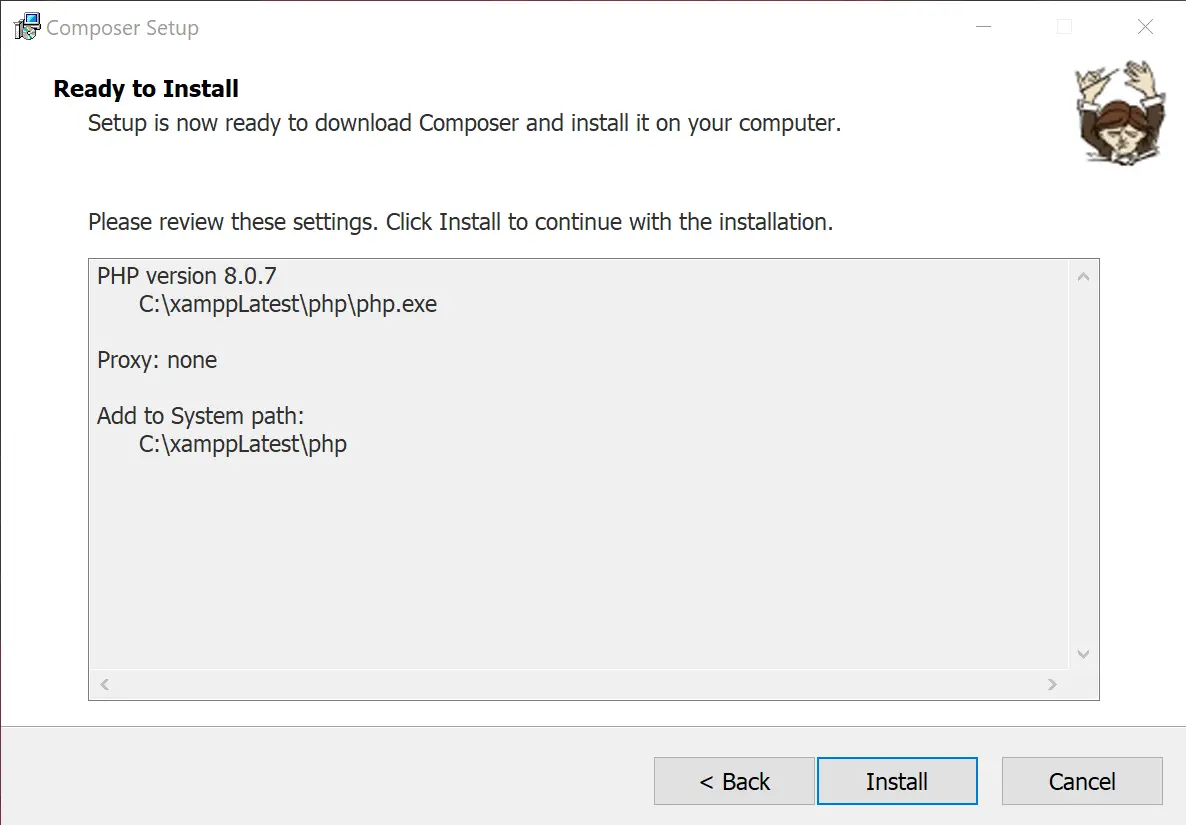

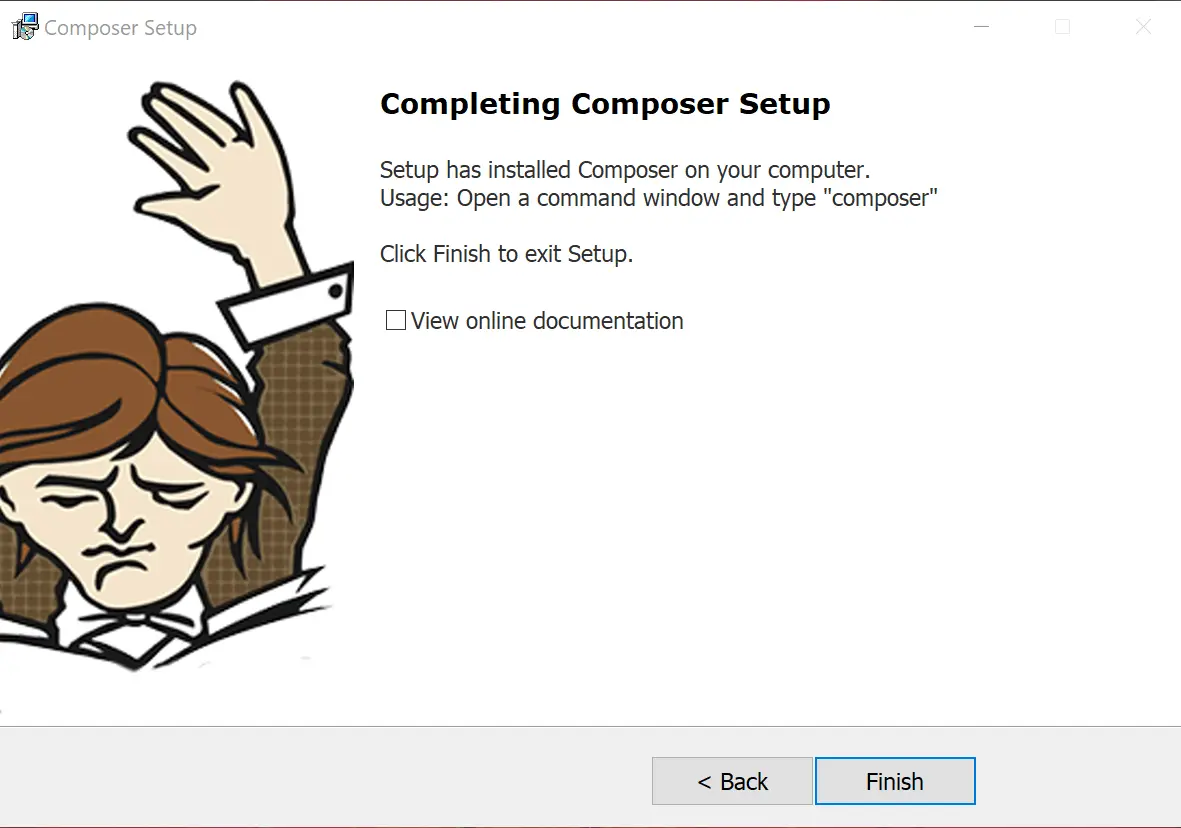
After Composer has been installed you can use it by opening cmd then navigating to the project where you want to add your dependencies. In this case, I want to use PHPMailer in my project to send emails.
Note: You can find all sorts of other libraries here.

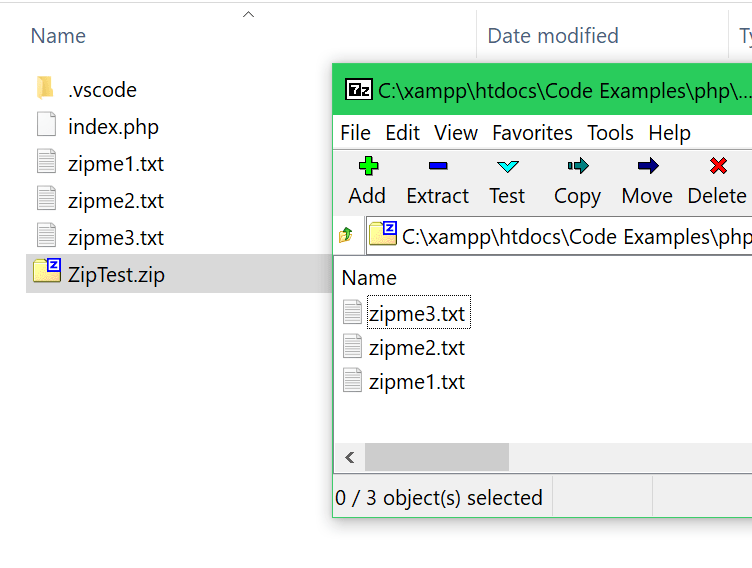
In this code snippet, we’ll learn how to zip files in PHP.
Let’s see the example below.
<?php

//Entry point////////////////////////////////////////////////////////////////////////////////////

//Array of file paths to be zipped.
$filesToBeZipped = [
	"C:\\xampp\htdocs\Code Examples\php\Zipping Files\zipme1.txt",
	"C:\\xampp\htdocs\Code Examples\php\Zipping Files\zipme2.txt",
	"C:\\xampp\htdocs\Code Examples\php\Zipping Files\zipme3.txt"
];

zipFiles($filesToBeZipped, "ZipTest.zip", "C:\\xampp\htdocs\Code Examples\php\Zipping Files");

/////////////////////////////////////////////////////////////////////////////////////////////////


//Functions//////////////////////////////////////////////////////////////////////////////////////

function zipFiles($filesToBeZipped, $name, $destination){
	//Join name and location.
	$zipFilePath = $destination . "\\" . $name;

	//Create archive. More info. about ZipArchive: https://www.php.net/manual/en/ziparchive.open.php
	$zip = new ZipArchive();

	//Open new or existing file. If operation fails we'll exit with an error.
	if($zip->open($zipFilePath, ZipArchive::CREATE) !== TRUE)
		exit("Error");

	//Iterate through all paths and add them to the zip file.
	foreach($filesToBeZipped as $path)
		$zip->addFile($path, basename($path)); //basename() gets just the file name from the path.

	//Finish and zip the files.
	$zip->close();
}

////////////////////////////////////////////////////////////////////////////////////////////////// 

This post contains a list PHP code snippets. In the code snippets, you can find PHP related topics with a quick explanation and a code example. I made this collection of code snippets so that if I ever forget something I can just come here to refresh my memory.
Hopefully, you’ll find it useful too.
The first thing you need to do is make a folder and put a manifset.json file into it. For the web browser to recognize this as an extension you need to need to fill the file with the following JSON(Put the name and description you want for your extension.):
{
"manifest_version": 2,
"name": "My Extension",
"description": "My first browser extension.",
"version": "1"
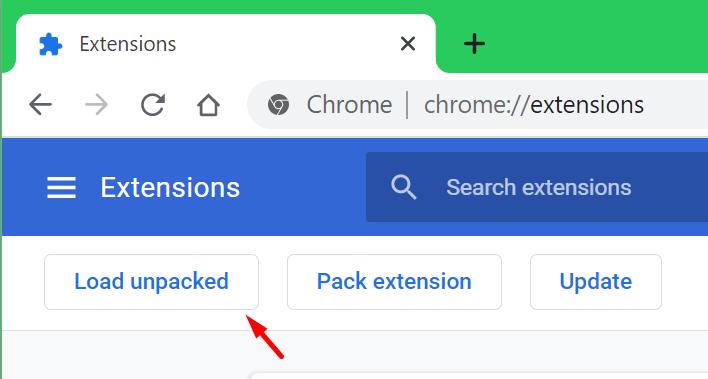
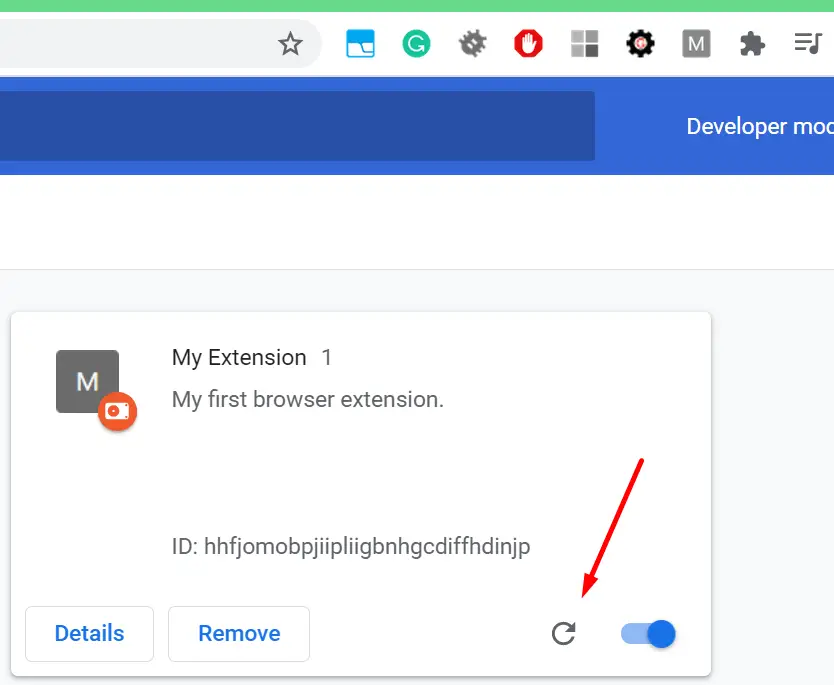
} Open up your browser(Chrome in my case) go to the extensions(chrome://extensions/), click “Load unpacked” and select your extension folder containing the manifest.json file. The browser should now recognize your extension.


{
  "manifest_version": 2,

  "name": "My Extension",
  "description": "My first browser extension.",
  "version": "1",
  "icons": {
    "128": "icon128.png",
    "48": "icon48.png",
    "16": "icon16.png"
  }
} 
{
  "manifest_version": 2,

  "name": "My Extension",
  "description": "My first browser extension.",
  "version": "1",
  "icons": {
    "128": "icon128.png",
    "48": "icon48.png",
    "16": "icon16.png"
  },

  "browser_action": {
    "default_icon": "icon16.png",
    "default_popup": "popup.html"
  }
}
Now make a file named popup.html in the extension directory. Inside define the desired layout for your popup. I also added a style.css for the styling, popup.js for the code and linked to both files from the HTML file. I won’t go into detail about HTML, CSS and JS as I assume you already know how to work with them.
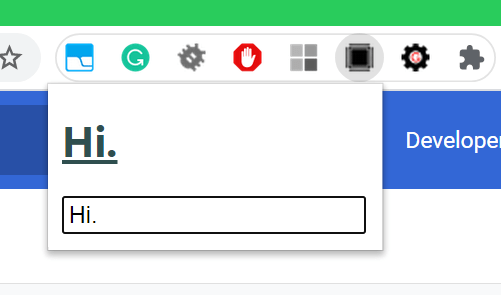
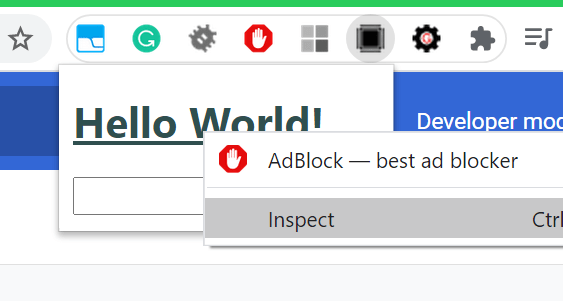
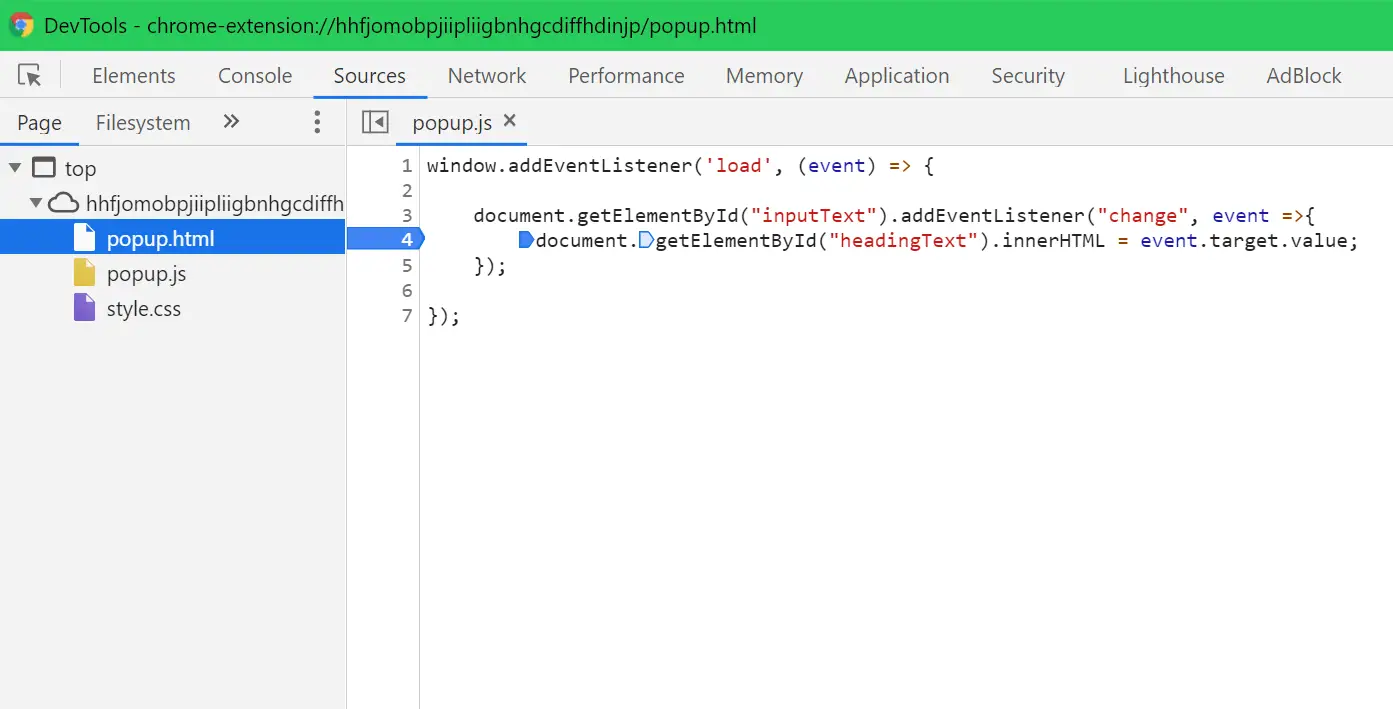
This is just an example of the basic functionality. All the popup will do is take whatever you put in the text box and display it above it in the heading.

<!DOCTYPE html>
<html>
<head>
<title>Hello World</title>
<link rel="stylesheet" type="text/css" href="style.css">
<script src="popup.js"></script>
</head>
<body>
<h1 id="headingText">Hello World!</h1>
<input type="text" id="inputText">
</body>
</html> h1{
font-weight: bold;
color: darkslategrey;
text-decoration: underline;
}
window.addEventListener('load', (event) => {
document.getElementById("inputText").addEventListener("change", event =>{
document.getElementById("headingText").innerHTML = event.target.value;
});
});
{
  "manifest_version": 2,

  "name": "My Extension",
  "description": "My first browser extension.",
  "version": "1",
  "icons": {
    "128": "icon128.png",
    "48": "icon48.png",
    "16": "icon16.png"
  },

  "browser_action": {
    "default_icon": "icon16.png",
    "default_popup": "popup.html"
  },

  "content_scripts": [{
    "matches": [
      "<all_urls>"
    ],
    "js": ["code.js"]
  }]

}
You can use the matches array to define which URLs our script will be invoked on. In our case, all of them, see the documentation from Google if you want to know how to perform matching to some specific pattern.
The js array defines all the scripts that will get called when the URL matches.
This simple bit of code here will get all the h2 elements and set their color to green.
window.addEventListener('load', (event) => {
    let list = document.getElementsByTagName("H2");

    for(let element of list){
        element.style.color = "green";
    }
}); 
So far we have two different js scripts, one that is loaded when the extension popup is opened and one when the page gets loaded.
Here we’ll see how to send data from one to another. We’ll enter a color in the text box in the popup and send that to the script running on the web page to change all the h2 elements accordingly.
window.addEventListener('load', (event) => {

    document.getElementById("inputText").addEventListener("change", event =>{
        const color = event.target.value;
        document.getElementById("headingText").innerHTML = color;

        //Send color to web page in tab.
        chrome.tabs.query({currentWindow: true, active: true}, function (tabs){
            chrome.tabs.sendMessage(tabs[0].id, color);
        });
    });

}); window.addEventListener('load', (event) => {
//When a message is received execute the receivedMessage function
chrome.runtime.onMessage.addListener(receivedMessage);
});
function receivedMessage(message, sender, response){
//When the message is received call and pass the value to the colorElements function.
colorElements(message);
}
function colorElements(color){
//Get elements.
let list = document.getElementsByTagName("H2");
//Color the elements.
for(let element of list){
element.style.color = color;
}
}
{
  "manifest_version": 2,

  "name": "My Extension",
  "description": "My first browser extension.",
  "version": "1",
  "icons": {
    "128": "icon128.png",
    "48": "icon48.png",
    "16": "icon16.png"
  },

  "browser_action": {
    "default_icon": "icon16.png",
    "default_popup": "popup.html"
  },

  "content_scripts": [{
    "matches": [
      ""
    ],
    "js": ["code.js"]
  }],

  "permissions": [
    "storage"
  ]

}
window.addEventListener('load', (event) => {
    //Initialize extension to the stored values.
    chrome.storage.sync.get(['color'], function(color) {
        setColor(color.color);
    });

    document.getElementById("inputText").addEventListener("change", event =>{
        //Get color.
        const color = event.target.value;
        //Set color.
        setColor(color);
        //Save color.
        chrome.storage.sync.set({'color': color}, function(){});
    });
});

function setColor(color)
{
    //Display the selected color.
    document.getElementById("headingText").innerHTML = color;
    //Send color to web page in tab.
    chrome.tabs.query({currentWindow: true, active: true}, function (tabs){
        chrome.tabs.sendMessage(tabs[0].id, color);
    });
} window.addEventListener('load', (event) => {
//When a message is received execute the receivedMessage function
chrome.runtime.onMessage.addListener(receivedMessage);
chrome.storage.sync.get(['color'], function(color) {
colorElements(color.color);
});
});
function receivedMessage(message, sender, response){
//When the message is received call and pass the value to the colorElements function.
colorElements(message);
}
function colorElements(color){
//Get elements.
let list = document.getElementsByTagName("H2");
//Color the elements.
for(let element of list){
element.style.color = color;
}
} Well, this is it, you should now have the basic knowledge for making a browser extension. For any additional information see the documentation from Google. You can get the full code on Github.

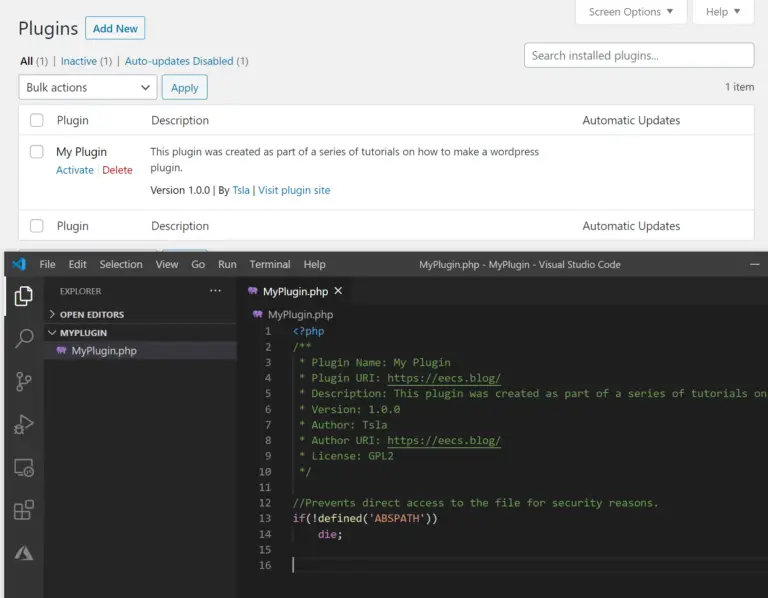
Some time ago I had to make a WordPress plugin as part of my job. Here I will document what I have learned in the process. Hopefully, this can also be useful to anyone who wants to make their own plugin or do any other WordPress development.
In this post, we will make a plugin while at the same time learning how to use some of the WordPress APIs. There are plenty more things to learn about which will not be covered here, for example, custom taxonomies, making themes, editor blocks, … If you are interested in that you can check out the official WordPress developer resources here.
<?php
/**
 * Plugin Name: My Plugin
 * Plugin URI: https://eecs.blog/
 * Description: This plugin was created as part of a series of tutorials on how to make a WordPress plugin.
 * Version: 1.0.0
 * Author: Tsla
 * Author URI: https://eecs.blog/
 * License: GPL2
 */

//Prevents direct access to the file for security reasons.
if(!defined('ABSPATH'))
    die;
When you activate, deactivate or uninstall a plugin WordPress will “fire” a hook. We can bind functions to these hooks and run some specific code required to activate, deactivate or uninstall our plugin.
In the code below I will create a class to represent the plugin. Inside it, I will put the required functions and register them with the register_activation_hook().
The register() will be used later to include any JS, CSS or PHP files. This isn’t a hook. Just a function that we’ll call when the plugin is about to be used.
<?php
/**
 * Plugin Name: My Plugin
 * Plugin URI: https://eecs.blog/
 * Description: This plugin was created as part of a series of tutorials on how to make a WordPress plugin.
 * Version: 1.0.0
 * Author: Tsla
 * Author URI: https://eecs.blog/
 * License: GPL2
 */

//Prevents direct access to the file for security reasons.
if(!defined('ABSPATH'))
    die;

class MyPlugin{
    function __construct(){
        //The constructor runs when the class is initialized.
    }

    function register(){
        //This is where we will later register/include any js, css or php files we require.
    }

    function activate(){
        //Remove rewrite rules and then recreate rewrite rules.
        flush_rewrite_rules();

        //When the user clicks "activate" this code will run.

        //Stuff to initially set up your plugin would be added here.
        //Like for example, making a table in the database to store your plugins data.

        //We will add it later.
    }

    function deactivate(){
        //Remove rewrite rules and then recreate rewrite rules.
        flush_rewrite_rules();

        //When the user clicks "deactivate" this code will run.

        //Code to deactivate the plugin would be added here.
        //Like for example, disable.

        //We will add it later.
    }

    function uninstall(){
        //When the user clicks "uninstall" this code will run.

        //Code to delete the plugin and clean up after it would be added here.
        //Like for example, deleting a table in the database that was used to store your plugins data.

        //We will add it later.
    }
}

//Create a new instance of the plugin class.
$myPlugin = new MyPlugin();
//Call the register function.
$myPlugin->register();

//Register the activation hook.
register_activation_hook(__FILE__, array($myPlugin, 'activate'));
//Register the deactivation hook.
register_deactivation_hook(__FILE__, array($myPlugin, 'deactivate'));
//Register the uninstall hook.
register_uninstall_hook(__FILE__, array($myPlugin, 'uninstall')); <?php
/**
* Plugin Name: My Plugin
* Plugin URI: https://eecs.blog/
* Description: This plugin was created as part of a series of tutorials on how to make a WordPress plugin.
* Version: 1.0.0
* Author: Tsla
* Author URI: https://eecs.blog/
* License: GPL2
*/
//Prevents direct access to the file for security reasons.
if(!defined('ABSPATH'))
die;
class MyPlugin{
function __construct(){
//The constructor runs when the class is initialized.
}
function register(){
//Add/register shortcode.
add_shortcode( 'MyPlugin', array( $this, 'shortCode' ));
}
function activate(){
//Remove rewrite rules and then recreate rewrite rules.
flush_rewrite_rules();
//When the user clicks "activate" this code will run.
//Stuff to initially set up your plugin would be added here.
//Like for example, making a table in the database to store your plugins data.
//We will add it later.
}
function deactivate(){
//Remove rewrite rules and then recreate rewrite rules.
flush_rewrite_rules();
//When the user clicks "deactivate" this code will run.
//Code to deactivate the plugin would be added here.
//Like for example, disable.
//We will add it later.
}
function uninstall(){
//When the user clicks "uninstall" this code will run.
//Code to delete the plugin and clean up after it would be added here.
//Like for example, deleting a table in the database that was used to store your plugins data.
//We will add it later.
}
function shortCode($attributes = []){
//Get the attribute from short code.
$attributeValue = strtolower($attributes['display']);
$HTML = "";
if($attributeValue == "greeting"){
$HTML = "
<div>
<h3>Hello World.</h3>
</div>
";
}else{
$HTML = "
<div>
<h3>Just some random text.</h3>
</div>
";
}
//Return html to the spot the short code was placed.
return $HTML;
}
}
//Create a new instance of the plugin class.
$myPlugin = new MyPlugin();
//Call the register function.
$myPlugin->register();
//Register the activation hook.
register_activation_hook(__FILE__, array($myPlugin, 'activate'));
//Register the deactivation hook.
register_deactivation_hook(__FILE__, array($myPlugin, 'deactivate'));
//Register the uninstall hook.
register_uninstall_hook(__FILE__, array($myPlugin, 'uninstall')); 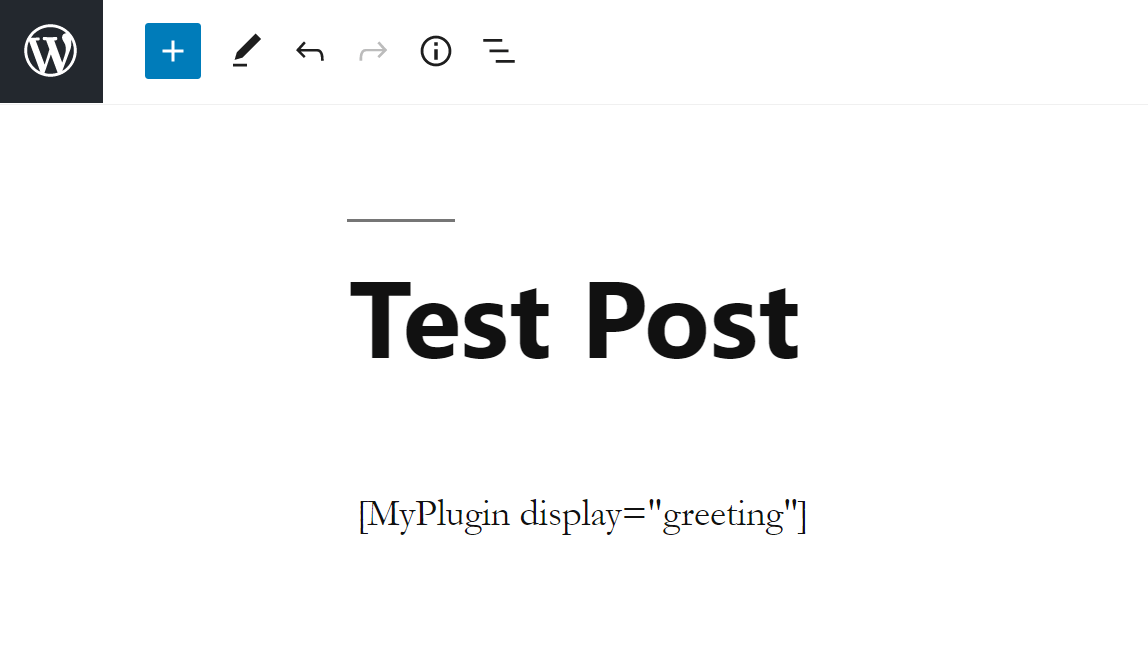

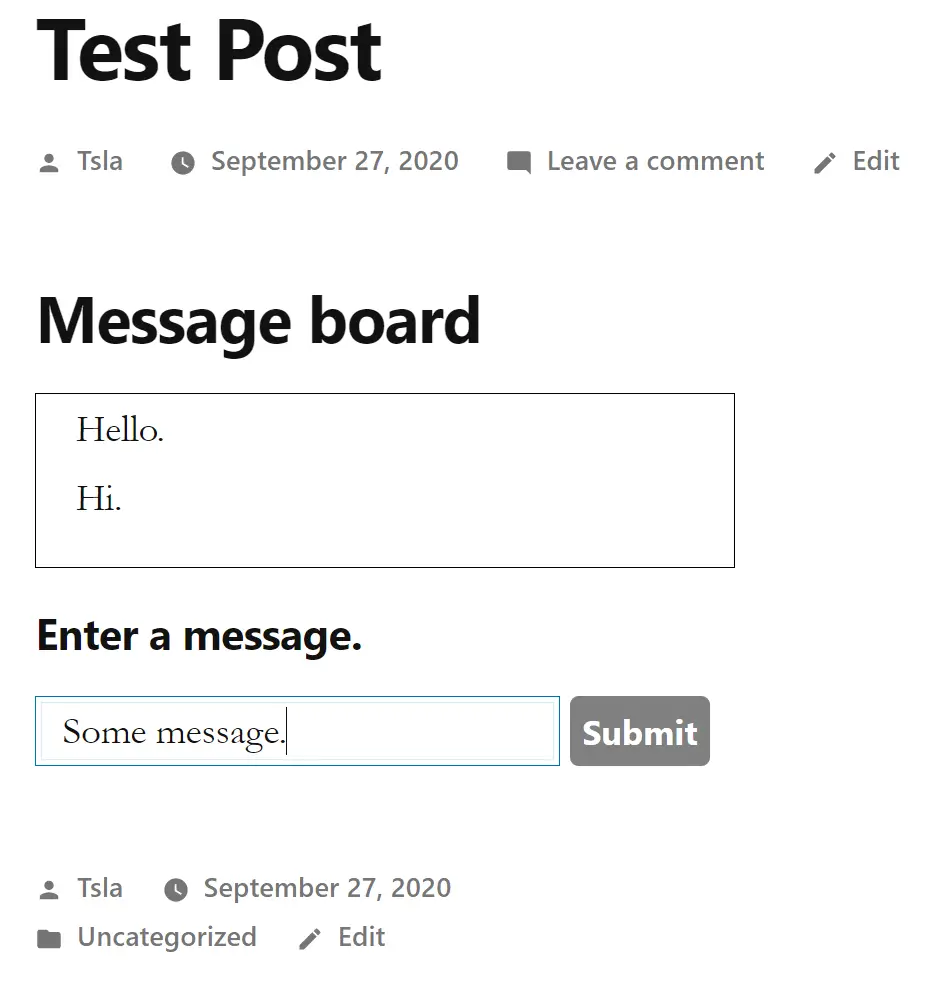
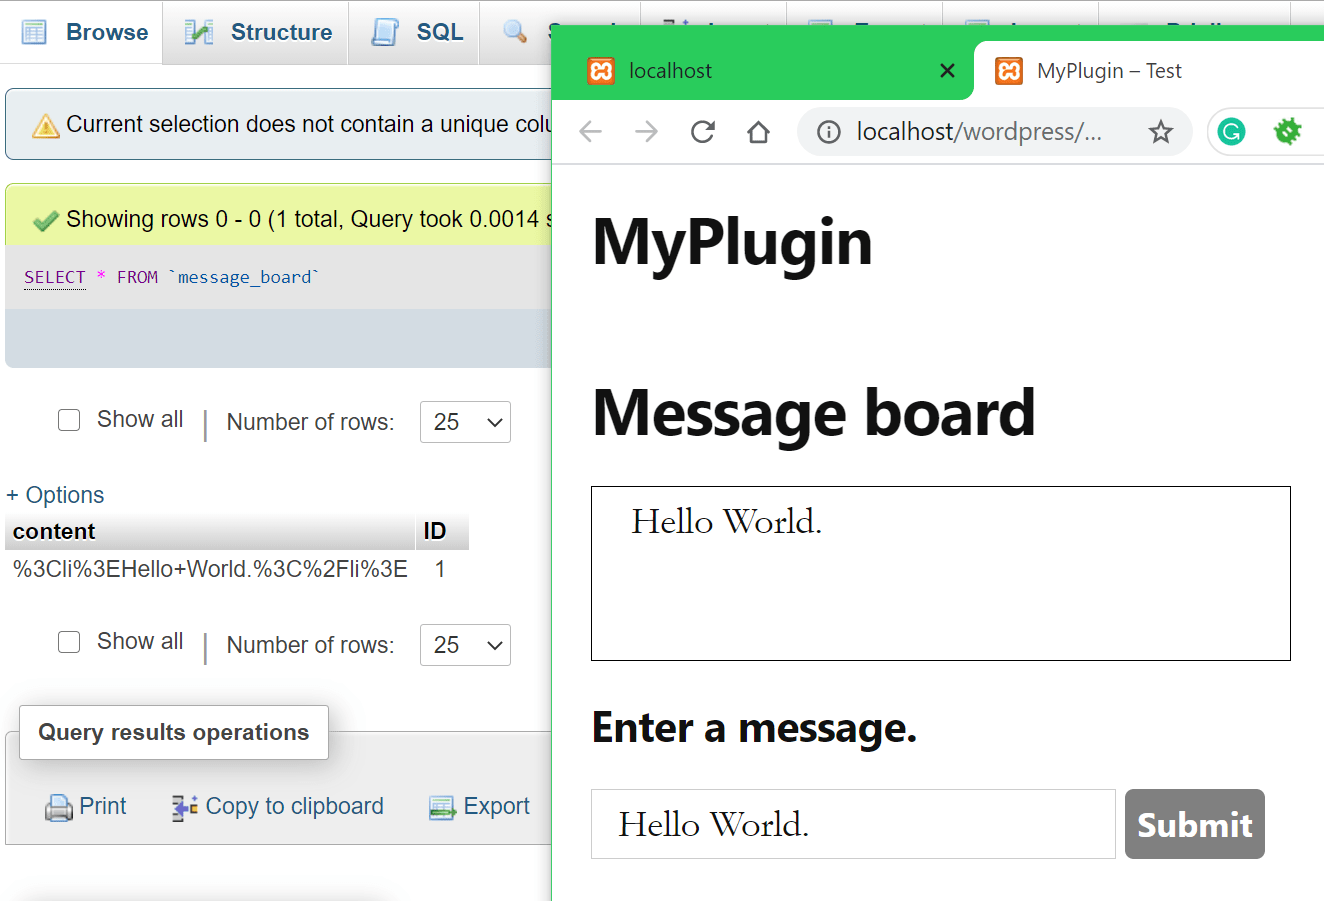
For this example and from now on, I will be making a simple message board plugin. I will be using this simple project to demonstrate how to develop further plugin functionality.
<?php
class MessageBoard{
    function getBoard(){
        return "
            <div id='wrapperDiv'>
                <div id='boardWrapper'>
                    <h3>Message board</h3>
                    <ul id='messageList'>
                    </ul>
                </div>
                <div id='messageWrapper'>
                    <h4>Enter a message.</h4>
                    <input type='text' id='messageBox'/>
                    <input type='button' id='button' value='Submit'>
                </div>
            </div>
        ";
    }
} #button{
background-color: grey;
}
#messageBox{
width: 300px;
height: 40px;
}
#button{
width: 80px;
padding: 0px;
height: 40px;
}
#messageList{
border: 1px black solid;
min-height: 100px;
width: 400px;
list-style-type: none;
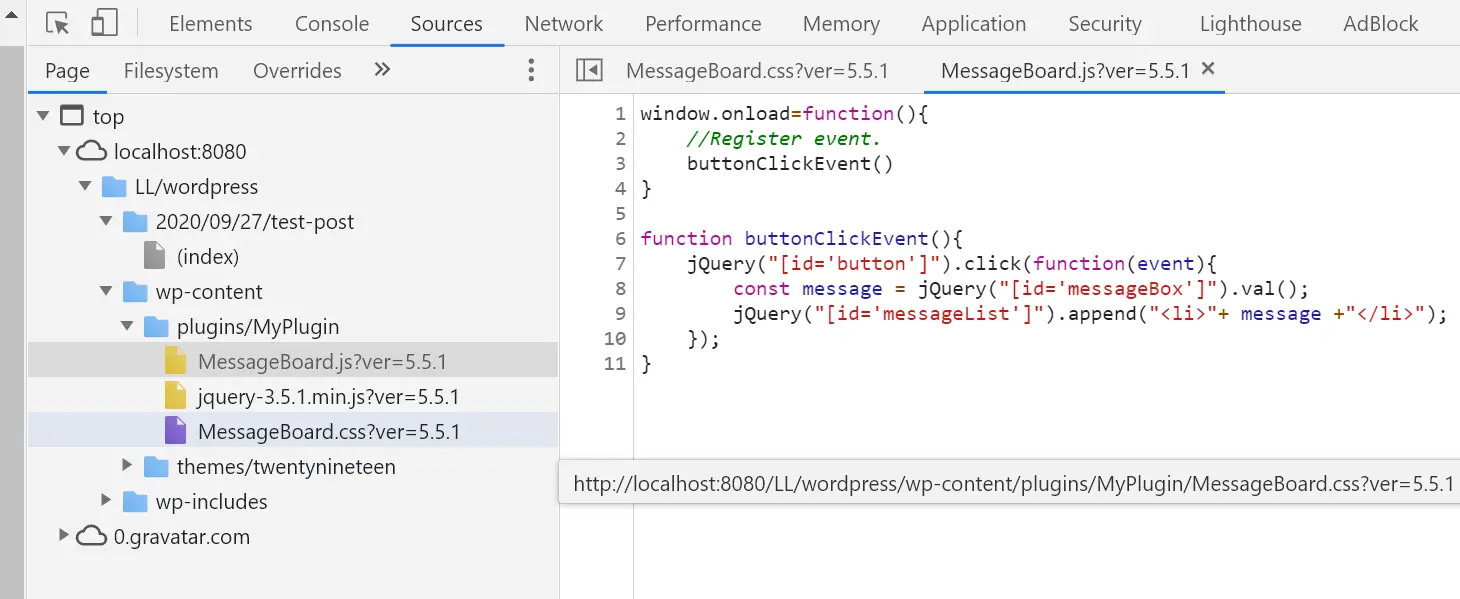
} window.onload=function(){
//Register event.
buttonClickEvent()
}
function buttonClickEvent(){
jQuery("[id='button']").click(function(event){
const message = jQuery("[id='messageBox']").val();
jQuery("[id='messageList']").append("<li>"+ message +"</li>");
});
} <?php
/**
* Plugin Name: My Plugin
* Plugin URI: https://eecs.blog/
* Description: This plugin was created as part of a series of tutorials on how to make a WordPress plugin.
* Version: 1.0.0
* Author: Tsla
* Author URI: https://eecs.blog/
* License: GPL2
*/
//Prevents direct access to the file for security reasons.
if(!defined('ABSPATH'))
die;
class MyPlugin{
function __construct(){
//The constructor runs when the class is initialized.
}
function register(){
//Add/register shortcode.
add_shortcode( 'MyPlugin', array( $this, 'shortCode' ));
//Reference .php files.
require_once(dirname(__FILE__) .'\MessageBoard.php'); //__FILE__ gets the current file, dirname() gets the parent directory
$file = __FILE__;
$fileDir = dirname(__FILE__);
$fileDir2 = dirname(dirname(__FILE__));
//Enqueue styles. plugins_url() gets the plugin directory
wp_enqueue_style('MessageBoard', plugins_url('/MyPlugin/MessageBoard.css'));
//Enqueue
wp_enqueue_script('jQuery_js', plugins_url('/MyPlugin/jquery-3.5.1.min.js'));
wp_enqueue_script('MessageBoard_js', plugins_url('/MyPlugin/MessageBoard.js'));
}
function activate(){
//Remove rewrite rules and then recreate rewrite rules.
flush_rewrite_rules();
//When the user clicks "activate" this code will run.
//Stuff to initially set up your plugin would be added here.
//Like for example, making a table in the database to store your plugins data.
//We will add it later.
}
function deactivate(){
//Remove rewrite rules and then recreate rewrite rules.
flush_rewrite_rules();
//When the user clicks "deactivate" this code will run.
//Code to deactivate the plugin would be added here.
//Like for example, disable.
//We will add it later.
}
function uninstall(){
//When the user clicks "uninstall" this code will run.
//Code to delete the plugin and clean up after it would be added here.
//Like for example, deleting a table in the database that was used to store your plugins data.
//We will add it later.
}
function shortCode($attributes = []){
//Get the attribute from short code.
$attributeValue = strtolower($attributes['display']);
$HTML = "";
if($attributeValue == "board"){
$messageBoard = new MessageBoard();
$HTML = $messageBoard->getBoard();
}else if($attributeValue == "greeting"){
$HTML = "
<div>
<h3>Hello World.</h3>
</div>
";
}else{
$HTML = "
<div>
<h3>Just some random text.</h3>
</div>
";
}
//Return html to the spot the shortcode was placed.
return $HTML;
}
}
//Create a new instance of the plugin class.
$myPlugin = new MyPlugin();
//Call the register function.
$myPlugin->register();
//Register the activation hook.
register_activation_hook(__FILE__, array($myPlugin, 'activate'));
//Register the deactivation hook.
register_deactivation_hook(__FILE__, array($myPlugin, 'deactivate'));
//Register the uninstall hook.
register_uninstall_hook(__FILE__, array($myPlugin, 'uninstall')); 

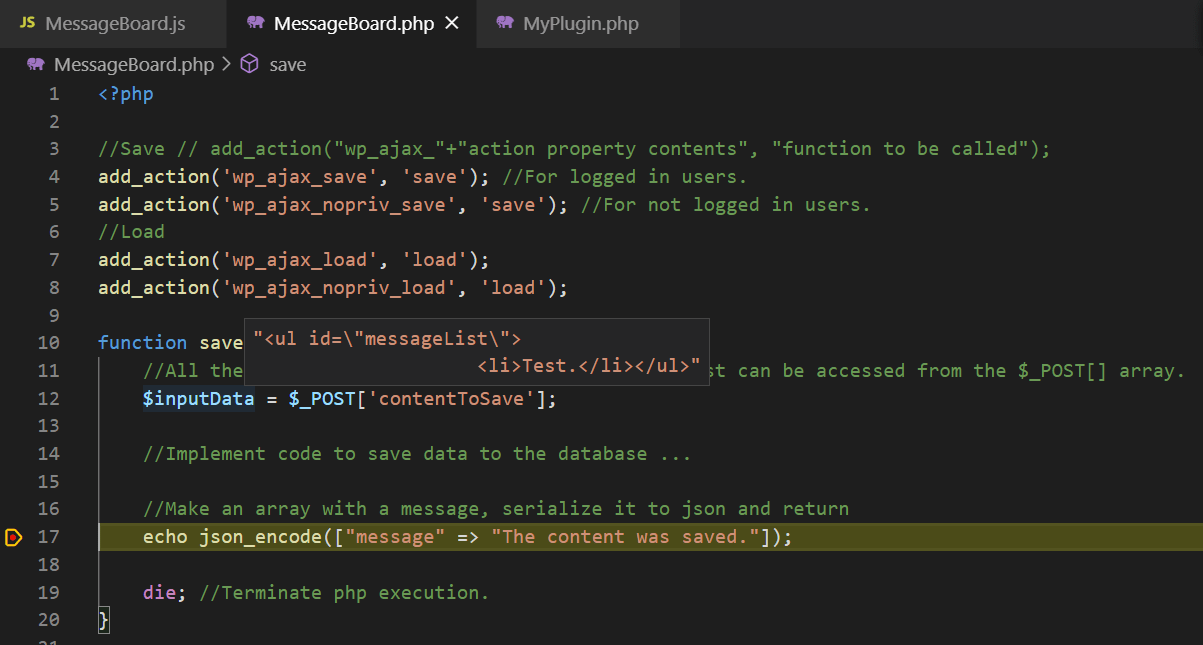
We can do this by using AJAX(asynchronous Javascript and XML). We’ll use JSON instead of XML. Regularly when you use the AJAX approach to communicate between the front/back-end you would just send the data to the PHP file(located on your server) that contains your back-end code. But with WordPress, you should instead send all of your requests to the admin-ajax.php file. Then you have to enqueue the PHP function you want to execute(upon receiving the request) with a unique name. Finally, you need to include this name in the request sent from the front-end.
Note: In this section, I will only demonstrate how to send/receive data using AJAX. I will demonstrate how to store/retrieve data from the database in a later section.
window.onload=function(){
//Register event.
buttonClickEvent()
}
function buttonClickEvent(){
jQuery("[id='button']").click(function(event){
const message = jQuery("[id='messageBox']").val();
jQuery("[id='messageList']").append("<li>"+ message +"</li>");
const messageBoardContents = jQuery("[id='messageList']").prop("outerHTML");
saveMBContentsToDB(messageBoardContents);
});
}
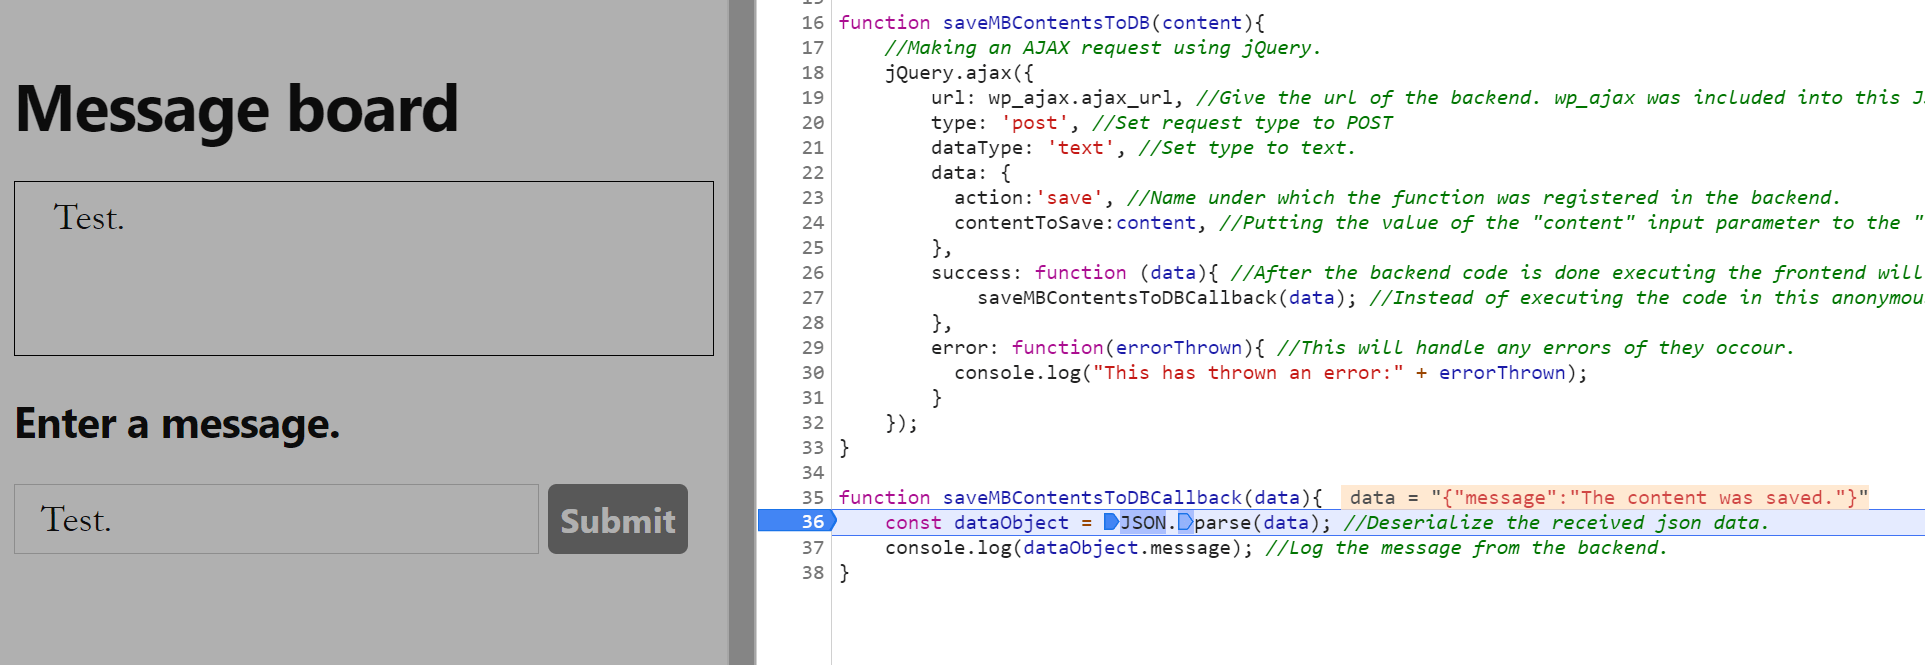
function saveMBContentsToDB(content){
//Making an AJAX request using jQuery.
jQuery.ajax({
url: wp_ajax.ajax_url, //Give the url of the backend. wp_ajax was included into this JS file from the backend using wp_localize_script() function.
type: 'post', //Set request type to POST
dataType: 'text', //Set type to text.
data: {
action:'save', //Name under which the function was registered in the backend.
contentToSave:content, //Putting the value of the "content" input parameter to the "contentToSave" property of the "data" object.
},
success: function (data){ //After the backend code is done executing the frontend will continue from here. Any data sent from the backend will be available in the data parameter.
saveMBContentsToDBCallback(data); //Instead of executing the code in this anonymous function we'll forward it to callback function.
},
error: function(errorThrown){ //This will handle any errors if they occour.
console.log("This has thrown an error:" + errorThrown);
}
});
}
function saveMBContentsToDBCallback(data){
const dataObject = JSON.parse(data); //Deserialize the received json data.
console.log(dataObject.message); //Log the message from the backend.
} //Save // add_action("wp_ajax_"+"action property contents", "function to be called");
add_action('wp_ajax_save', 'save'); //For logged in users.
add_action('wp_ajax_nopriv_save', 'save'); //For not logged in users.
function save(){
//All the properties that were sent via POST request can be accessed from the $_POST[] array.
$inputData = $_POST['contentToSave'];
//Implement code to save data to the database ...
//Make an array with a message, serialize it to json and return
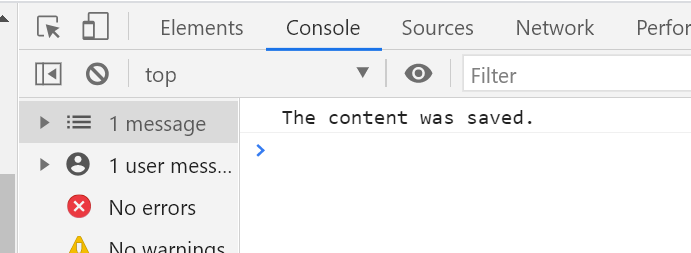
echo json_encode(["message" => "The content was saved."]);
die; //Terminate php execution.
} 
In this section, we’ll learn how to access the database and read/write/create tables in it. WordPress uses a MySQL database so obviously, all the queries will be written in the MySQL syntax.
In the previous section, we’ve seen how to get data from the frontend to the backend(and back to the frontend again). Now let’s see how to save this data into the database.
Note: I will create the table for storing the data manually in phpMyAdmin for this demonstration. In the later section Install, Uninstall Hooks (Continued) I will show how to make the table when the plugin is activated and delete it when the plugin is uninstalled.
//This function can be used to execute any MySQL statment:
    //query("your SQL query statement");
    $users = $wpdb->query("SELECT * FROM users");


    //Prevents SQL injection.
    //prepare("your SQL query statement", "array with the values"); //% represents the parameter (%s for string; %d for integer, %f for float)
    $unsanitizedString = "bob";
    $user = $wpdb->query($wpdb->prepare("SELECT * FROM users WHERE name LIKE %s", [$unsanitizedString]));


    //Inserts new data:
    //insert("table name", "your data as an associative array");
    $wpdb->insert(
        "users",
        [ "id" => 1, "name" => "bob" ], //column => value
        [ "%d", "%s"] //format (%s for string; %d for integer, %f for float)
    );


    //Gets a single variable:
    //get_var("your SQL query statement");
    $userName = $wpdb->get_var("SELECT name FROM users WHERE id LIKE 1");


    //Gets multiple results and returns associative array.
    //get_results("your SQL query statement", output_type ); //output_type how you get the reults indexed array = ARRAY_N, associative array = ARRAY_A, object = OBJECT
    $allUsers = $wpdb->get_results("SELECT name FROM users", ARRAY_A);


    //Updates table:
    //update("table name", "your data as an associative array", "where condition as an associative array");
    $wpdb->update(
        "users",
        ["name" => "alice"],
        ["name" => "bob"]
    );


    //Deletes table row:
    //delete("table name", "where condition as an associative array");
    $wpdb->delete("users", ['id' => 1]);

    //You can get all the available functions and examples in the official WordPress documentation here:
//https://developer.wordpress.org/reference/classes/wpdb/ 


window.onload=function(){
    //Register event.
    buttonClickEvent();
    //Load existing messages onto the message board.
    loadMesssageBoard();
}

function buttonClickEvent(){
    jQuery("[id='button']").click(function(event){
        const message = jQuery("[id='messageBox']").val();
jQuery("[id='messageList']").append("//Save // add_action("wp_ajax_"+"action property contents", "function to be called");
add_action('wp_ajax_save', 'save'); //For logged in users.
add_action('wp_ajax_nopriv_save', 'save'); //For not logged in users.
//Load
add_action('wp_ajax_load', 'load');
add_action('wp_ajax_nopriv_load', 'load');
function save(){
//Storing the actual HTML in the DB is not the best idea. Ideally, it should be serialized then stored in the DB. This is just quicker and easier for the demonstration.
//Here I will use urlencode() to mitigate SQL injection. Usually, you would use the strip_tags() function, but in this case it would ruin our HTML. Or use the prepare() function provided by WP.
//All the properties that were sent via POST request can be accessed from the $_POST[] array.
$inputData = urlencode($_POST["contentToSave"]);
//$wpdb is a global object that contains functions to work with the DB. It is instantiated and provided by wordpress automatically.
//So this is all we have to do to use it:
global $wpdb; //Get the global instance of the wpdb class(used to work with the DB).
//Run update query.
$wpdb->query("UPDATE message_board SET content = '" . $inputData . "' WHERE id LIKE 1");
//Make an array with a message, serialize it to json and return
echo json_encode(["message" => "The content was saved."]);
die; //Terminate php execution.
}
function load(){
//$wpdb is a global object that contains functions to work with the DB. It is instantiated and provided by wordpress automatically.
//So this is all we have to do to use it:
global $wpdb; //Get the global instance of the wpdb class(used to work with the DB).
//Get stored messages.
$content = $wpdb->get_var("SELECT content FROM message_board WHERE id LIKE 1");
$content = urldecode($content);
echo json_encode($content);
die; //Terminate php execution.
} 
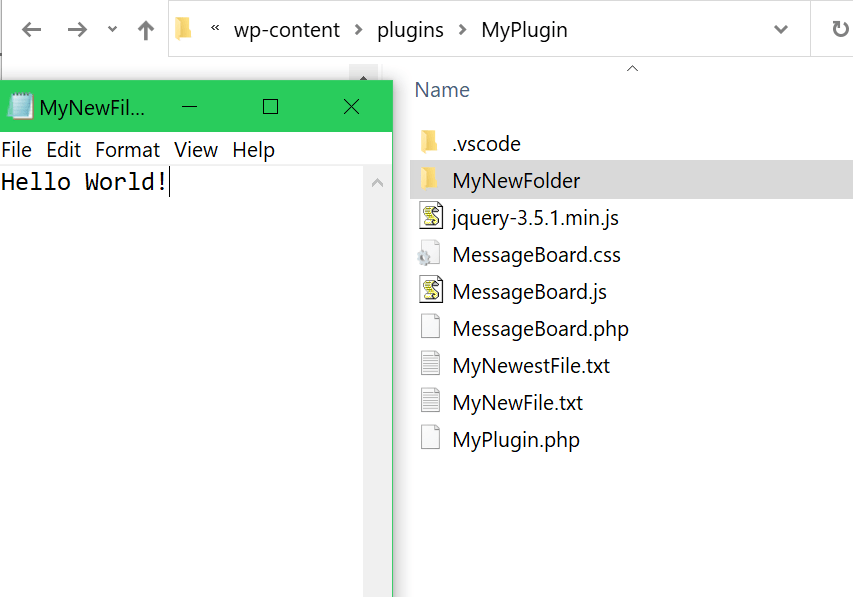
function WP_Filesystem_Functions_Demo(){
    //Here I will demonstrate a few of the more common For the full list and full functionality of the WP filesystem functions check the official documentation.
    //https://developer.wordpress.org/reference/classes/wp_filesystem_direct/#methods

    //Call WP_Filesystem() or the $wp_filesystem global will be null;
    WP_Filesystem();
    //Get the file system object.
    global $wp_filesystem;

    //Here we'll just get the plugin folder path.///////////
    $path = dirname(__FILE__);

    $dirPath = $path . "/MyNewFolder";       //Define path/name for our new directory.
    $filepath = $dirPath . "MyNewFile.txt";  //Define path/name for our new file.

    ////////////////////////////////////////////////////////


    //Make a directory.
    $wp_filesystem->mkdir($dirPath);

    //Make a file.
    $wp_filesystem->put_contents($filepath, "Hello World!");

    //Get the data from the file.
    $fileContents = $wp_filesystem->get_contents($filepath);

    //Changes file/folder permissions.
    //chmod(file/folder path, permissions(same logic as linux permissions), recursive(optional) apply to all files/subfolders)
    $wp_filesystem->chmod($filepath, 777); //777 gives everyone all the permissions.

    //Copy file, with new name into the same directory.
    //copy(source, destination, overwrite the destination file if it exists(optional parameter))
    $wp_filesystem->copy($filepath, $path. "\MyNewestFile.txt");

    //Move the file file.
    //move(source, destination, overwrite the destination file if it exists(optional parameter))
    $wp_filesystem->move($filepath, $path . "\MyNewFile.txt"); //This will move the file from MyNewFolder to the plugin root folder.

    //Check if the file exists...
    if($wp_filesystem->exists($path . "\MyNewFile.txt"))
        $wp_filesystem->delete($path . "\MyNewFile.txt"); //if so delete it.

    //Remove directory.
    $wp_filesystem->rmdir($dirPath);
    //Delete all the files and subdirectories within the folder.
    //rmdir(path, recursive(optional))
    $wp_filesystem->rmdir($dirPath, true);
} 
Now that we’ve seen how to work with the WordPress database and Files API in the previous sections let’s use that knowledge to finish up our hooks.
When the plugin is activated we will check if the “message_board” table is already present in the database. If it doesn’t exist we will create it and put some initial data in.
function activate(){
//Remove rewrite rules and then recreate rewrite rules.
flush_rewrite_rules();
//When the user clicks "activate" this code will run.
//Stuff to initially set up your plugin would be added here.
//Like for example, making a table in the database to store your plugins data.
global $wpdb;
//Check if table already exists. If not add it.
if($wpdb->query("SHOW TABLES LIKE 'message_board'") == 0){
//Create the message_board table.
$wpdb->query('CREATE TABLE message_board
(
id INTEGER NOT NULL,
content TEXT,
PRIMARY KEY (id)
)'
);
//"Initialize" it with some data.
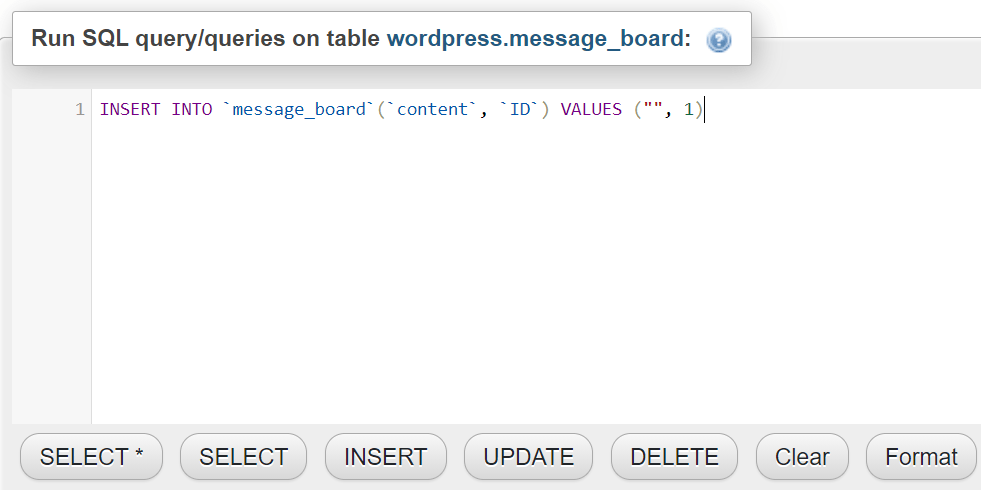
$wpdb->insert(
"message_board",
array(
'content' => "",
'id' => 1
)
);
}
} The code below will remove the table we created on the first activation. All the directories and files will be removed automatically, no code needed.
<?php

//The code in this file will be run when the uninstall button for the plugin is clicked.
//All that we have to do is make this uninstall.php file and it will be run automatically on uninstall.
//No need to register any hook.

//Check if plugin is actually to be uninstalled...
if (!defined('WP_UNINSTALL_PLUGIN'))
	die; //.. if not finish program execution here.

global $wpdb;
//Remove the "contents" table and all of its data from the WP database.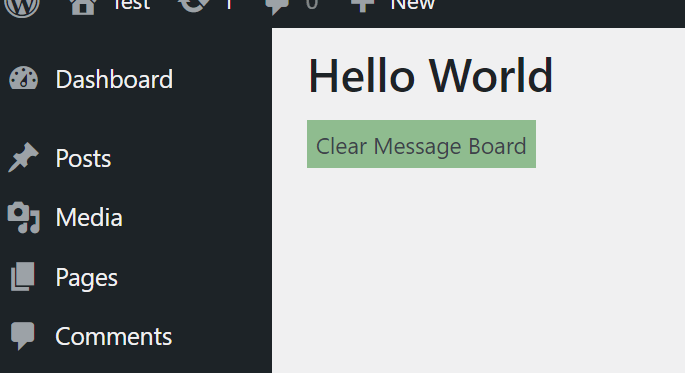
$wpdb->query("DROP TABLE message_board"); <?php
echo "
<h1>Hello World</h1>
<div id='clearBoardButton' style='background-color: darkseagreen; width: fit-content; padding: 5px;'>Clear Message Board</div>
<div id='message'></div>
";
?> //On page load....
window.onload=function(){
//Register event.
jQuery("[id='clearBoardButton']").click(function(event){
//Making an AJAX request using jQuery.
jQuery.ajax({
url: wp_ajax.ajax_url, //Give the url of the backend. wp_ajax was included into this JS file from the backend using wp_localize_script() function.
type: 'post', //Set request type to POST
dataType: 'text', //Set type to text.
data: { action:'clear' }, //Name under which the function was registered in the backend.
success: function (data){ //After the backend code is done executing the frontend will continue from here. Any data sent from the backend will be available in the data parameter.
//Deserialize the json string into an object.
deserializedData = JSON.parse(data);
//Display message.
jQuery("[id='message']").html(deserializedData.message);
},
error: function(errorThrown){ //This will handle any errors if they occour.
console.log("This has thrown an error:" + errorThrown);
}
});
});
} //Clear
//Make this available only to logged in users.
add_action('wp_ajax_clear', 'clear');
function clear(){
//Check if the user has admin privileges.
//Get the current user data.
$user = wp_get_current_user();
//Take the $user->roles array and chekc if it contains the 'admin' role.
if(!in_array( 'administrator', (array) $user->roles )){
//If not, return a warning and stop the code execution.
echo json_encode(["message" => "You need to be an Admin to clear the message board."]);
die; //Terminate php execution.
}
//$wpdb is a global object that contains functions to work with the DB. It is instantiated and provided by wordpress automatically.
//So this is all we have to do to use it:
global $wpdb; //Get the global instance of the wpdb class(used to work with the DB).
//Run update query.
$wpdb->query("UPDATE message_board SET content = '' WHERE id LIKE 1");
//Make an array with a message, serialize it to json and return
echo json_encode(["message" => "Message Board was cleared."]);
die; //Terminate php execution.
} //Admin page in WP backend.
//Add admin page. 'add_admin_page' is the name of the function that will be called to add the page.
//The array($this, 'add_admin_page') is used to specify that we are calling the function from $this object.
add_action('admin_menu', array($this, 'add_admin_page'));
//Add link to admin page from plugin listing on the plugins page.
add_filter("plugin_action_links_" . $this->pluginTitle, array($this, 'AdminPageLink')); require_once(dirname(__FILE__) .'\MessageBoard.php'); //__FILE__ gets the current file, dirname() gets the parent directory
//Add a page to the wordpress backend menu.
//add_menu_page('page title', 'menu title in side bar', 'define roles', 'unique page ID slug(can be whatever)', 'function that is called to initialize page ', 'sets icon in sidebar', 'position in sidebar')
//'define roles' will define which user can see the page https://wordpress.org/support/article/roles-and-capabilities/#manage_options
//You can find a list of all the existing icons here: https://developer.wordpress.org/resource/dashicons/ or put a url to your custom icon
add_menu_page('My Plugin', 'My Plugin', 'manage_options', 'MyPlugin', array($this, 'LoadMyPluginAdminPage'), 'dashicons-testimonial', 110);
//Enqueue styles
wp_enqueue_style('adminAreaStyleSheet', plugins_url('MyPlugin/adminAreaStyleSheet.css'));
//Enqueue
wp_enqueue_script('adminArea_js', plugins_url('MyPlugin/adminArea.js'), /*NULLdependencies such as jQuery*//* array('jquery'), true*/);
//Localize
wp_localize_script( 'adminArea_js', 'wp_ajax', array( 'ajax_url' => admin_url( 'admin-ajax.php' ) ) ); function LoadMyPluginAdminPage(){
require_once dirname(__FILE__) .'\AdminPage.php';
} public function AdminPageLink($links){
//$links is a array of links that are present in the plugin listing on the plugins page.
//To add a new link lets simply push a new HTML link into this array.
array_push($links, '<a href="admin.php?page=MyPlugin">Settings</a>');
return $links;
} 
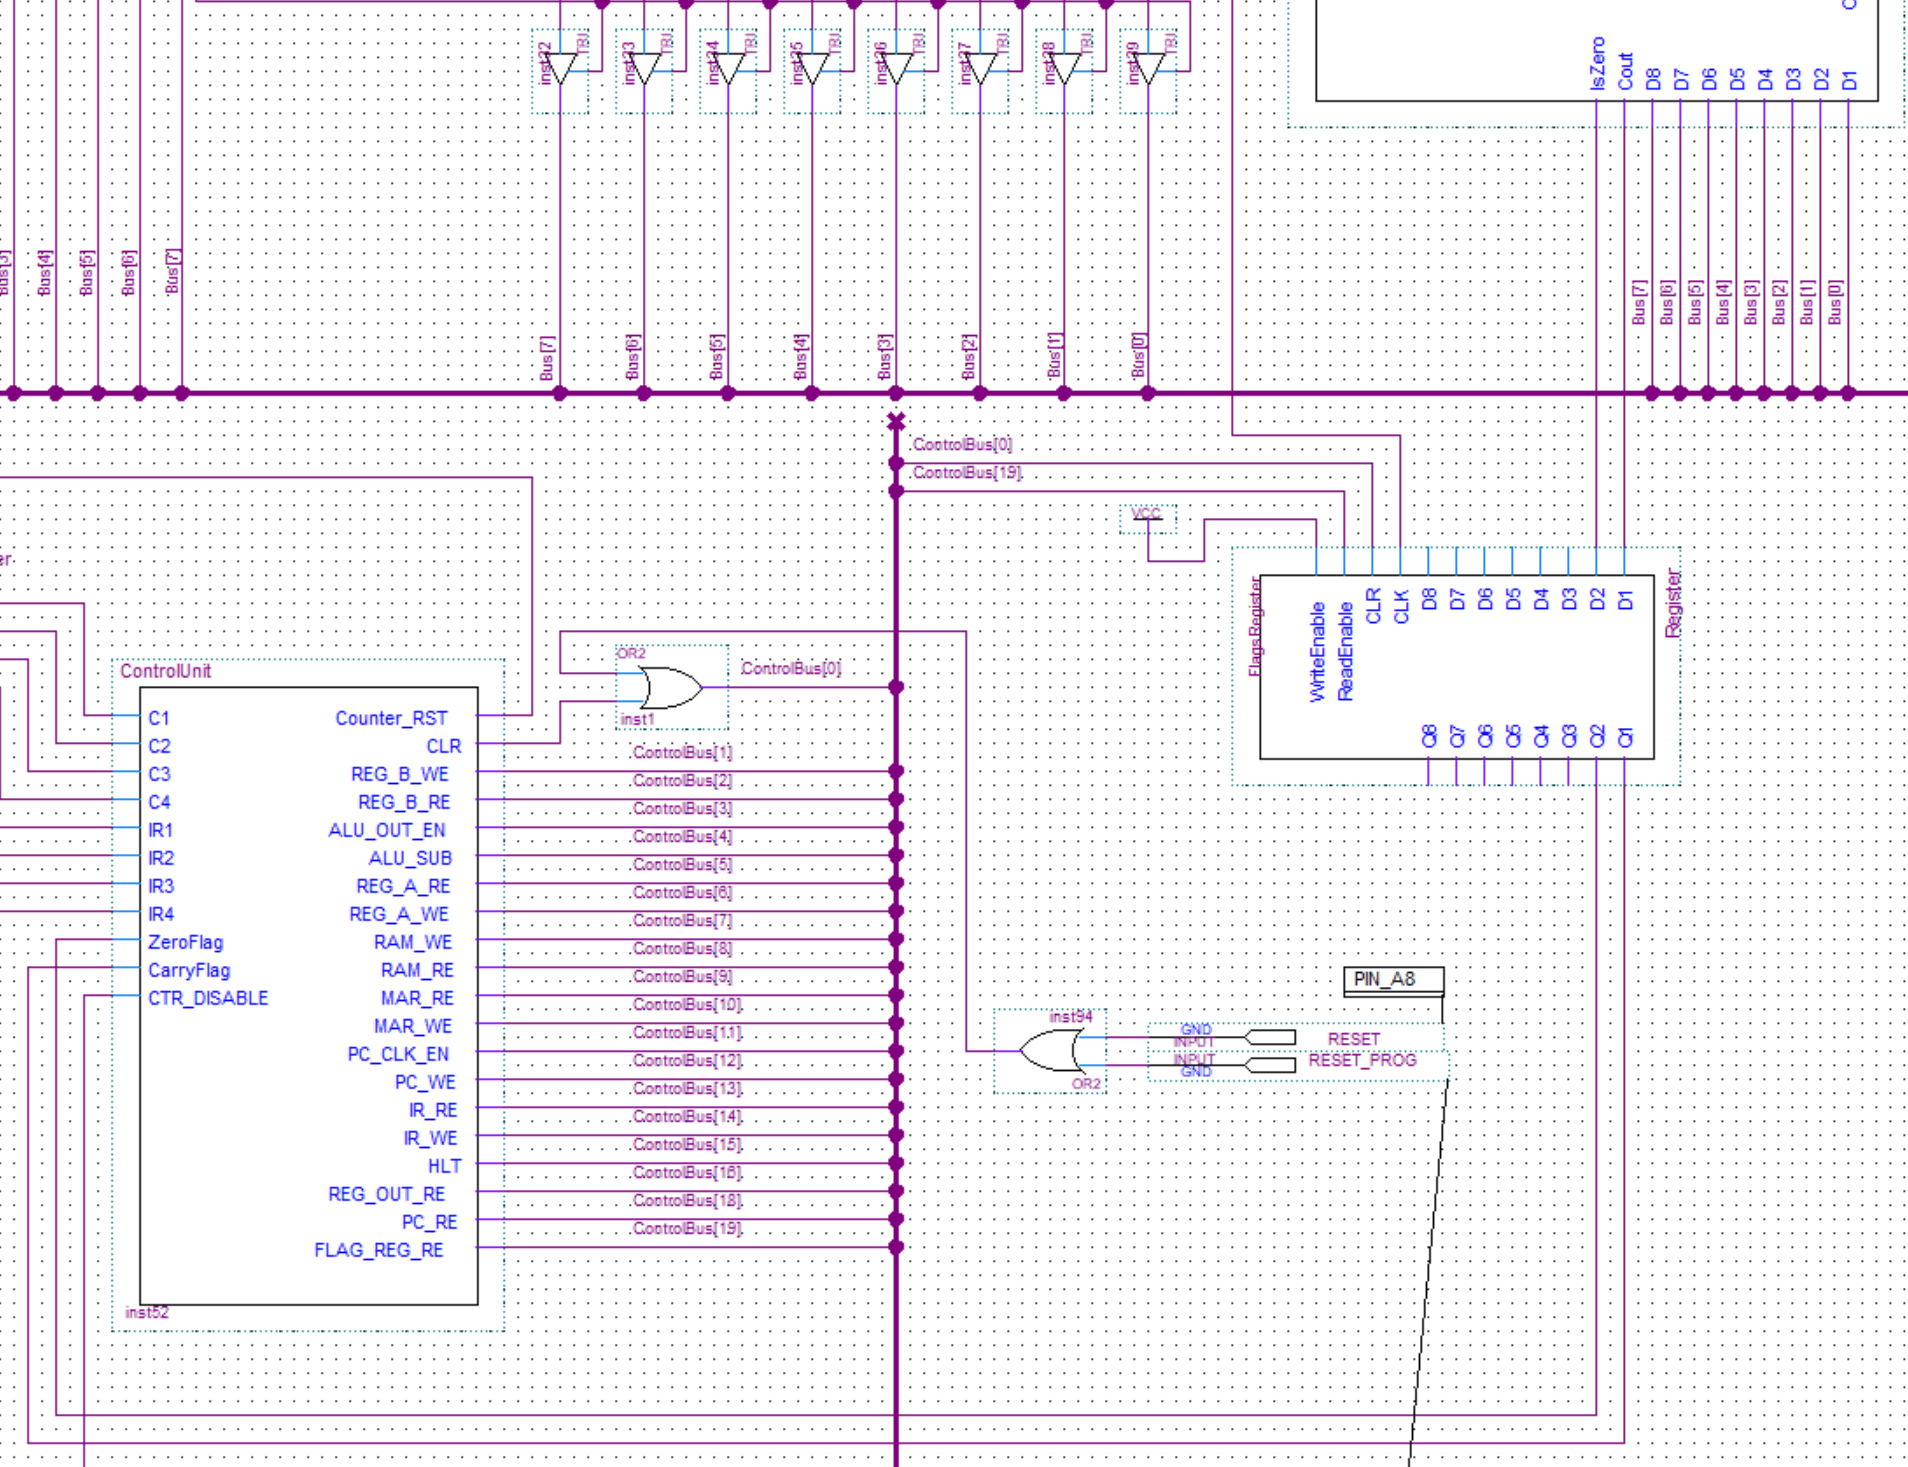
The computer doesn’t have any real inputs that would allow it to read in values from the outside and use them to do some computations. The only data inputs are the ones used for programming the RAM. See this post for more information.
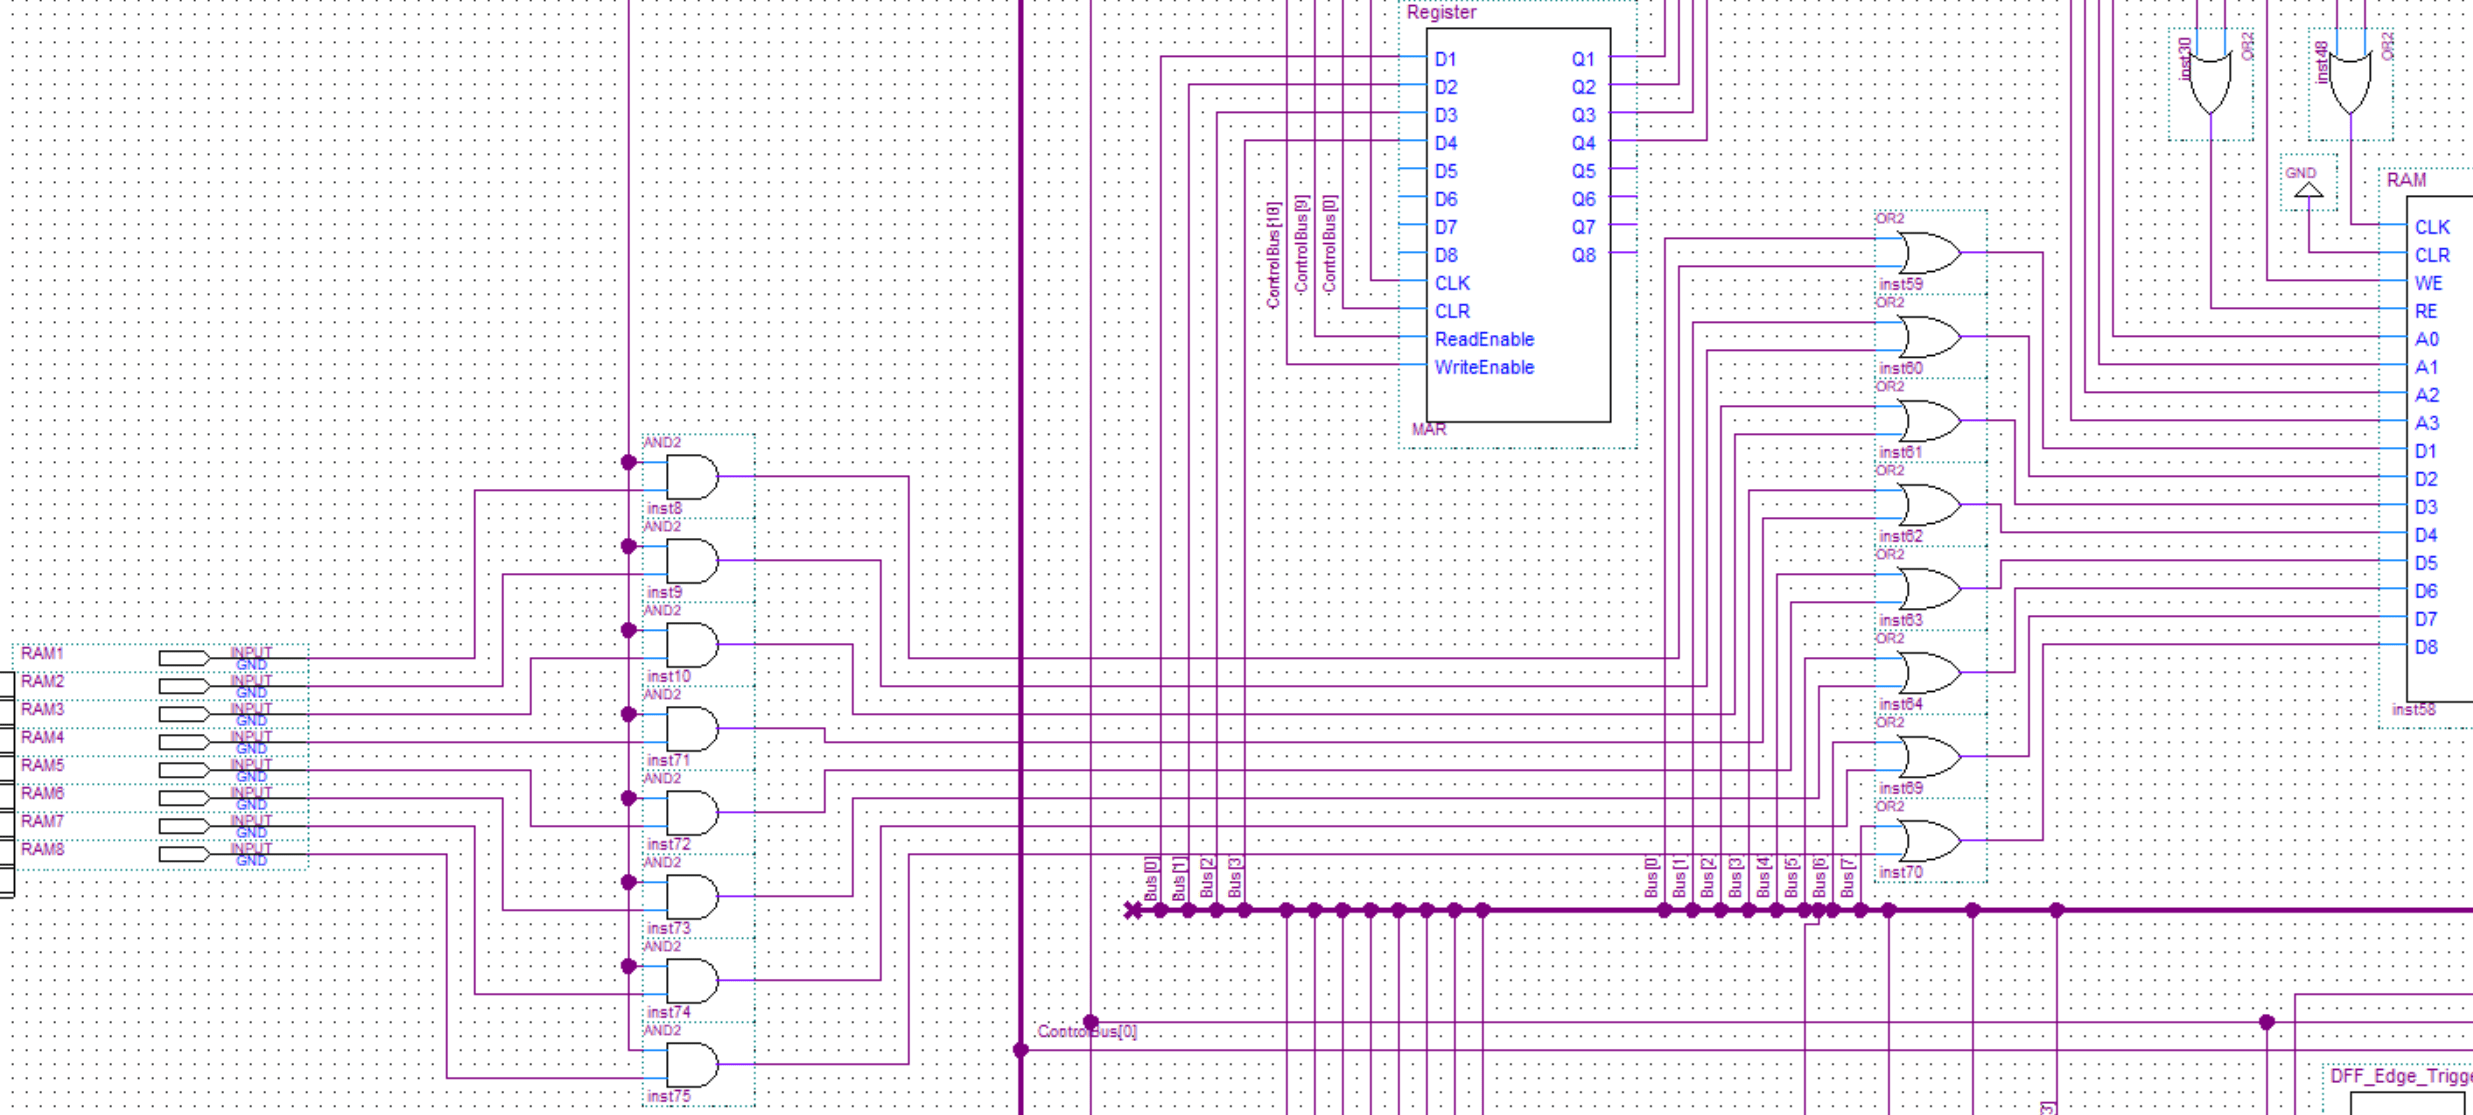
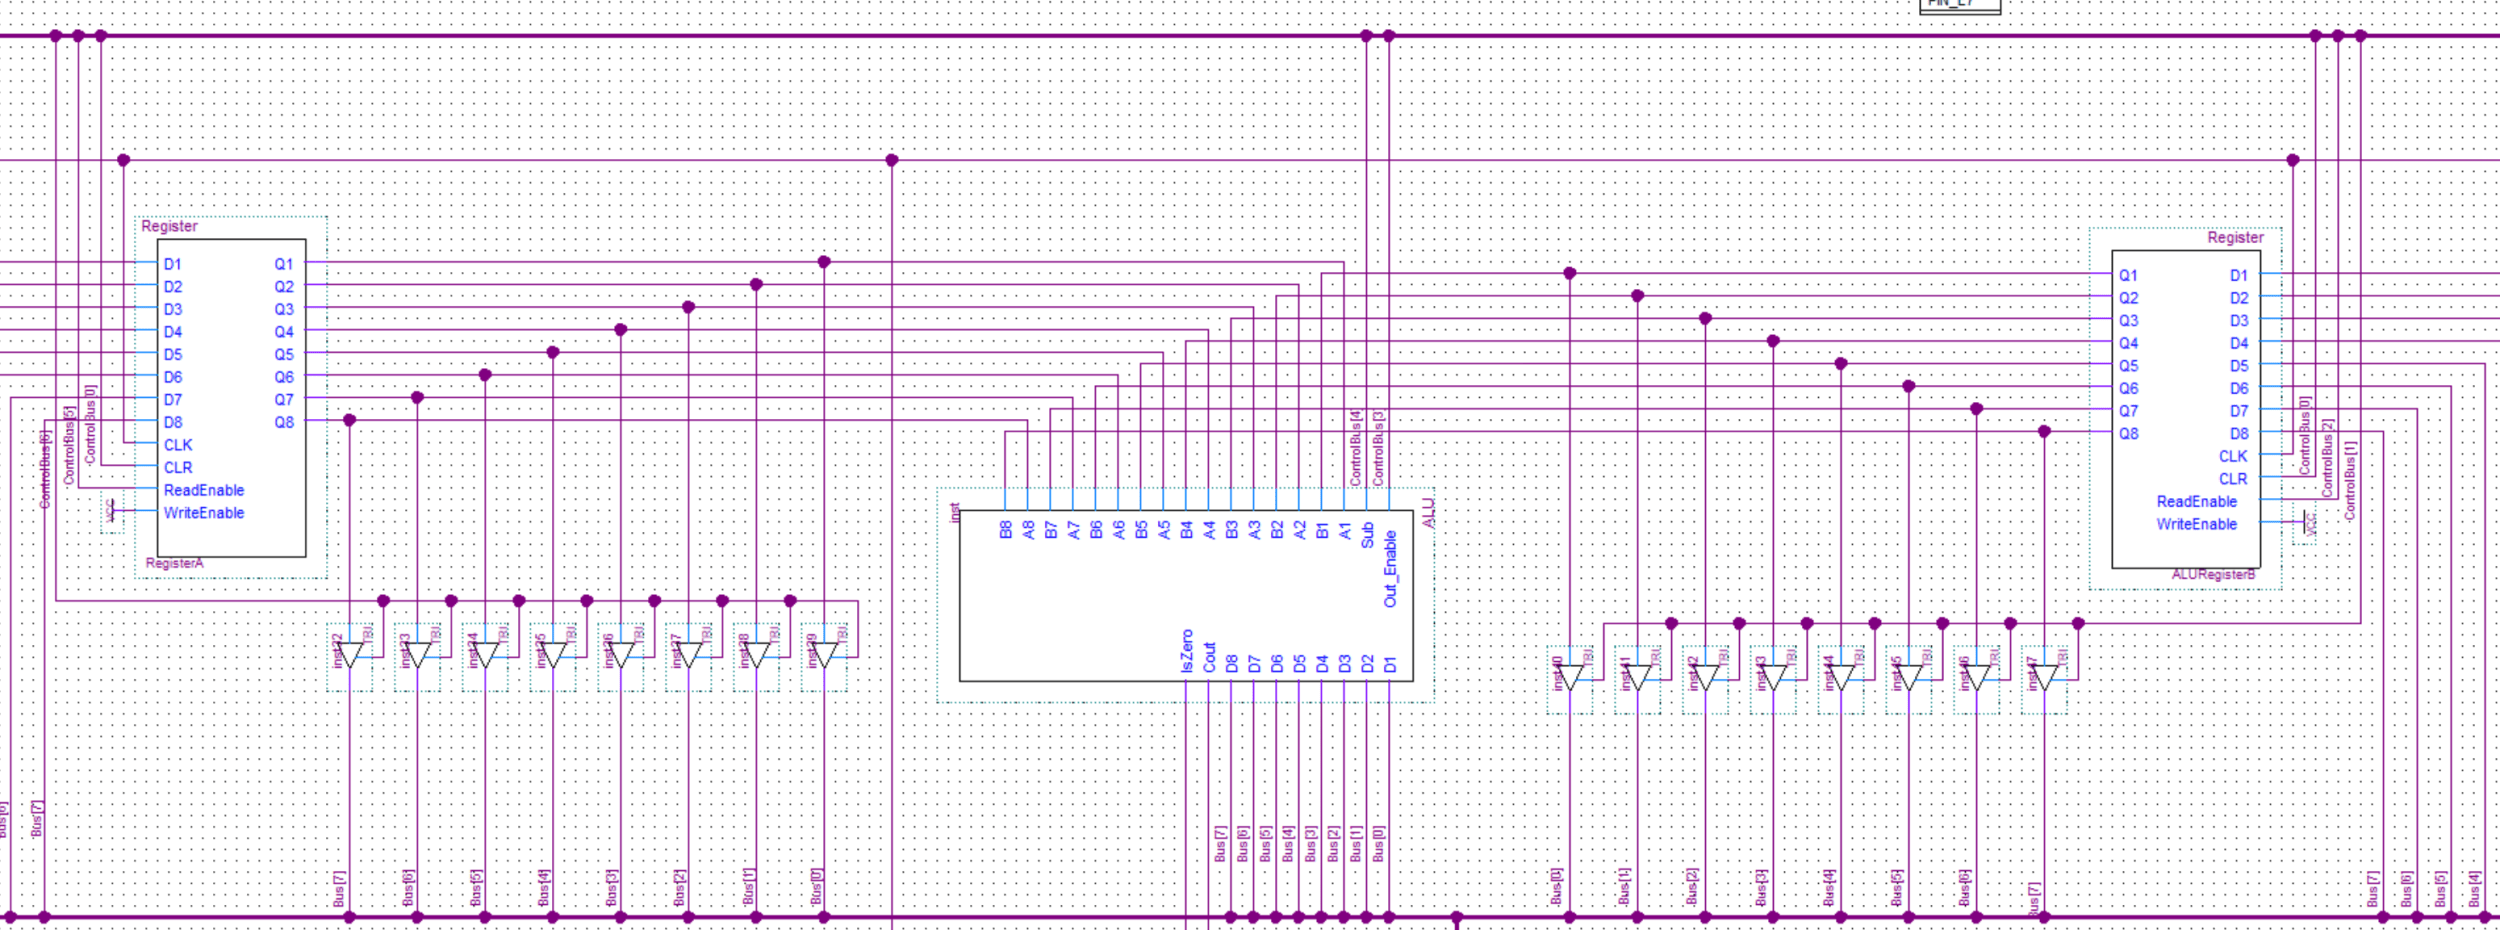
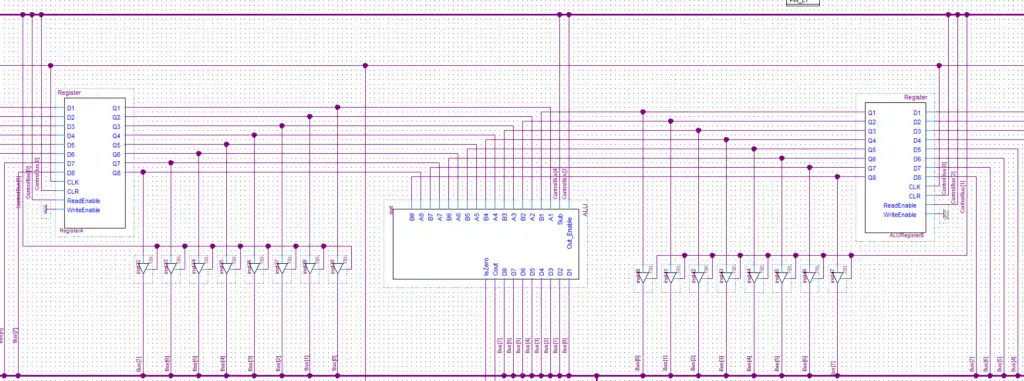
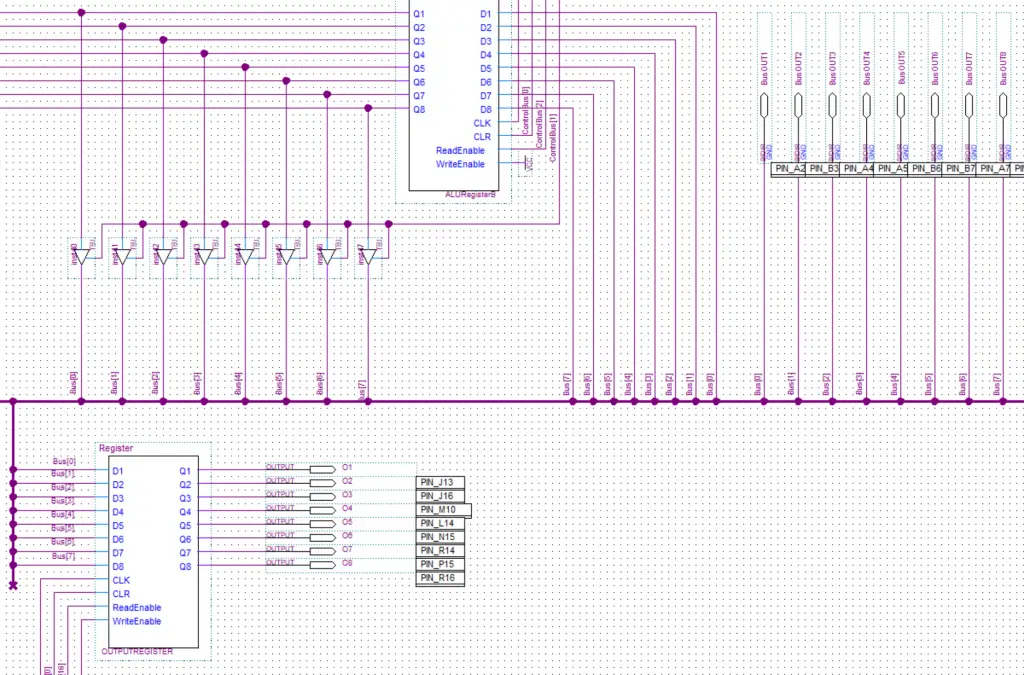
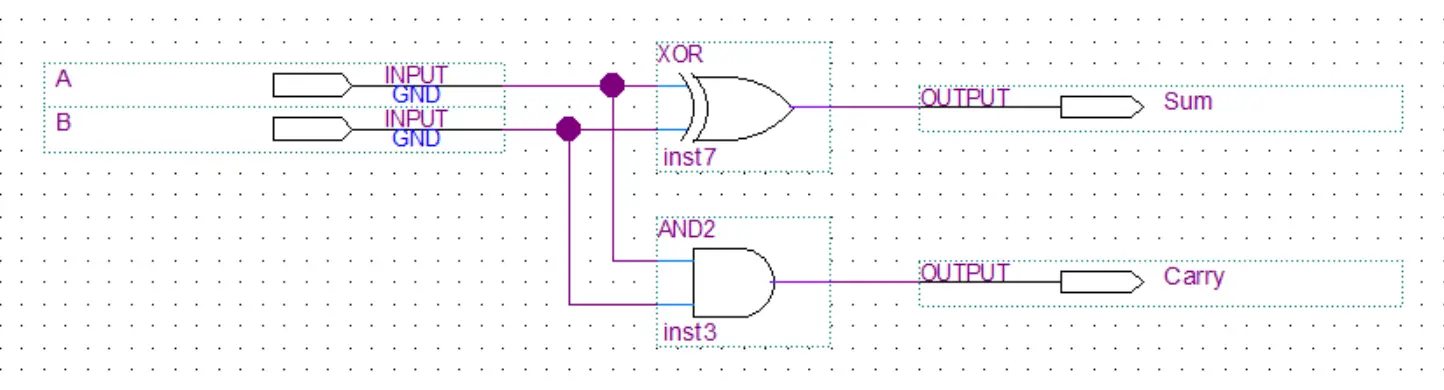
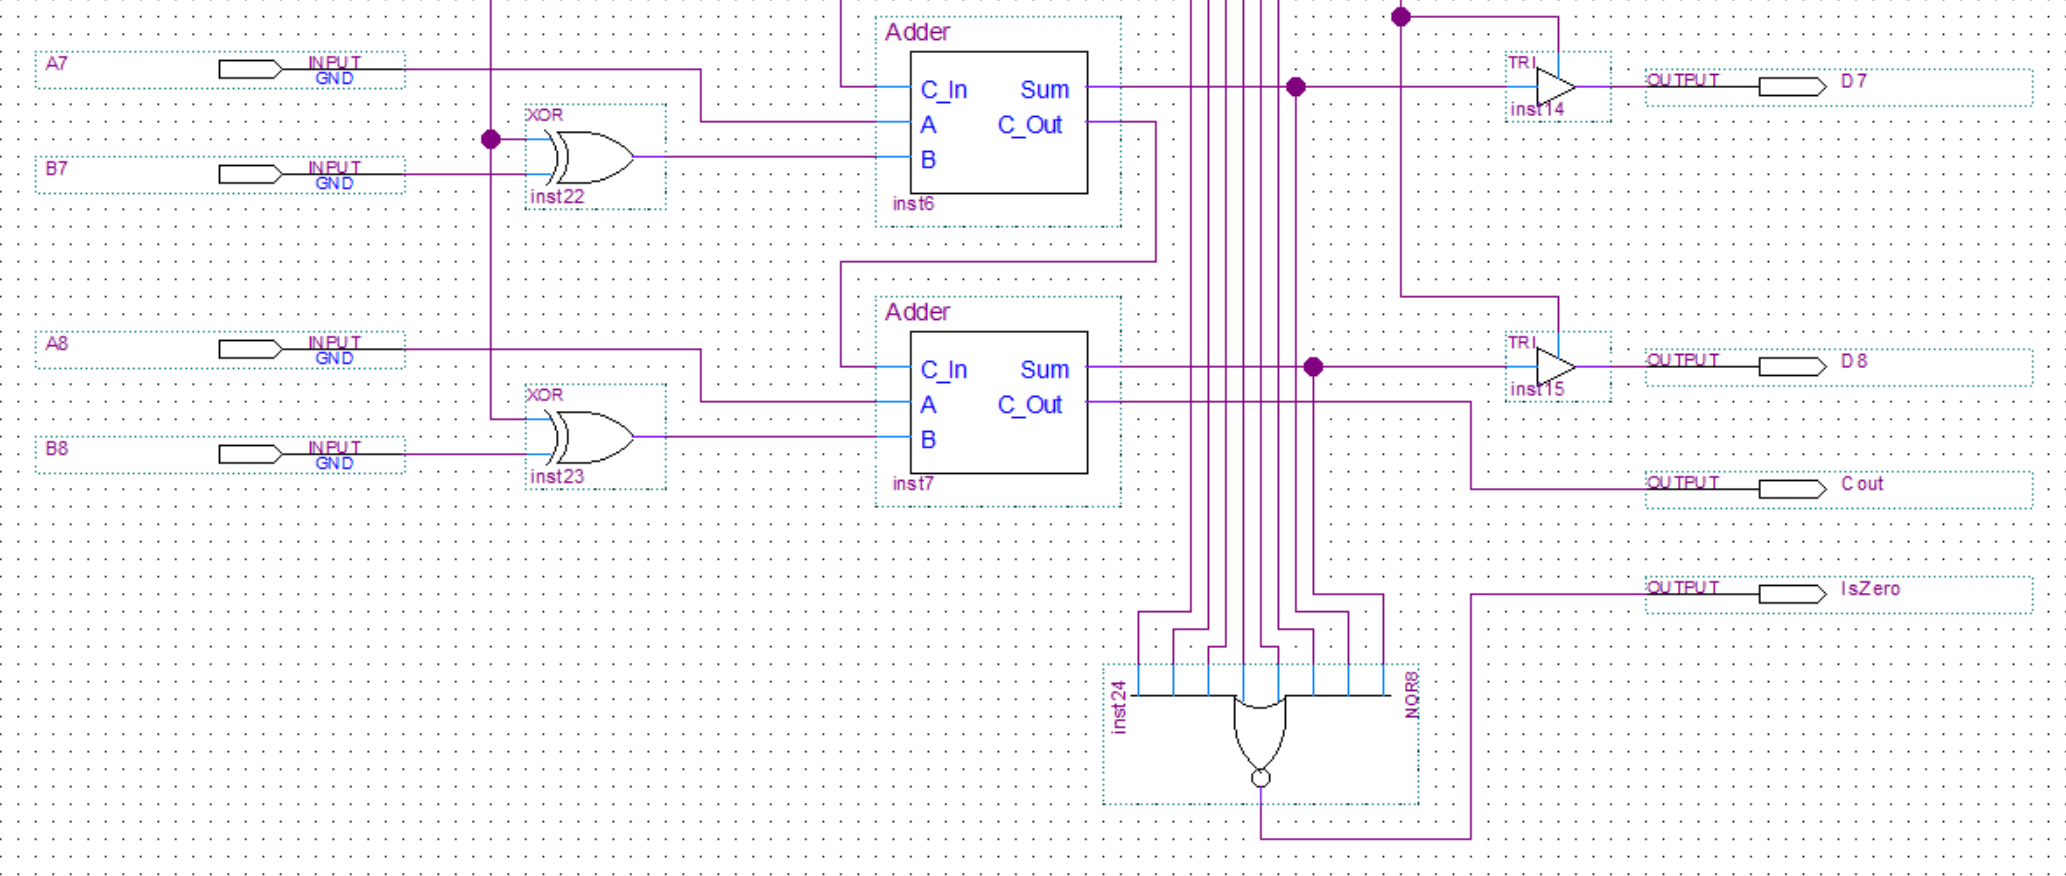
In this post, I will talk about the ALU and the flags register of my 8-bit computer.
The arithmetical logical unit(ALU) is where all the computation happens in a computer. The ALU of this computer is very simple and only has the option to add or subtract numbers. So something like multiplication would have to be implemented in software.
The flags register stores the Carry(a carry occurs) and Is Zero(the result is a zero) flags that it receieves from the ALU.
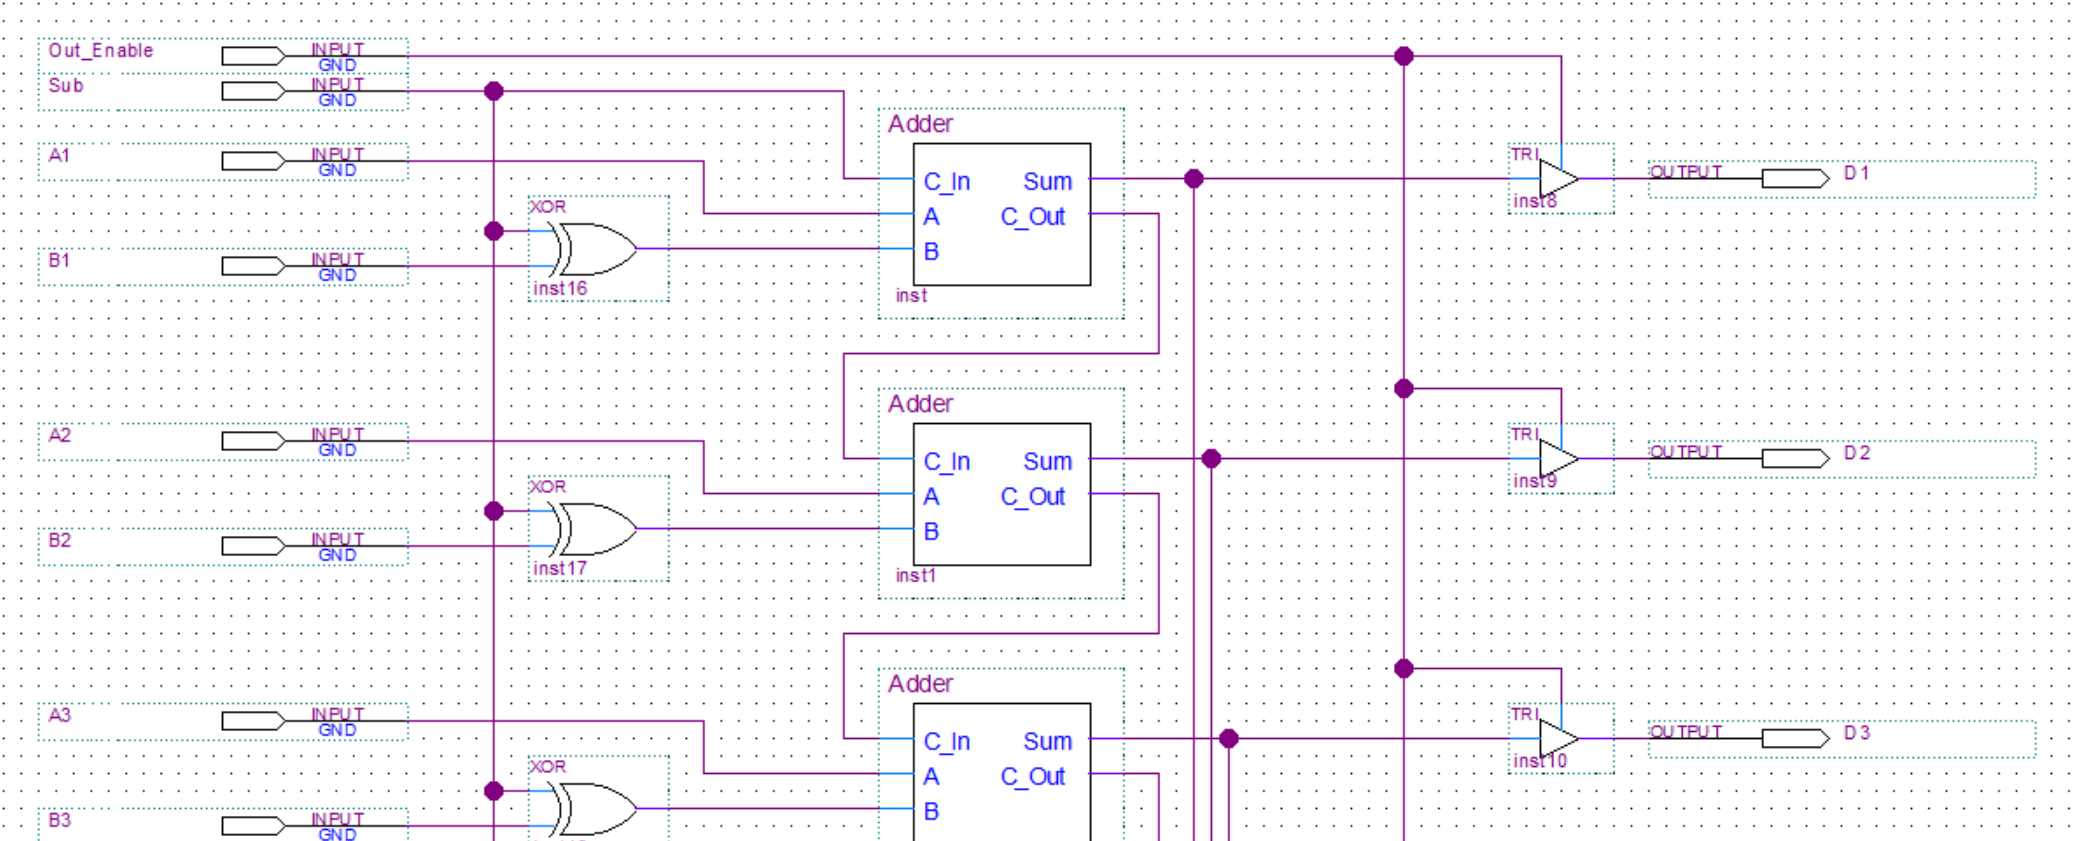
When bits from the A and B register arrive into the adder they are automatically added and the result is sent out of the Sum output. If the bits from both registers are 1 the C_Out output will be also set to 1. This output is thne feed into the C_In input of the next adder.
To implement the subtraction one of the values(B register) is XOR-ed and the carry in(C_In) of the first adder is set to 1. If you want to know how and why exactly this will perform subtraction(despite the fact that the bits are getting added) search more about “twos complement” or watch Ben Eaters video about it here.
Finally, there is a tristate buffer to control whether the value is put on the BUS or not.
| A | B | C |
|---|---|---|
| 0 | 0 | 0 |
| 0 | 1 | 1 |
| 1 | 0 | 1 |
| 1 | 1 | 0 |
| A | B | C |
|---|---|---|
| 0 | 0 | 0 |
| 0 | 1 | 0 |
| 1 | 0 | 0 |
| 1 | 1 | 1 |


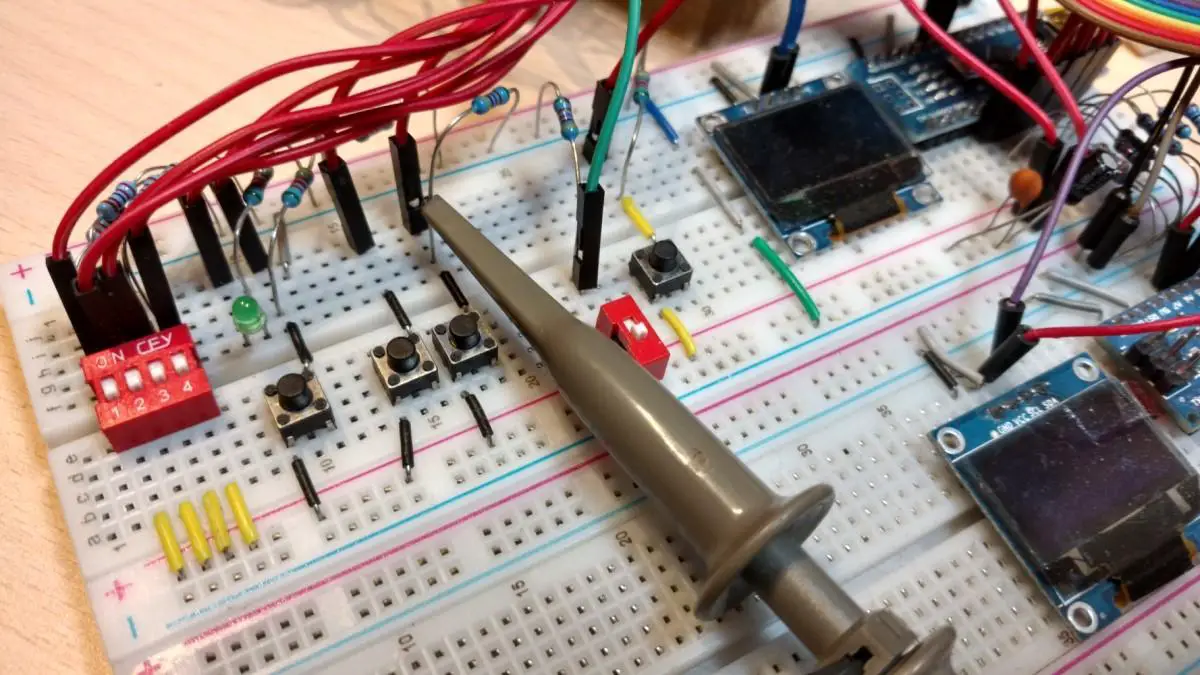
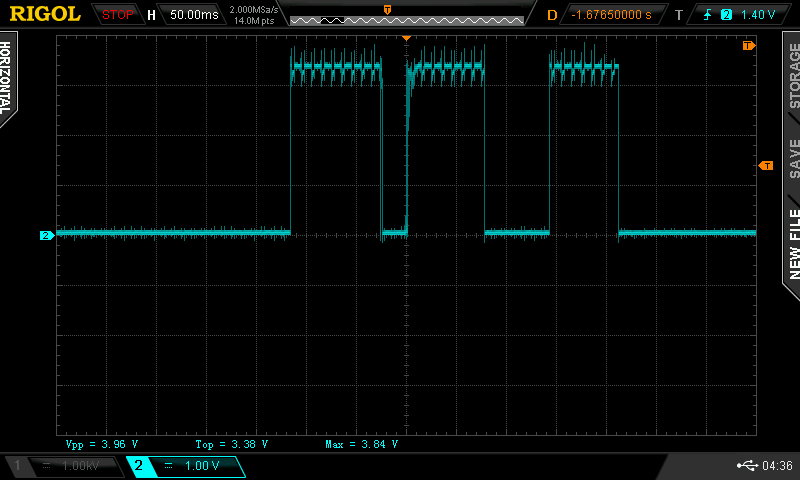
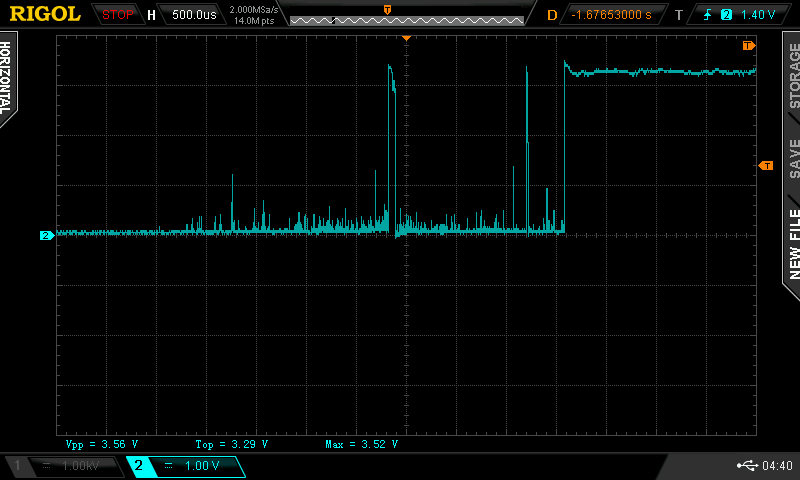
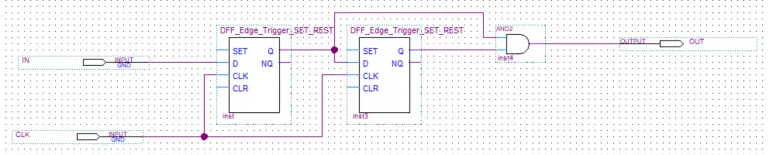
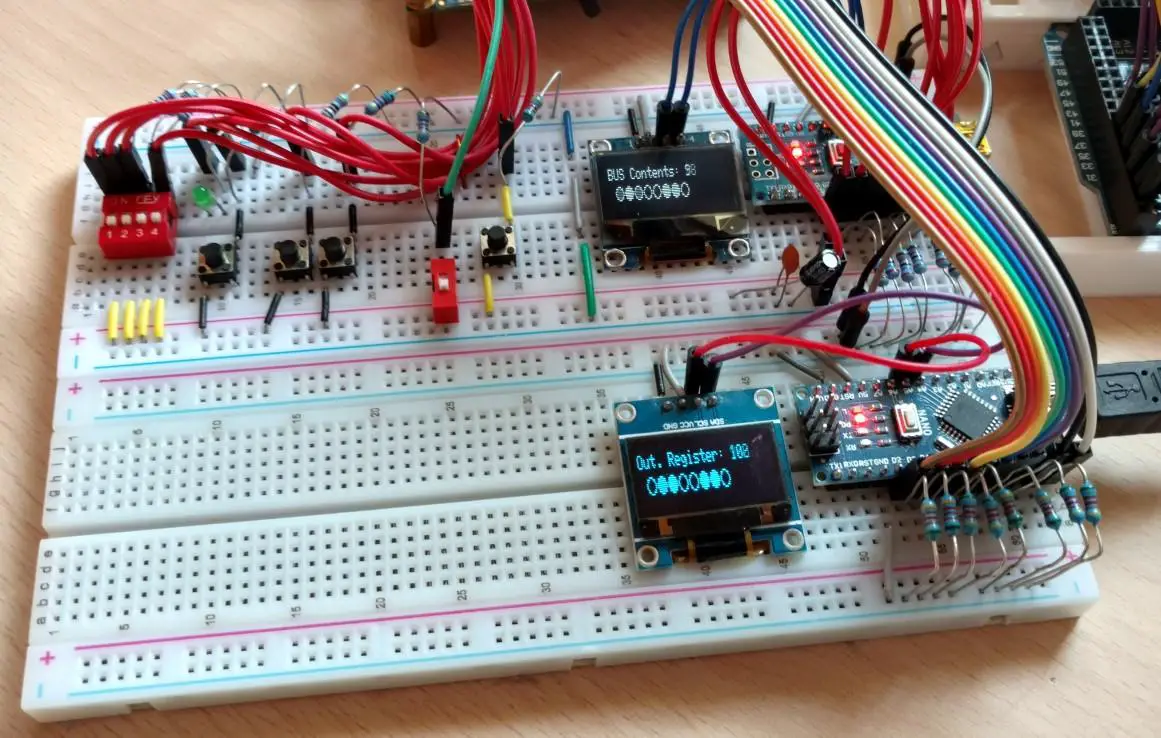
In this post, we’ll take a look at the button debounce module of my 8-bit computer. Ben used a 555 timer in his clock module to make a delay to debounce the button. I took a different approach.
I took the 50 MHz input from the crystal oscillator and lowered the frequency by using another clock module. This way I have another slower clock signal independent from the main clock. This slow frequency is then fed into the debounce modules.