About
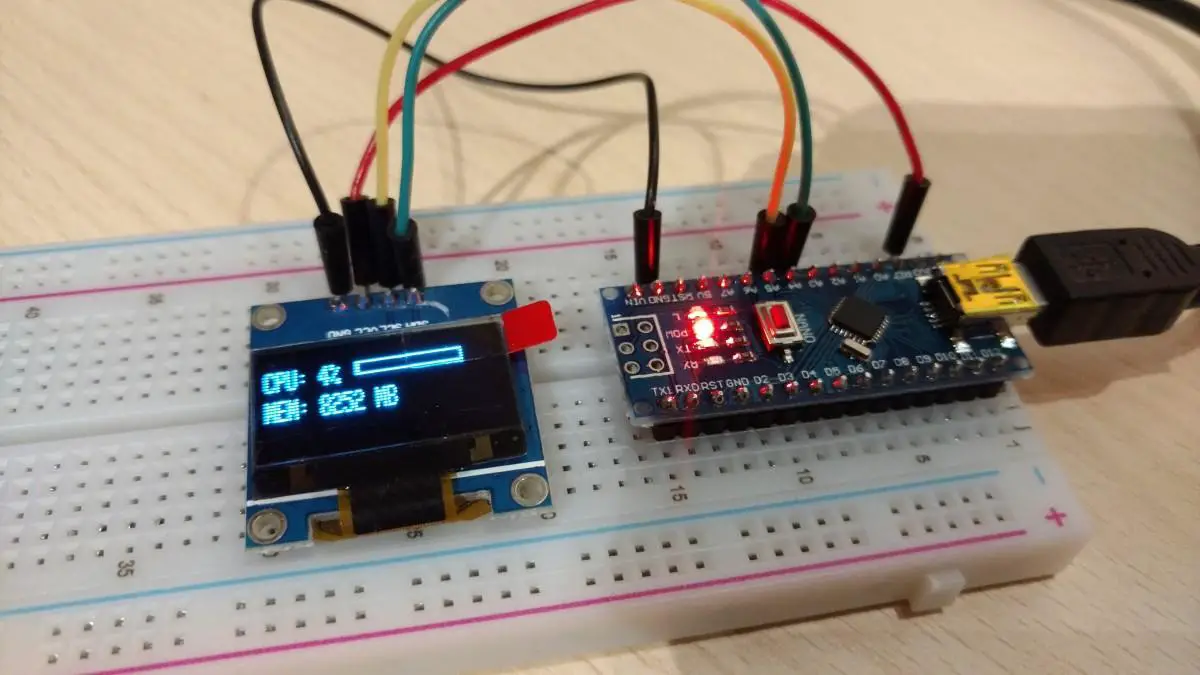
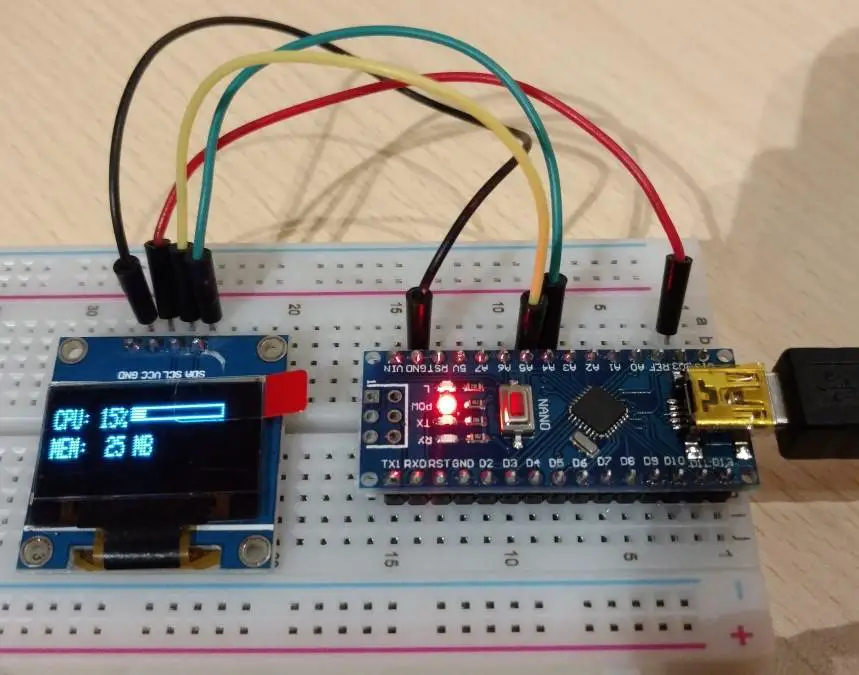
In this post, we will learn how to send/receive multiple values at once to/from the Arduino over the serial port. In this specific case, I want to display my computer’s CPU and RAM usage on an ssd1306 display. To do that I have to send more than one value at once over the serial port to the Arduino.
Hardware Used
- #adAmazon LinkArduino Nano
- #adAmazon LinkSSD1306 OLED Screen
- #adAmazon LinkBreadboard
Sending Multiple Values
To send multiple values we will simply send a string with our values separated by a special character of our choice. In this case, I will use a comma to separate the values. I will show you how to do that later on.
Receiving Values
Getting the values is a little bit more complicated. If this was just a C# Windows app running on a regular PC getting the values from the string would be pretty easy. We would just use the Split() function to split the string into an array when the specified character is encountered. Then our values would be stored in that array in the order that they were in the string
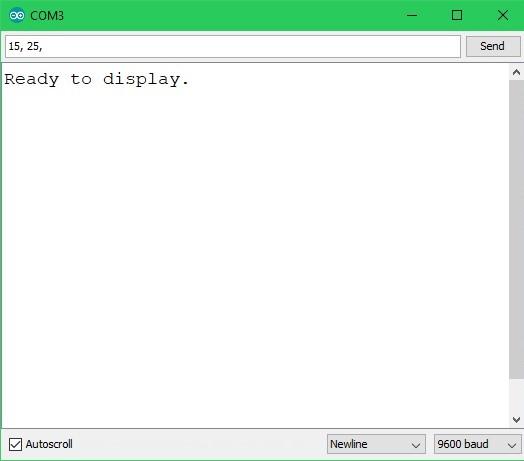
receivedString = "15,25,";
string[] values = receivedString.Split(',');
string value1 = values[0];
string value2 = values[1]; But with the Arduino, we have to put in a bit more work and do this manually.
Complete Arduino Code Example
This Arduino sketch displays the CPU and RAM usage of my PC so there is some extra code here. There is an app on the PC that tracks CPU and RAM usage and sends the data over the serial port to the Arduino to be displayed. If you are interested in this little project of mine you can check it out here. I also made this tutorial that explains all about how to connect to and control the Arduino from a Windows App on your PC.
//Include library
#include  <Adafruit_GFX.h>
#include  <Adafruit_SSD1306.h>

#define OLED_RESET 4
Adafruit_SSD1306 display(OLED_RESET);

//Variables.
int cpuValue = 0;
String cpuValueString = "0";
String memValueString = "0";
String strArr[2]; //Set the size of the array to equal the number of values you will be receiveing.

void setup()
{
    //Initialize display by providing the diplay type and its I2C address.
    display.begin(SSD1306_SWITCHCAPVCC, 0x3C);

    //Start serial.
    Serial.begin(9600);
    Serial.println("Ready to display.");

    //Display setup.
    display.clearDisplay();
    display.setTextSize(1);
    display.setTextColor(WHITE);
}

void loop()
{
    String rxString = "";

    if (Serial.available()) {
        cpuValueString = "";

        //Keep looping until there is something in the buffer.
        while (Serial.available()) {
            //Delay to allow byte to arrive in input buffer.
            delay(2);
            //Read a single character from the buffer.
            char ch = Serial.read();
            //Append that single character to a string.
            rxString += ch;
        }

        int stringStart = 0;
        int arrayIndex = 0;

        for (int i = 0; i  < rxString.length(); i++) {
            //Get character and check if it's our "special" character.
            if (rxString.charAt(i) == ',') {
                //Clear previous values from array.
                strArr[arrayIndex] = "";

                //Save substring into array.
                strArr[arrayIndex] = rxString.substring(stringStart, i);
                //Set new string starting point.
                stringStart = (i + 1);
                arrayIndex++;
            }
        }

        //Put values from the array into the variables.
        cpuValueString = strArr[0];
        memValueString = strArr[1];

        //Convert string to int.
        cpuValue = cpuValueString.toInt();
    }

    //Clear display.
    display.clearDisplay();

    //CPU Text value display.
    display.setCursor(0, 5);
    display.print("CPU: " + cpuValueString + "%");

    //MEM Text value display.
    display.setCursor(0, 15);
    display.print("MEM: " + memValueString + " MB");

    //Progress bar display.
    //x,y,w,h
    display.drawRect(50, 5, 60, 5, WHITE);
    display.fillRect(50, 5, (cpuValue * 0.6), 5, WHITE);

    //Update display.
    display.display();
    delay(1);
}
Just The Relevant Code
if(Serial.available()){
  String rxString = "";
  String strArr[2]; //Set the size of the array to equal the number of values you will be receiveing.

  //Keep looping until there is something in the buffer.
  while (Serial.available()) {
    //Delay to allow byte to arrive in input buffer.
    delay(2);
    //Read a single character from the buffer.
    char ch = Serial.read();
    //Append that single character to a string.
    rxString+= ch;
  }

  int stringStart = 0;
  int arrayIndex = 0;

  for (int i=0; i < rxString.length(); i++){
    //Get character and check if it's our "special" character.
    if(rxString.charAt(i) == ','){
      //Clear previous values from array.
      strArr[arrayIndex] = "";
      //Save substring into array.
      strArr[arrayIndex] = rxString.substring(stringStart, i);
      //Set new string starting point.
      stringStart = (i+1);
      arrayIndex++;
    }
  }

  //Put values from the array into the variables.
  String value1 = strArr[0];
  String value2 = strArr[1];

  //Convert string to int if you need it.
  int intValue1 = value1.toInt();
}
Send Values Using Serial Monitor
Sending Values From An App